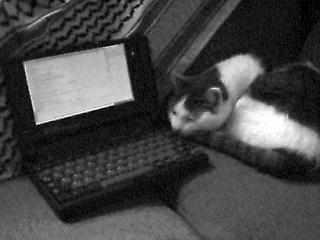
Command line Linux on a laptop powered by 4 AA batteries [06/13/2004]Or, why command line can be your best friend, and how to do it with an ancient Gateway Handbook.In college, I used a Gateway Handbook 286 laptop to type my papers. It was the size of a large pencil box, had a decent keyboard, and would run on AA batteries in a pinch. To my lasting regret, I sold it toward the end of college and moved on to chunky Windows laptops. Thanks to eBay and more hours of fiddling than I'd ever admit, I've retrofitted a Gateway Handbook 486 laptop with modern components to transform it into a swanky command line Linux box that can go with me anywhere. I keep a journal, compose emails, and work on text documents. The setup:
I find it refreshing to have a very straightforward machine that only does text. No distractions, no accessories to worry about, no crashing or rebooting, and requires only a spare set of AA NiMH batteries and tiny AA charger to keep it going indefinitely. Want one for yourself? GET A GATEWAY HANDBOOK 486 AND FLOPPY DRIVE
First, take a look and make sure this is really what you want. Gateway has specifications on their site, and Google is always your friend. eBay is your best bet for buying one. I bought a set of 6 mostly working Handbooks for around $45 including shipping, but I've seen individual ones in good shape go for as much as $100. There are several processor speeds available, ranging from a 486SX-25 to a 486 DX2-50. I use a DX2-50, but the others would likely work fine as well. I keep a DX2-40 as a spare in case my current one breaks, but I haven't tried setting it up. You may be able to get by without a floppy drive, but only if you like banging your head against a wall. Updating the BIOS, running Linux install disks, and transferring files before the machine is fully set up are all much easier with the external floppy drive. If you don't get the floppy, you'll have to remove the hard disk and install DOS on it on another machine, do your installs over the serial port, or hope that the OS that happens to be installed in the hard drive will recognize the PCMCIA slot and let you use a memory card to move files back and forth. You'll keep your sanity with a floppy drive handy. UPDATE THE BIOSYou want to update to BIOS 1.25 - earlier BIOS versions had trouble with power management and other important issues. Instructions and the BIOS update program can be found on the Gateway website. UPGRADE THE RAMIf you're only going to run DOS, the built-in 4MB of RAM should be
sufficient. For Linux, you'll want to max out the memory to 20 total MB with
a 16MB RAM module that plugs into the bottom of the machine. Luckily,
www.kahlon.com sells the 16MB module for $12 at the time of this writing
(inexplicably cheaper than a 4MB module), including shipping. OPEN UP THE MACHINEUnlike the 286 Handbook, this isn't too hard:
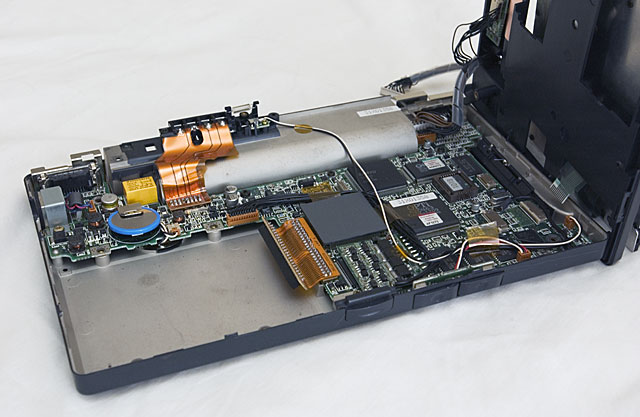
Now for the hard part. The machine doesn't open easily - there are plastic catches all the way around that will sound like they are snapping as you open the machine. Some of them may break, which isn't a disaster, but be careful. You want to open the left side of the machine first - the cables connecting the two halves are all on the right side, so you want to lift the left side up, and rest the top half vertically on the right side of the machine. It is much easier to do this with the screen open. You may need to insert a screwdriver between the two halves to get some of the catches to pop. I haven't found a foolproof way to do this - just wiggle and pry gently until you've separated the two halves, being careful not to stress the cables connecting them.
Details on all of the following appear in later sections, but here's the basic rundown of important stuff inside:
When you put the machine back together, the battery release catch will actually appear to fit fine even if you put it in upside down. However, this will make it very difficult to slide the switch, so before screwing the release catch down, make sure it slides back and forth easily. REPLACE THE HARD DRIVE WITH A FLASH DRIVEThe hard drive is probably 80-250MB, but is power-hungry, noisy, and almost certainly well past its design lifetime. I replaced the hard disk with a Sandisk 800MB flash memory disk, purchased on eBay for $40 including shipping. This took some fiddling - the BIOS wasn't made to recognize large hard drives. I partitioned the 800MB flash drive into a 208MB ext2 (Linux) and a 550MB FAT (DOS) partitions. It may be easier to get the drive to work if the first partition is smaller than 250MB, but this is just a guess. You
may need to write the MBR to get the drive to boot - this also took
some fiddling. Every time I cold boot the machine it now says that it
can't find an operating system on the drive, but when I press F1 to
continue, Linux happily boots with no problems. For a while, before I
wrote the MBR using the Slackware install disks (there is an option to
do this during setup), the machine would just hang on a blank screen
unless you booted from the floppy drive. Very frustrating. With enough
fiddling, I got it to work, but don't really know what specific step
finally made it work. There are rails screwed onto the original Gateway drive that you'll want to remove and
install on the replacement drive. With the CF->IDE adapter, this wasn't possible, but it
seemed to be fine loose inside the machine - it was so
lightweight that it didn't put much stress on the connector. That said, I do feel
better with the 2.5" flash disk completely screwed down. When you boot the machine up with a new drive, you may need to re-run the BIOS installer to get it to be recognized. REPLACE THE CMOS/RAM BACKUP BATTERYA great feature of the Handbook is its instant resume, even if you
remove and replace the main battery. With this, you can be working along, hit the power
switch, remove the main battery, replace it, and you'll be right back where
you were next time you fire it up. I haven't rebooted my machine
in...well...I can't remember, but multiple months. Unfortunately, the small
rechargeable battery that makes this possible has been dead on every Handbook
I've seen. Also unfortunately, the battery is welded
onto the motherboard, so is difficult to replace. If you're going to damage
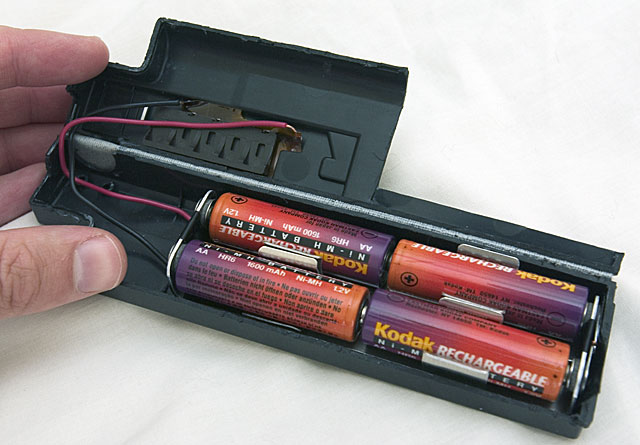
something in the machine, this is probably when you'll do it. My wife (who solders much better than I do) soldered long wires between the battery's solder tabs and the motherboard. After making sure all the connections were solid, and wrapping the leads and entire battery in electrical tape, it fit by the flash drive, out of the way of everything. Decide where you want the battery to finally end up, and make sure your wires are long enough. DISCONNECT THE INTERNAL SPEAKERJust to the right of the backup battery, on the edge of the motherboard, there is a small tan connector with two wires leading down under the motherboard to the speaker. I wanted my Handbook to be completely silent, so I disconnected this speaker. The connector is very, very difficult to disconnect, but if you twist it a bit with a jeweler's screwdriver, it eventually comes out. I haven't noticed any bad effect from disconnecting this, and I like the fact that there is NO WAY that speaker is going to beep in the middle of taking notes during a lecture. BUILD A 4 AA NiMH BATTERY PACK
You can use the Gateway Handbook battery, but finding a good one may be difficult, and it can only be charged with an extremely non-standard power supply designed specifically for the Handbook. You won't find an adapter with the right connector at Radio Shack - I don't know of anyone that makes the connector. Gateway did make a 6-AA cell battery pack for the 286 Handbook, but batteries back then really didn't have enough oomph to make it useful on a Handbook 486. These are almost impossible to find, but I do have one. It works fine with NiMH AA cells. The problem is that most battery chargers only charge 4 cells at a time, so 6 is an inconvenient number. Plus, the 6-cell pack just steps down the voltage anyway, so you may as well start with 4 cells. First, I tried prying the two halves of a battery pack apart with a screwdriver and an X-acto knife. Big mistake - the plastic is thick, and this would have taken a VERY long time. A rotary tool with a cutting wheel worked much better. The original cells in the pack go right up to the plastic, however, so you need to be VERY CAREFUL not to cut into the cells and spray battery innards all over. You always wear goggles when using your rotary tool, right? The cells in the pack I took apart had a green cardboard covering - so when you see green, STOP CUTTING. In addition, the cells are connected to the contacts on the top of the battery pack with a flexible orange circuit. I just snipped most of it off, including a component I believe was a heat fuse in case charging ran wild or something. Then, the positive and negative terminals of the battery pack were soldered to the matching connections at the top, and the connections super glued into the top of the pack, since they are only held in by the large cells in the original pack. The battery holder is a Keystone 4-AA cell holder part # 192K-ND, epoxied into the bottom of the battery pack. It is very stiff to get batteries in and out of, but after you get the knack, it isn't too difficult. I used copious electrical tape to make sure that shorts would be nearly impossible. Make sure the wires are long enough to allow the pack to open and close for easy battery replacement. I could have tried to leave the AC adapter connector in place, but decided not to mess with charging the cells in the pack - I just remove them and charge them in a separate charger. I suppose if you were using the machine all day, this would get tiresome, and you'd want an AC connection. An alternative to the AC adapter would be to wire in a USB connector (which provides 5V) and use that instead. Since I wouldn't want to mess around with the charging circuit, I'd just put in a switch to toggle between running off of the AA batteries and the USB power. Not the most elegant solution, but at least you wouldn't have to use the bulky Handbook AC adapter. Originally, I thought I'd need to completely reseal the case and slide the batteries in through an opening, which is why there is a cutout in the upper-righthand corner. It turns out that after taping the hinge edge in the picture above with high quality black gaffer's tape, I can just open it up and change the batteries, then hold it closed as I insert it into the laptop, and it works fine. You just have to make sure that you leave enough plastic after cutting the pack open that it maintains good contact when put into the Handbook. If you cut too much plastic, the pack will be a bit shorter than originally, so you may need to add some spacers or something to keep the connection to the laptop nice and tight. Fortunately, this didn't happen when I cut this pack open, but I'd be more careful next time to leave some areas of plastic along the seam, and I obviously wouldn't make the cutout. INSTALL COMMAND LINE LINUXI used Slackware 9.1, but others distributions would probably work fine. The trick was getting the install files onto the flash disk. There are probably a hundred ways to do this, but for a variety of reasons, I ended up making two partitions on the drive using another machine - a 250MB ext2 partition, plus a FAT (DOS) partition. I copied all of the Slackware install components I wanted (just command line stuff, which really keeps the size down) onto the DOS partition, made the Slackware boot floppies, and did the install off the DOS partition onto the ext2 partition. I had to tell the Slackware installer to write the MBR on the disk - when I didn't do this, the machine would hang while booting. OTHER LAPTOPS TO CONSIDER
ADDITIONAL RESOURCES & COMMENTS
DISCLAIMERIf you do this, you're mucking around inside a laptop that wasn't designed to be mucked around in. It is really easy to damage either the machine or yourself if you aren't careful. The Handbook is so old that there is no warranty you can void, but this also means that if you break something, Gateway won't be able to help you out - these things went out of style over a decade ago. Anyway, all of this is COMPLETELY AT YOUR OWN RISK. These instructions are provided as-is, with no warranty. They may not work for you. Most of this probably isn't a very good idea unless you have some background in computer repair. If you don't know why rubbing a balloon in your hair before doing this wouldn't be a good idea, close this document and forget you ever saw it... REVISION HISTORY11/01/2005 Added list of other old small computers & added pmext.sys
download.
|