![]()
![]()
![]()
![]()
![]()
![]()
![]()
![]()
![]()


All my content and ptohos

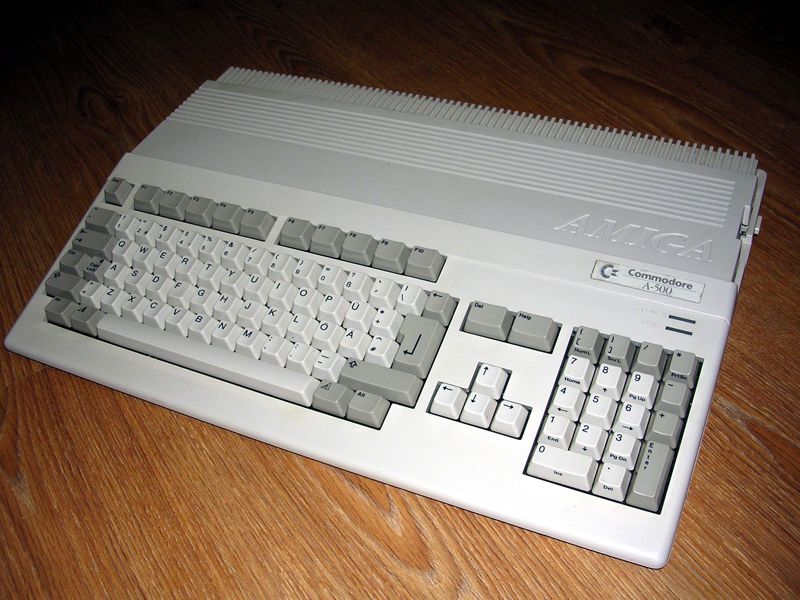
Amiga 500 (500+)
Popular in Poland in early 90s, this 16-bit
home computer has a nice, mouse-driven GUI system (with command line
processor) and allows some complex multimedia operations. It's more
powerful than C64 in its CPU, sound and graphics capabilities. A new
Motorola 68K processor is much faster, allowing even to simulate
multitasking, but programming in machine language is not as easy as in
C64. Because of this, and a lack of relatively cheap high-capacity
storage (for example a hard drive) Amiga 500 was used mainly for games.
After selling A500 (in fact a stripped down mutation of Amiga 2000),
Commodore released (but sold it for a very short time) Amiga 500+ - it
was A500 with memory expansion installed by default, giving 1MB of RAM.
RAM in Amiga was used for operating system, programs and a RAM drive.
| Manufacturer | Commodore |
|
| Origin | U.S.A | |
| Year of unit | 1991 | |
| Year of introduction | 1987 | |
| End of production | 1991(1992 - A500+) | |
| CPU | Motorola MC68000 | |
| Speed | 7,093MHz | |
| RAM | 512K+512K | |
| ROM | 256K (Kickstart 1.3), earlier 1.2 | |
| Colors: | 16-64 of 4096 | |
| Sound: | Stereo, 4-channel, 8-bit PCM | |
| OS: | Amiga Workbench 1.3 (1.2) | |
| Display modes: | Text: Simulated Graphics: 320x256, 320x512, 640x256, 640x512. |
|
|
|
||
|
|
||
| Media: |
3.5" Floppy disk (FDD embedded) RAM disk |
|
|
Power supply: |
||
|
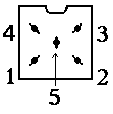
Female 5-pin DIN square t the computer: |
||
| I/O: | Joystick connector Mouse connector RS-232 serial port Parallel port (Centronics) External floppy interface RCA audio (stereo - x2) Expansion port Memory expansion port RGB Video output Monochrome Luma video output |
|
| Possible upgrades: | 500+ was equipped with 512K RAM upgrade in memory expansion port, giving 1MB of RAM. | |
|
DO NOT USE C128 POWER
SUPPLY (or vice versa)! |
||
| Add-ons in collection: | ||
| Software accessibility: | Quite Easy (TOSEC, sites) |
To get a color picture, you need a SCART adapter or Amiga 520 TV modulator, which gives composite output. Here you'll get a pinout of Amiga - Comodore 1084 monitor cable.
Because I haven't planned to add it, I'm adding here: Amiga 500 "newer"
mainboard jumpers (M/B with additional RAM holes):
JP2 - Expansion RAM access method: 1-2 - Chip RAM, 2-3 - Slow RAM
JP3 - Expansion RAM (2-3) or pre-installed RAM (in holes) (1-2)
JP7A - Turning slot Expansion RAM on (1-2) and off(2-3), works only when
expansion is put on board (JP2 in 1-2). Otherwise meaningless.
To expand memory inside Amiga, you can use any 4256 (256K*4, four chips
are needed) memory chips, placed in corresponding holes IN SOCKETS.
Early motherboards don't have the holes, so you have to use expansion
board. As you solder, you'll probably loose some compatibility wth older
games.
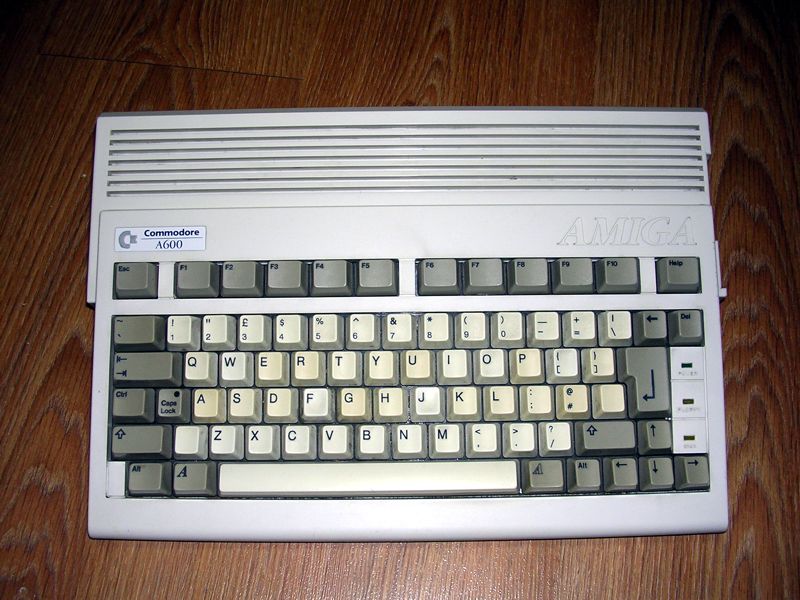
Amiga 600
Amiga 500 was a low-end computer. To get full Amiga 2K
computing experience, few other things were needed. First, booting the
machine with floppy was good for games, but not for any serious work.
Flipping disks was the worst thing, especially when creating music with
many samples... on many floppies. Amiga 600 had a compact look, PCMCIA
slot for expansion and IDE (ATA) hard disk connector (and sometimes
ready cradle) inside. To use it, a 1:1 cable between two (2mm raster)
small IDE connectors was needed.
Amiga 600 was more expensive, but it gave much better computing. It has
newer operating system, Workbench 2.05, which was installable to HDD,
had better graphics capabilities and higher resolutions. Unfortunately
booting game floppies still neded to be booted from the floppy.
| Manufacturer | Commodore |
|
| Origin | U.S.A | |
| Year of unit | 1993 | |
| Year of introduction | 1992 | |
| End of production | 1993 | |
| CPU | Motorola 68000 | |
| Speed | 7,093MHz | |
| RAM | 1MB | |
| ROM | 256K (Kickstart 2.05) | |
| Colors: | 4-64 of 4096 | |
| Sound: | Stereo, 4-channel 8-bit PCM | |
| OS: | Amiga Workbench 2.05 | |
| Display modes: | Text: Simulated Graphics: 320x256, 320x512, 640x256, 640x480, 640x512, 1280x200, 1280x256 |
|
|
|
||
|
|
||
| Media: |
3.5" Floppy disk (drive embedded) RAM disk Internal 2.5" Hard disk (if installed) |
|
|
Power supply: |
||
|
Female 5-pin DIN square t the computer: |
||
| I/O: | Joystick connector Mouse connector Serial port (RS-232) Parallel port (Centronics) External FDD interface RCA audio (2x) PCMCIA IDE 2.5" inside Composite video RF out Memory expansion connector |
|
| Possible upgrades: | Memory can be upgraded by adding board or piggybacking chips. | |
|
DO NOT USE C128 POWER
SUPPLY (or vice versa)! |
||
| Add-ons in collection: | ||
| Software accessibility: | Quite Easy (TOSEC, sites) |
| Contents: | Starting | Image file formats | Recording media | Links |
Starting:
These computers have a very limited ROM, called
Kickstart. It can initialize and check the computer, display a nice logo
with hand inserting floppy and try to load OS from disk. You need to
provide a floppy with version the same as in Kickstart ROM (there are
some very few exceptions), so it'll boot an OS.
OS is mouse-driven, so it's quite easy to navigate thru it.
Unfortunately Amiga's disk accessing method is totally different than in
PC - it means that Amiga floppies can't be read or written in PC drive.
Ah, I almost forgot: For beginners: Alternative contents of pull-down
menu bar is shown with right-clicking.
My Amiga 600 had problems with a HDD during installation. Some HDDs just don't work. If devices doesn't show after partitioning, it means that you should try another HDD.
Installation of Workbench to a new HDD (A600):
1. Put WB installation disk to Amiga
2. Turn it on. Wait, system will boot to desktop with install disk icon.
Open it.
3. Open HD Tools. Then HDToolBox.
4. Now a very important thing. It'll show one drive, yours, as SCSI or
something. Click "Change drive type", then in a new window click "Read
configuration". It'll auto-detect disk's geometry.
5. In the same window, in File Name field, you should write
Ram:junk - it'll mount a large drive
properly. For better identification you can write Manufacturer's name
and Drive name as you wish. Click OK.
6. Click OK in Drive Type window, where your drive should appear. Yes,
you want to change drive letter (continue).
7. Click on Partition drive. Now you can specify partitions.
8. If you can't get to partition drawing, click "Delete partition" once.
With slider, set the first one for Workbench. You won't need more than
200-250MB. After setting size type DH0
in Partition device name and check "Bootable". Confirm settings by
clicking "New partition".
9. Click on the right side of the graph, specify another partition size
with slider. Change its name to DH1, DO
NOT click Bootable. Confirm with New partition button. Do the same thing
with all your partitions, naming it DH2, DH3, etc.
10. OK, now click "Save Changes to drive". Confirm. Confirm reboot.
11. If you don't get partitions visible on desktop after reboot, your
HDD is incompatible. If they are, with strange names, it's OK.
Click on DH0, from Icons select "Format disk". Enter name, confirm.
It'll perform formatting. Do the same thing with al other partitions.
12. Open Workbench installation disk. Click on Install, English. Follow
the instructions on screen.
Image file formats:
- ADF - Amiga Disk Format - Amiga's disk image.
- DMS - DiskMaster image. You can convert it to ADF using DMS2ADF, but
it's not always reliable.
- LHA - not an image, it's an archive compressed with LHA. Sometimes it's
LHZ or LZX
- IFF - a bitmap, picture. XNView should open it.
- SVG - SuperView Graphics - NOT todays SVG vector graphics. Specs are in
"SVG-Specs.lha" file in my fileland, as it has been removed from Aminet.
More Amiga-specific file formats can be found
here.
Recording media
It's not so easy with only one Amiga...
If you have an Amiga and no system disks, the only thing you can get is
the "insert floppy" screen. There's no way to make system floppies on a
PC.
You have two ways, both of them requiring another Amiga:
1. Get another Amiga's system disks, which will boot
your computer (versions must be the same), and then make system disks
for your computer.
2. Get another Amiga and make system disks for your computer on it.
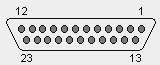
Copying disk from ADF image file to a physical floppy
needs a cable to connect Amiga to PC. Connection is made using a
null-modem serial cable, between Amiga's 25pin RS232 port and PCs COM
port, usually 9-pin. You need a 25-pin female connector to Amiga and
9-pin female to PC. Connection is as follows:
 DB25 Female plug (to Amiga) |
 DB9 female plug (to PC) |
| 2 | 2 |
| 3 | 3 |
| 4 | 8 |
| 5 | 7 |
| 6+8 | 4 |
| 7 | 5 |
| 20 | 1+6 |
Now you can use one of 2 programs:
- Commercial Cloanto Amiga
Explorer - as 30-day trial, allows a full access to Amiga's drives.
- Free, but a bit more difficult
ADFSender Terminal, allows disk copying.
The procedure is similar in both cases:
1. Booting Amiga with good system disk
2. Running Command Line and configuring serial port
3. Receiving data sent by PC to a file in RAM disk
4. Configuring program in a RAM disk to use serial port with specified
baud rate, parity etc.
5. Running program on Amiga
6. Sending system boot disk from computer.
To work with ADFSender, you must use Transdisk or
Transwarp program on Amiga side. Explained
HERE (method A).
To work with Amiga Explorer, you use its own program, explained
HERE.
HERE
is another method, but not tested by me
One more thing: During transfer don't move Amiga's mouse. Seriously, it can damage transfered data.
Amiga 500 - Commodore 1084 monitor cable pinout:
This cable has 2 plugs: One is female DB23, another is male DB9. You can see the cable in A500's gallery, page 2. The pinout is as follows:
|
A500 DB23 side |
1084 DB9 side |
Meaning |
| 13, 16-20 | 1,2 | GND |
| 3 | 3 | Red |
| 4 | 4 | Green |
| 5 | 5 | Blue |
| 10 | 7 | /CSYNC |

Links:
Software:
http://www.lemonamiga.com/
- games to download
http://hol.abime.net/ -
Exhaustive game list
http://web.archive.org/web/20100212210601/https://www.freeroms.com/amiga.htm
- Downloads not working anymore [2018]. DO NOT DOWNLOAD ANYTHING -
serves malware.
http://www.doperoms.com/roms/Amiga.html - well known site with
games.
http://web.archive.org/web/20120210133132/http://www.pictureinthesky.net/applications.php
- There were downloads, now nice descriptions with screenshots
http://www.theoldcomputer.com/roms/index.php?folder=Commodore/Amiga/Applications/h
- More, some rare ADFs. Free registration is required, so use fake data
or fake account from services like bugmenot.com.
http://amiga.technology/
- Amiga Emulator.
http://web.archive.org/web/20120126093940/http://akson.sgh.waw.pl/~ppawlo/omnie.htm - POLISH -
old Amiga page, some interesting posts from amiga-news.de translated to
Polish.
Hardware and hacks:
http://theweeks.org/toms-stuff/AMYHACKPAGE.html - Amiga hacks
http://aminet.net/ - Here you'll
find many files for Amiga, including programs, instructions and hardware
hack tutorials.
http://web.archive.org/web/20021002103857/http://www.rit.edu/~wwt5491/hacks.html
- ZIP drive in Amiga tower
http://www.ami-media.net/amiga/old/HardwareHacks.html - Amiga
hardware hacks page
http://www.nyx.net/~rdavis/AmigaHints.html - A number of Amiga
hints
http://www.nyx.net/~rdavis/AmigaHints2.html - More tips and
tricks
http://web.archive.org/web/20100715090018/http://www.mylinuxisp.com/~jdbaker/oldsite/SmallSys/JDBAmiga.html
- One more successful try to put Amiga in tower, and more.
http://www.free.of.pl/n/norbid/ - POLISH - Adding ZIP to Amiga
500, PC floppy drive modification
http://amiga.resource.cx/
- information about various hardware.
http://www.textfiles.com/computers/8meg_exp.txt - Expand your
Amiga's memory to 8MB... no schematics.
http://www.ianstedman.co.uk/Amiga/amiga_hacks/amiga_hacks.html
- More hacks
http://www.thule.no/haynie/
- Amiga docs
http://web.archive.org/web/20040725081306/http://www.starnet.com.au/davem/amiga.html-
Amiga overclocking site. Nothing about A500, but some interesting
articles about overclocking and its history.
http://web.archive.org/web/20010424090951/http://www.amiga.dk/nybo/
- Amiga on the net, links and utilities.
http://web.archive.org/web/20130118070816/http://www.rabayjr.com/monte_o_seu_hardware.htm - Many hacks,
ZIP to Amiga 500, connecting VGA monitor to A500, keyboard controller, etc.
http://www.victortrucco.com/Commodore/ExpansaoA600/ExpansaoA600.asp
- PORTUGUESE - Amiga 600 piggyback mod. Here is an English explaination,
but photos were lost:
http://www.amibay.com/showthread.php?t=8500 . These two tutoairls
show different modifications, this Portuguese one is easier to solder.