![]()
![]()
![]()
![]()
![]()
![]()
![]()
![]()
![]()


All my content and ptohos

UCR-61S / UCR-61S2B CARD READER MOD
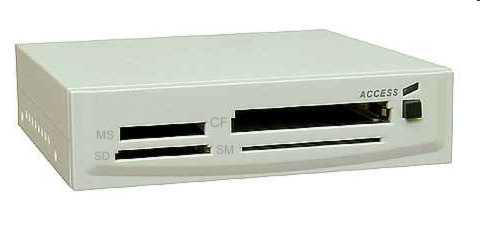
This reader is an OEM reader, so it's pre-programmed to work with one mainboard model (ECS, PC Chips, Philips etc.) and it won't work with another board. It also needs its own driver. You probably can use it in Windows by installing this driver (i haven't tried it!) , but it will just make reader compatible by launching third-party software. It means thay you'll be limited to only one computer with a special driver, it'll be impossible to use this reader in another computer with no drivers. In this document I'll show how to make this reader more universal and how to add some visual hacks. By changing a jumper, this reader will be supported using generic Windows USB Mass Storage driver, so it'll be usable on any computer with Windows 2000 and up.
How it works?
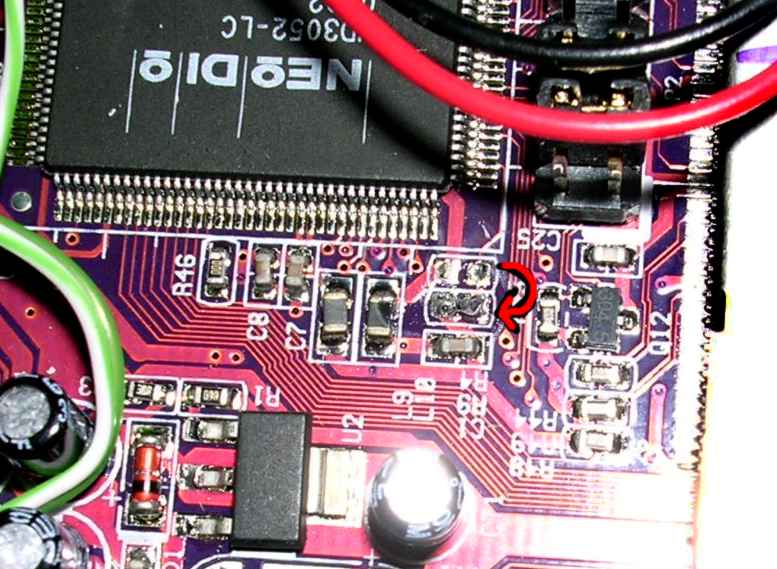
This reader is based on NEODIO chip. Think of it as of a small computer, which converts data between cards and USB. It reads its program from a small memory chip. Mainboard ID data is stored in this chip, alongside with access methods (which means how the device is controlled by a driver). It is possible to tell the NEODIO not to use this chip, and let be directed by Windows driver instead. It is quite simple, you need only a soldering iron to re-wire a SMD jumper (remove a SMD resistor and connect another two SMD pads). I think you can remove this resistor by ripping it from the board, but it's not good for tracks, and they must remain good.
First, remove two screws from the reader. It's ready for disassemble. Remove an upper plastic part (above CF card slot), you should see a complete mainboard. Locating a NEODIO chip isn't much difficult, it's the biggest chip in this board with "NEoDIo" marking. Now turn the reader as you can read NEoDIo, and look abowe thw left corner of NEoDIO chip. You should see (from the corner upwards) a SMD resistor used as a jmper (code 000), a SMD pads for resistor and a capacitor. You have to remove this resistor (with 000 code) and connect the pads below (in fact you're changing a logic state of Neodio's pin 105).
Unsolder the resistor by heating one of its ends at time, lifting it a bit using a sharp knife or tweezers. Connect the pads using only solder.
It should look like that (after the mod):
There is a problem: "Active LED" won't work at all now. We have to make it another way: First, remove a piece of thermal glue being careful not to rip any SMD components with it. Now remove cables from it, so it'll move along a LED wires. Cut this glue out from both wires.
On a board, near these cables, you will see a 5 LED places. You can use only one, as "Active LED", or use all 5, mounting them on the front panel. Let's begin by power LED.
1. Unsolder active LED wires.
2. Link SMD pads labelled as R43. After that do the same thing with R2.
3. Solder a 470 Ohm resistor to LED1 hole marked "+"
4. Solder a black wire to remaining LED1 hole. Solder the red one to the resistor.
The behaviour of Active LED will be somewhat strange - it will light up only if the system detected the device, so if you "safely remove" it, light will go out... But it will work...
If you're going to use other LEDs - LED places may be jumpered - just remove the jumper.
LED2 lights up when SmartMedia slot is active. Connect R55 pads. If there's no resistor in R26, there must be about 100 Ohm.
LED3 - is a CF card indicator. Connect R28, 100 Ohm goes to R38 (if there isn't).
LED4 - SD/MMC cards. Link R41, but connect this thru a 100-Ohm resistor (like LED1). R35 should be also near 100 Ohm.
LED5 - MS card. Link R42, connect like LED4. R54 must be about 100 Ohms.
You can re-make front panel for all 5 LEDs, like mine:
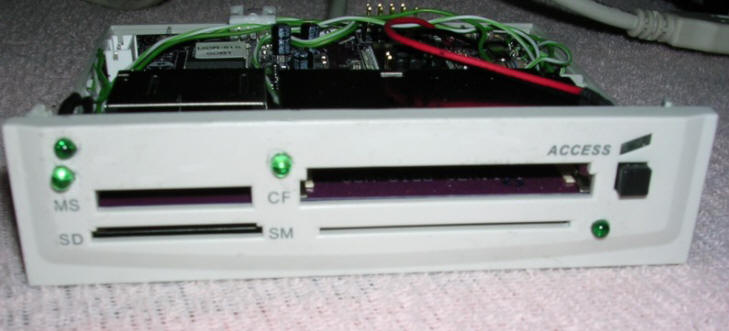
Another picture of everything inside:

OK, if you're curious and you see that these resistors have the same color codes. Yes, they are about 60Ohm resistors cut down using a flat file to suit my needs.
And to connect an USB cable: Looking to front of the reader:
Red - White - Green - Black
(Power - -DATA - +DATA - GND)
MCbx 2010
SOURCES:
ND3060 Datasheet (it's hard to get this)

