![]()
![]()
![]()
![]()
![]()
![]()
![]()
![]()
![]()


All my content and ptohos

Chord Keypad for software automation
| If you see an old Engelbart 1968 demo, you may notice that they are using technologies which became widely used 30 years later. Computer mouse, hypertext, remote collaborative text processing or screen sharing (analog version) are presented there working on a specific mainframe modified to support ca. 100MB of disk memory (yet I still don't know bytes or words, as they are often mistaken in modern documents because in 1960s byte had 7 or 8 bits and word was 24 bit, but grew to 25 bit when transferred specific ways), probably few CPUs and graphic terminal displays. You can see the original paper about the system. Another article from 1967 shows photo of early chord keypad prototype made of keyboard switches, it is called "pushbuttons". |
 A NLS operator's console in 1968, Source: Gizmag.com |
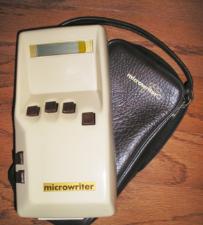 A Microwriter device, 1981? Source: Wikipedia |
One device shown there, but not widely spread in modern computing is a
chord keypad, initially called in Engelbart's papers just "pushbuttons"
or "chord keyset". The main problem with this device was the need to
learn 5-bit code to type letters in a system, and for special characters
it was still too small. There were some tries in 1970s to use Braille typewriter keyboard for typing text to computer, but none of them were much successful as keyboard key chords were not easy to learn. In 1980s a chord keyset based electronic typewriters have been marketed as "Microwriter", but haven't gained much popularity. They were used along with other early wearable computing devices in 1980s (yes, in 1980s there was something like wearable computing), but short battery life (but still more than smartphones today) made it not well usable in field. Microwriter (later known as CyKey) have been developed until late 1990s. According to wsome sources NASA tested chord keypad as typing device which, contrary to the normal keyboard, can be used in conditions of high acceleration. |
There are some open-source chord keyset projects like SpiffChorder, FeatherChorder or PIC-Key (the last one got a few merely successful commercial incarnations, but source code for PIC microcontroller is still on GPL), but none of them focuses on controlling a software, they are rather for typing. Engelbart also used chord keypad for typing and only specific parts of NLS e.g. menus were controlled by letters.
I've made an assumption that it won't be too difficult, especially if I won't
learn any binary code, but make a programmable chord code for specific tasks in
specific programs. There are design programs which are, at least on some stage
of workflow, operated by mouse and keyboard shortcuts. They have hundreds of
difficult keyboard shortcuts, and it will be easier to do it using keyset than
keyboard because one hand is always on a mouse and second one on keyset. More, I
think that it will be a bit easier to remember the move than to remember and
find specific keys. Later in a workflow, all user-defined parameters (like
dimensions, materials, component values) can be applied, and chord keypad will
not be needed.
The idea is to introduce hierarchy in key combinations based on
frequency of their use and their meaning. For example, the most frequent
operations while designing a schematic in KiCAD is inserting components (usually
resistors, capacitors, transistors, ICs etc.), transforming and rotating them,
linking them with wires and buses. Next, alphanumeric kayboard is used to add
values to components. For the first step of workflow (call it "composition") the
shortcuts would be for example the following:
Key 1: Insert
- Key 2: Resistor
- Key 3: Capacitor
- Key 4: Electrolytic capacitor
- Key 5: User list
Key 2: Transform
- Key 1: Rotate 90 degrees
- Key 2: Move
- Key 3: Delete (for certainty Key 3 has to be tapped 2 times)
- Key 4: Drag
Key 3: Modify
- Key 1: Value
- Key 2: Flip horizontal
- Key 4: Flip vertical
- Key 5: [reserved for expansion]
Key 4: Insert power/line
- Key 1: Ground
- Key 2: Vcc
- Key 3: Wire
- Key 5: Bus
etc.
So to insert a capacitor one should press Key 1, then press and release key 3.
The component appears and is draggable with cursor. Then, if one wants to rotate
it, releases Key 1 and presses key 2, then presses and releases Key 1 specified
number of times. The capacitor may be then dropped in its place. To add
resistor, Key 1 then 2 are used. If the resistor is placed and key 1 is still
pressed, one can press-release Key 2 again to get another resistor in cursor, or
Key 3 to have capacitor etc.
The hierarchy based on having one key pressed and then accessing similar
functions with other keys is the main idea here.
To verify this assumption I decided to build a chord keyset and make a programming solution for automation.
THE HARDWARE
The hardware side has been made to comply with most operating systems available.
It was made as a USB HID keyboard, sending keyboard scancodes for key press and
release events. It was programmed to Arduino module for prototyping and later
moved to separate PCB.
The firmware can be re-built to give another keyboard scancodes, by default the
codes are:
Alt+Shift+Meta+A - for key 1 press
Alt+Shift+Meta+B - for key 1 relase
...+C for key 2 press, ...+D for key 2 release etc.
If you use these combinations for something useful, they can be changed both in
firmware and driver.
The idea to use two separate scancodes for one key's press and release is
intentional. Some notebooks' USB keyboard implementations (thanks Lenovo)
introduce automatic key repeating independently when "Key pressed" code is
received until the "Key Release" is catched. Two keys had to be used
to avoid chord detection failures.
USB HID standard has more keys, many of them are not used in standard PC keyboards,
such as F13..F24 keys, Cut/Copy/Paste or similar, but HID drivers in many
operating systems don't understand these keys properly not transmitting them to
user-space programs. These scancodes couldn't be used as not all operating
systems support them even if HID device introduces itself as capable of emitting
these keys and it emits them.
I also considered using unused "multimedia" keys as placeholders, but support of
these is totally random from system to system. Linux supports only few of them,
more can be added only if totally different HID device is used (in some
keyboards volume keys are handled a very strange way). Windows has even worse
cases - some keys are seen by driver up to Vista, but their effects disappear in
Win7 (like "Network neighbourhood", "DVD player" or "Macros Configuration"), XP
can't see keys available in Win8. It is too chaotic to make sure that the
solution will work on every machine. So as placeholders, unused ordinary
keyboard shortcuts have been used.
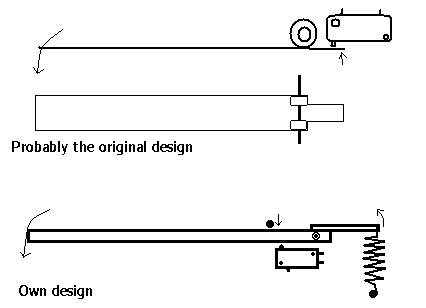
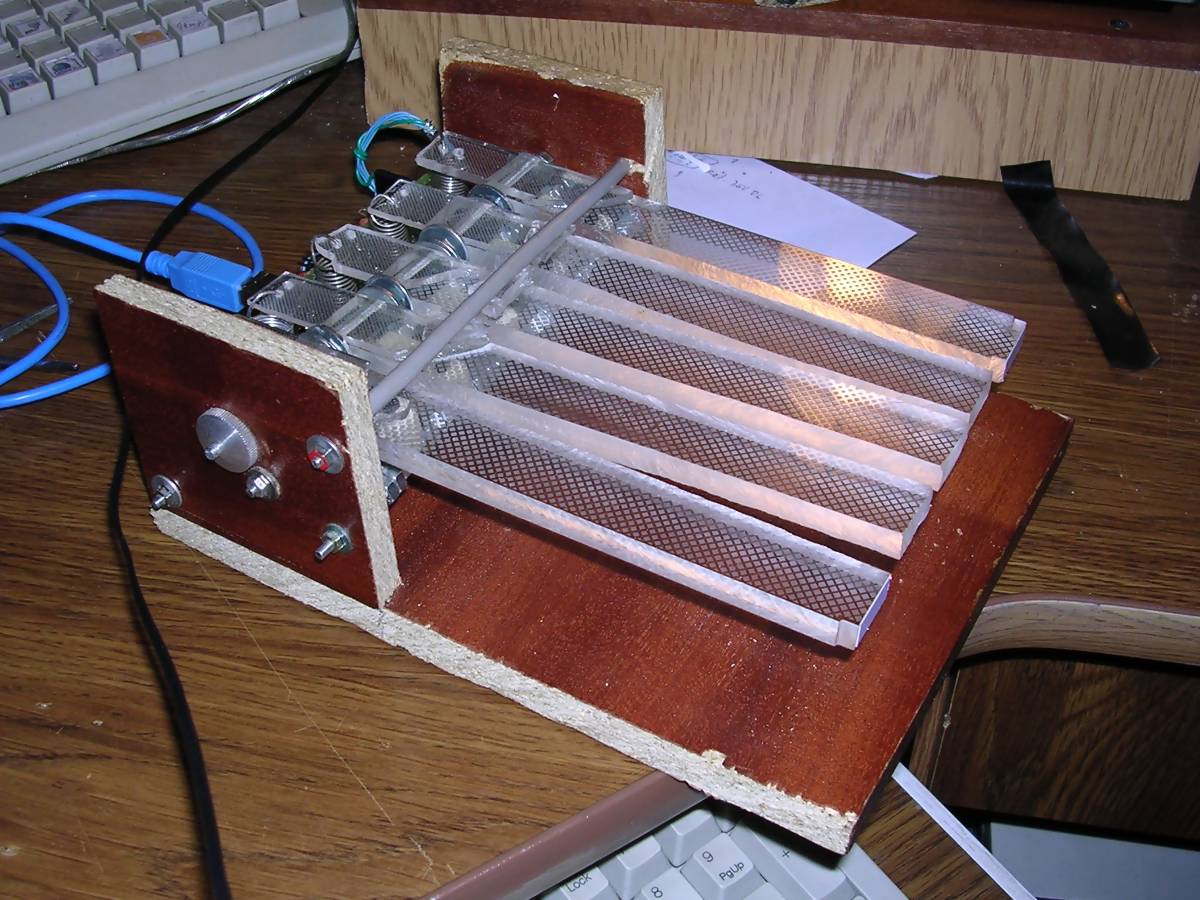
| The construction is a bit different than Engelbart's, which can be seen in the Official Engelbart's NLS page: The key in original solution is pushing the button from below, the button is located above. This way the force to push a button is very small, but the key has to be very light not to push the button acting with force momentum. Engelbart used a thin pieces of flat metal, probably cut and rolled twice in one end to rotate on a shaft. There are two problems: One, if too bif gorce is uset, the metal may bent. Second, the springback is not very good. Because I had problems with cutting metal precisely (and not slashing hands during usage on sharp edges), I decided to use epoxy glass for keys and press the buttons located below the keys. Keys are quite thick (8mm) with 4mm holes for shaft. The epoxy glass is from old LCD. This glass also has quite nice engravings which prevent fingers from slipping on polished surface. |
 |
Later I've found that the keys are heavy enough to push the contacts by
themselves, so I had to glue a small pieces of thinner epoxy glass and attach
springs in the place in which I wanted mainboard. This forced two more shafts to
be added: One for springs and another one limitting the button's upper position,
with protective sleeve on it. It was also needed to fix the spring shaft to the
base.
During construction, the most important thing is the straight angle of drills in
keys, in a hole where the shaft goes. Any deviaton from the straight angle makes
the key protrude in some direction. See the figure.
The switches are old pushbuttons (with Normally Open and Normally Closed pins)
taken from washing machine programmer (1980s, probably made by Crouzet). They
can be mounted using two rods, but they need proper distance tubes or like in my
application, nuts bigger than the shaft.
Everything is installed on a base made of wood.
Dimension details:
Key length: ca. 200mm
Key width: ca. 20mm
Space between keys: ca. 6mm
Key shaft diameter: 4mm
All other shafts diameter: 3mm
Here are few photos of a ready construction:
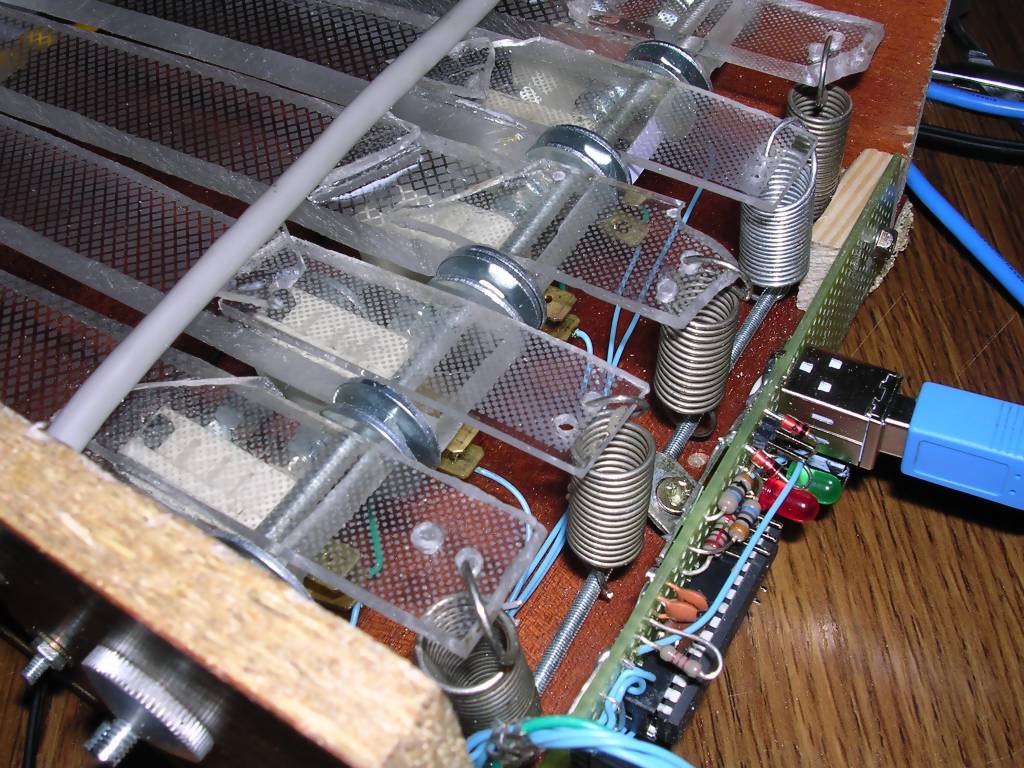
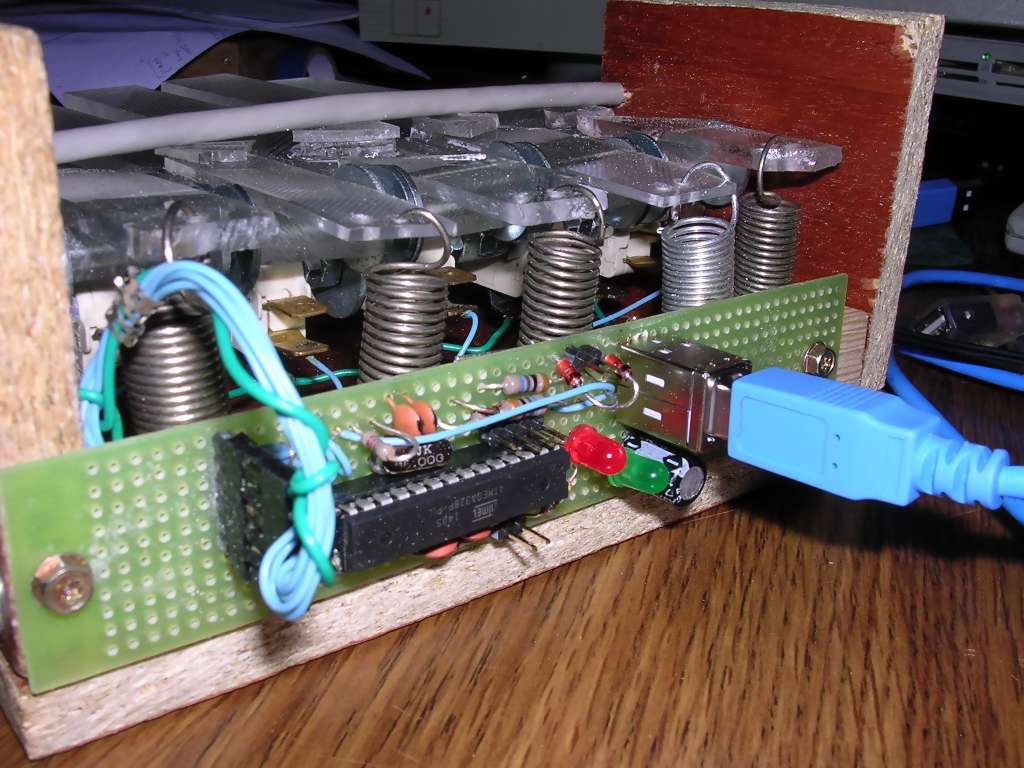
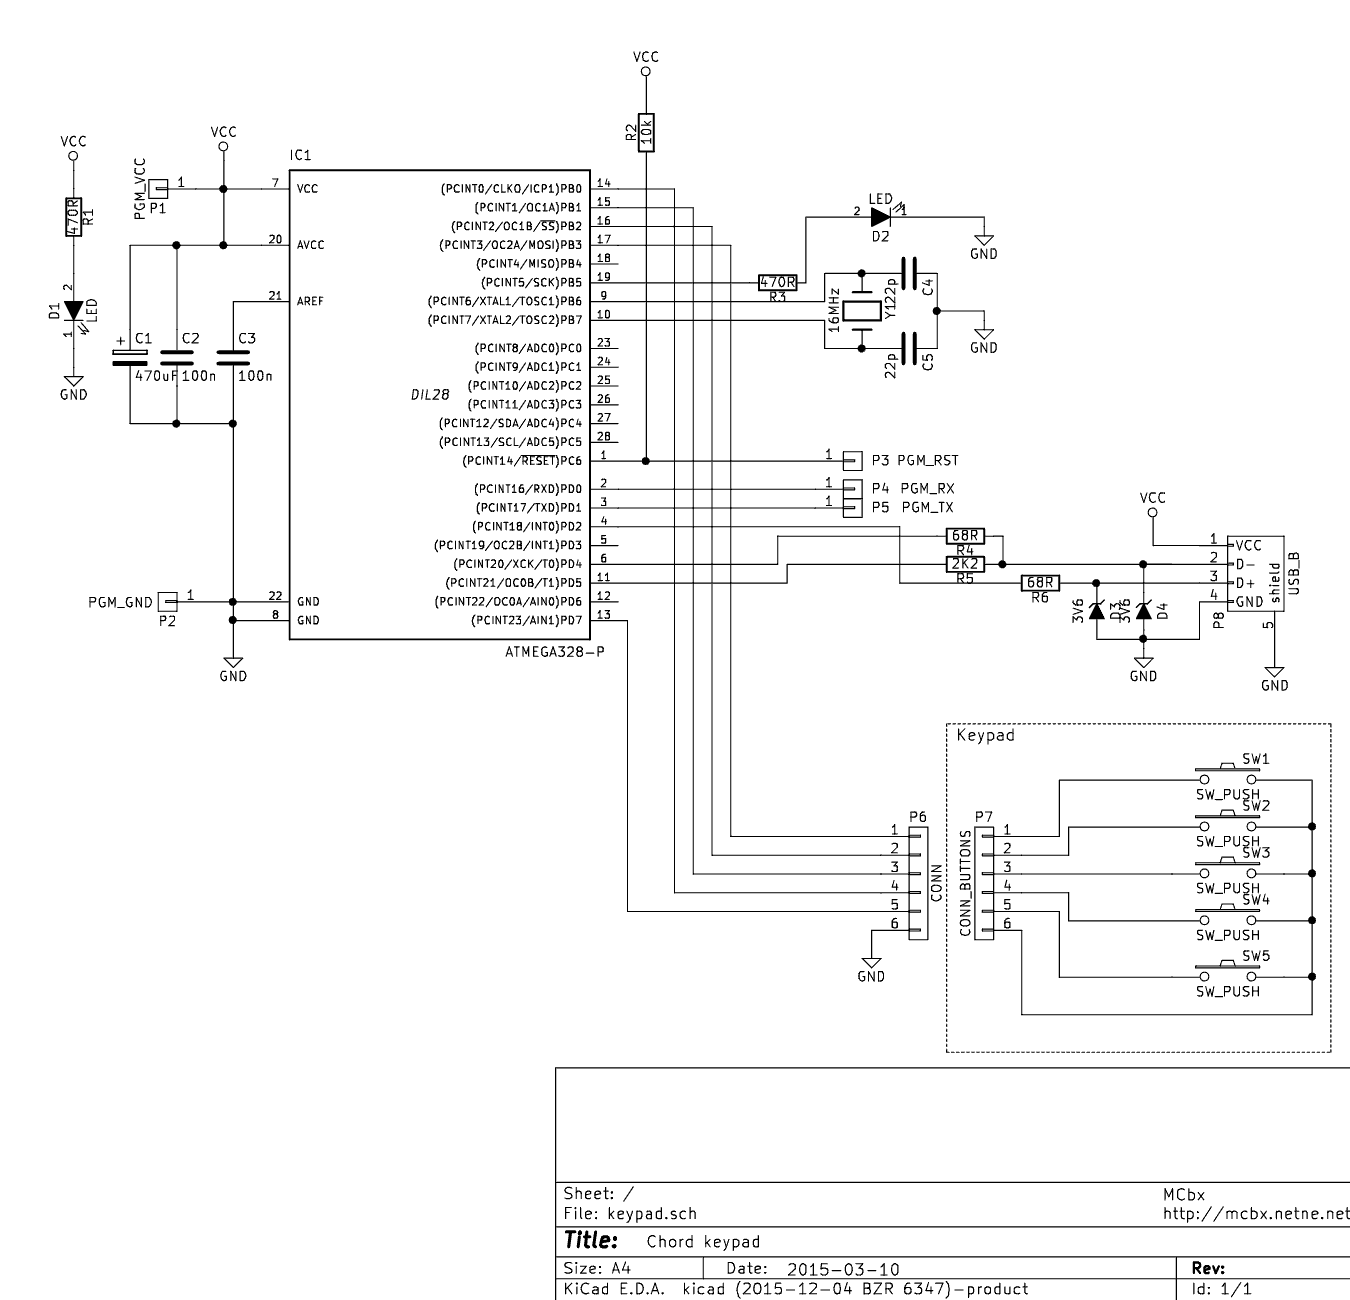
The electronic part has been made on an universal board with Atmega328P
microcontroller programmed in Arduino Uno configuration. This way the board can
be connected using 5 wires to Arduino Uno board with chip removed and then
programmed with a new firmware. USB interface is made using one of V-USB
implementations.
To configure it, only defines can be changed.
You can see the schematic here. also KiCAD version is available.
A complete source code with library can be downloaded here. The library is based on OBDev's V-USB library, AVRUSB modification for Arduino 1.6.
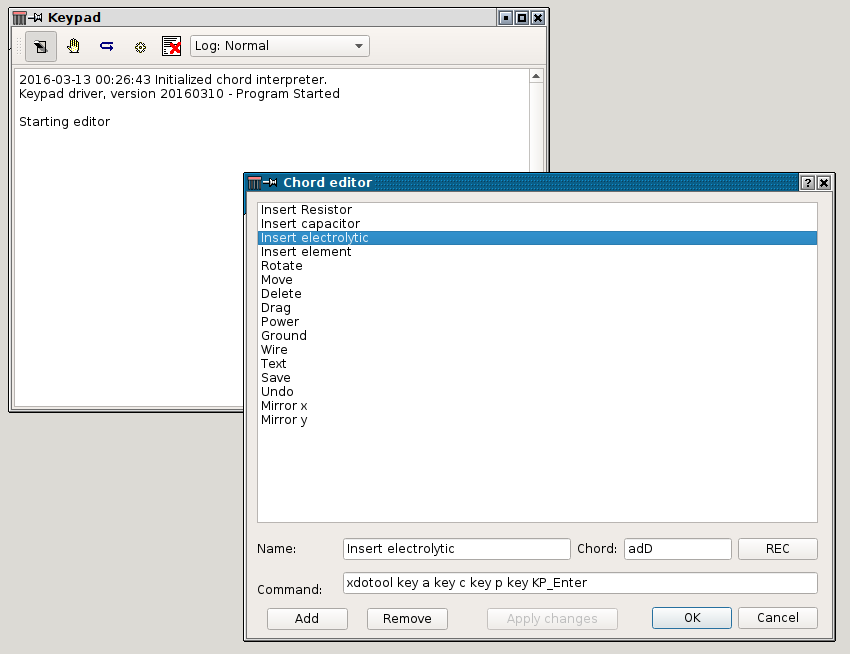
THE SOFTWARE
The software has been made in Qt, and is accessible, as all parts of this
project, on GPL. It allows to activate/deactivate keys or enter "training mode"
in which no commands are executed but their names are shown in a log window. Chord
definitions can be modified to start proper program.
A chord is represented by a string which consists of upper and lowercase
letters. There are 5 possible letters (a,b,c,d,e) which form a combination. Each
letter can be lowercase (means key down) or uppercase (means key is released).
For example:
acCA
means Key A down, key C down, key C up, key A up. So:
acC
means as above, but does not require releasing of A key. Having additionally defined chord:
abB
you can press A key, then press and relase B, and then, without releasing A key press and release C. This will execute two functions.
The software has been tested in Linux. By default it sits in system tray. Double-clicking on it shows the main window with buttons and log. It is possible to change log verbosity using the box on a toolbar. The last one - Debug - should show every keypress/release and chord buffer contents.
 |
To customize keys, launch the program and close it, then edit its settings file ".chordsettings.rc" it created in home directory. There are keyboard commands for each key press/release and path to default chords file - by default ~/.chordkeypad.rc. The keycode procedure is a bit quick-and-dirty so sometimes it locks - pressing and releasing of last used keys unlocks it. Here you can download a complete source code (GPL). It requires Qt runtime version at least 5.5. It has parts of abandoned Libqxt ported to Qt 5.5, but only for Linux - Windows version is added but not ported. It compiles and runs in Debian 8 with Qt 5.5 and X windows headers (xlib or libx11-dev). |
AUTOMATION IN LINUX
To automate tasks, in Linux a single tool called
xdotool can be used,
it is present in most distributions' repositories. It has quite
nice documentation
for command-line parameters. You can set separate macros for separate
programs based on window selection. If something more has to be executed, you can program the driver to
launch a shell script in which set of commands will be specified.
If you plan to port the software to Windows, you can use tools like AutoHotKey for it. I think it may be even possible to use AutoHotKey for a whole keypad support instead of Qt driver.
CONCLUSIONS
By doing designs in KiCAD I have found that in the first stages of design
process, in which components are set and connected, the keypad indeed speeds the
process up. In general it increases the efficiency of operations when they don't
require a full-featured keyboard and they are made of smaller, repetitive steps
combined in different combinations.
I think macro-based chord keypad may become useful in some other CAD, 3D
graphics, maybe DTP, definitely in computer simulation environments (graphical
pre- and postprocessors) in which lots of commands are the same, but they are
made for different components clicked by a mouse.
Using chord keypad for typing is not very fast in the beginning, maybe after
longer training it would be faster than in a normal keyboard, but better and
faster results seem to be from using the keypad for commands.
Links:
http://www.dougengelbart.org/firsts/dougs-1968-demo.html - Here you can see
the original part of Engelbart's chord keypad.
http://i0.wp.com/99percentinvisible.org/wp-content/uploads/2014/12/1450065_10154835434955223_600605115474172169_n1.jpg
- photo of the NLS console set-up
MCbx, 2016

