Chapter 1: Introduction, computer
inspection, cleaning
First of all, a very good source of information in abandoned Jerzy Sobola's
site:
http://web.archive.org/web/20131017195011/http://jsobola.republika.pl/serwis.htm
[IN POLISH]. This page is
inspired by Jerzy's one, but with additions of own experience.
So you have a completely unknown old computer and you want to run
it.
First thing after you get a computer is to look what you have and what
is probably missing. Does the machine look complete? Maybe keys on
keyboard are missing? Is there a power supply unit? Maybe some cable
with AC plug sticks from it? How about monitor connector? Is there a
cable with antenna plug or maybe composite connector? Or some totally
unknown DIN or even edge connectors?
Next, notice all markings on the casing and stickers. Usually you will
find manufacturer, model, serial number, sometimes revision version and
power supply requirements. In other cases you may only find unknown
manufacturer's name and nothing more. This is true especially if your
machine is from prototype series or made to order.
Look for warranty seals. If they are not broken, it means that the
computer hasn't been opened and there are chances that it's complete
inside. Or someone gave up and put it on a shelf when it failed. If
seals are broken, expect that some parts have been removed. If you see
empty chip socket inside a computer with warranty seals complete, you
can safely think that the socket is for upgrade purposes. If seal has been broken, look
carefully, maybe someone removed this part for other application?
Warranty seals are in all types and colours. Usually they are paper or
foil stickers,
but sometimes, especially in Eastern block computers, they may be stamps
on wax poured into screw hole after closing machine's casing. |
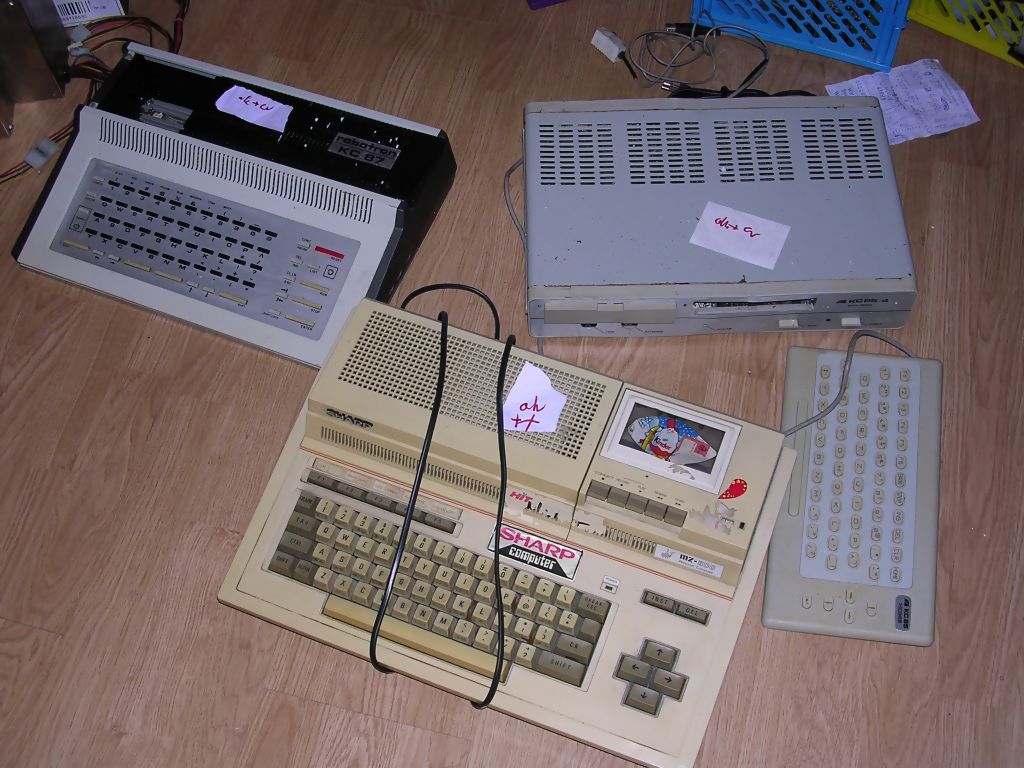
That's how they arrive... |
Now check the appearance of casing. Is it covered in dust? If yes, it
was probably kept in some storage. Try to remove some dust by finger. If
it is hard to remove, the computer could have been visiting atmospheric
conditions. Usually silicon chips can survive it, but electrolytic capacitors
not. If there is a thick layer of mud-like dust, it is possible that the
computer spent some time in a humid basement. You may find a very neglected
computers, I call it "year in the garden" condition, but once I had "year in a
pigeon house". It can be cleaned.
Look at the rear connectors, vent holes, metal parts of case, shields or
chassis. Aren't they rusty? Rust on these suggests humidity, and humidity means
oxidation not only of exposed parts, but also connectors, capacitors' housings
or DIP sockets holes.
Basic information
Now it's time to find some information about your machine. Look in the Internet,
but today (2016) you won't find so many web pages with practical informations
like in early 2000s. Search for essential information, like CPU type, how much
RAM, how is it organized and how to connect power and video (information about
connectors are called pinouts). If you don't know
power supply unit voltage and current values, look for its photos on internet
auctions/auction archives. Search for schematics, pinouts and photos of internals. Pinouts are
very important because they are information how to connect peripherals.
Sometimes you may get a link but the page will not be available. It is quite
frequent because this knowledge cannot be easily sold and its preservation is a
matter of hobbyists. To look for archived copies, use Internet Archive's
Wayback Machine. I recommend getting the
bookmarklet (drag this link to your bookmarks) because then if you click it
you will land in the list of archived copies of page currently in your browser's
window.
If a computer is neglected or too dirty, usually you need to open it, at least
to clean inside, but in some cases it is just easier to disassemble it
completely and wash plastic parts of casing. It is also convenient to open and
check if computer came in unknown state. If there's a "was working 20 years
ago" claim in the internet auction, don't expect it will work.
There is also one more method of discovering the computer condition: the smell.
If you smell tobacco from it and computer has a fan, prepare for cleaning it
from oil-like dirt. The worst cases are smells of burned plastic/laminate and
characteristic smell of oxidation (like the one you smell when you hold
alluminium CD-ROM drive casing too long). If you smell humidity, basement-like
odour from floppy disk drive, do not use it before cleaning its heads,
take this advice seriously or you may end with rings cut on disks surface. Any
acid-like odour means that capacitors may need replacing or internal battery is
in a very bad condition. Sweet but irritating odour from power supply unit may
idicate problems with input filtering capacitors. They are not electrolytic, but
when they fail, they emit a liquid-like substance made of melted dielectric.
So if you have a machine with "a year in a garden" condition, it should be
obvious that opening will be performed with vacuum cleaner within reach. It will
help to remove any groups of dirt, pieces of flora and sometimes living
inhabitants. Avoid using the vacuum directly - move the dust with a small brush
(2.5cm/1-inch is OK), having working vacuum cleaner's tube few centimeters
nearby to suck all dirt removed by brush. We don't want to suck jumpers or chips
out from DIP sockets. If you want to clean power supply unit or inside of a CRT
monitor, better do it outside room or in a balcony, because they may be really dirty inside
the casing.
If plastic casing is in a really bad condition, consider removing it totally and
washing it separately. Dirty keyboard? Consider the same thing, check how
keycaps can be removed and isn't it too risky to remove them all for washing
(e.g. in Commodore 64 it's very easy to break keycap or even keyboard's main
plate parts). Remember to take photos of all steps during disassembly to
re-assemble the machine back. Take photos and notes of connectors you
unplug, be extremely careful with ribbon cables as they are fragile. In many old computers there is more than one way to fit plugs in
board, and fitting them incorrect way will destroy the system when powered on.
For different nuts and bolts it is convenient to use small trays (pieces
of typical household containers or products packages may be used) to
collect all of them in specific order. Such ordered set makes
re-assembly much easier because you know which part goes where.
I wash plastic parts of casings when they are too dirty to be cleaned using
cloth, window cleaning liquid and thicker washing liquid. I'm usually doing it in
a bowl of water (mixed with e.g. washing powder, it works unusually well) and
using a harder brush (but not metal one!). It is only needed to pay attention to
stickers and printed markings. Any markings engraved in plastic usually have to
be cleaned using harder brush too. Next, I rinse the parts in clean water, roughly
dry them using cloth to avoid bad looking damp patches and leave to dry completely on air
(maybe near radiator, but don't use excessive heat, plastic may melt in
unexpectable temperature!.
Do not use water if your casing is made of wood or wood-like material
(e.g. Meritum computer). |

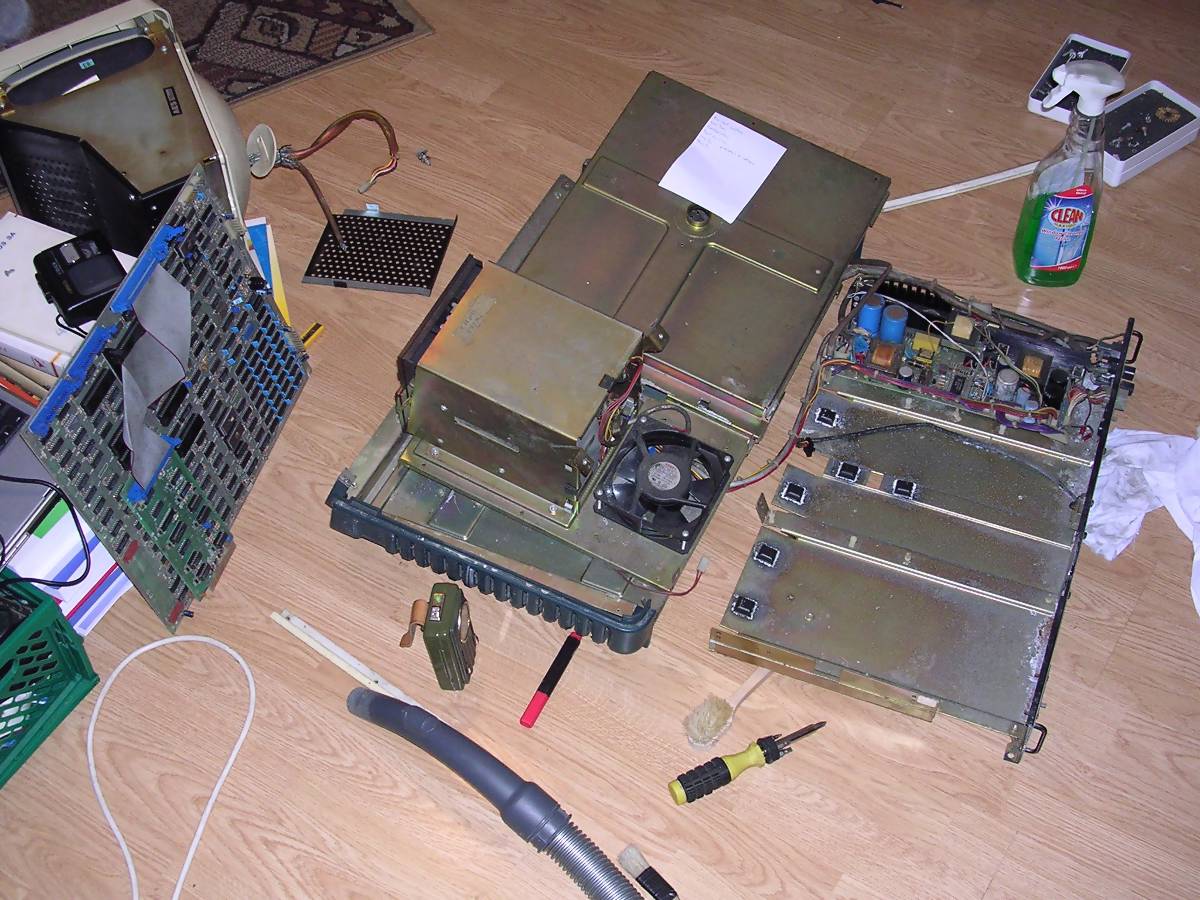
Computer under restoration. Notice tools, trays for
screws, flashlight, brush and vacuum cleaner. Cleaning cloth and some
liquid is usually also needed. |
If some parts of casing are broken, try to glue them before crack propagates too
much. On invisible part of casing try cyanoacrylic glue, in most cases it will
be OK. Some parts (e.g. power buttons in desktop Macs) should not be glued using
cyanoacrylic glue, you can try with polychloroprene-based (neoprene) glue there.
Be careful, as polychloroprene glue degrades polystyrene, so if casing is made
of it (PS markings) you shouldn't use neoprene glue. Avoid hot-melt glue. It is
good to secure small wires to PCB, but not if large forces are in action.
As the last method for broken plastic parts you can use straightened staples to
hold broken parts from the invisible side (usually inside unit). Do not insert
them like in a paper but straighten them, cut to needed length and melt into
plastic using soldering iron. They should not protrude from the other side. This
method works if significant forces have to be transmitted using glued part.
Close the crack between staples by melting plastic with soldering iron. Do not
attempt to drill in cracks to prevent propagation, it's not an old car, drilling
always ends with bigger crack.
Look for sponges and foams used for e.g. vibration protection or
ribbon cable separation. After 20 years its consistency is similar to clay so
they should be removed and replaced with something useful. Look for them near
mechanisms, motors, drives or in battery compartments. Rubber parts may become
harder or even break off. Remove remains of rubber bands used for cables and
replace them with e.g. zip-type bands which are not falling apart after 3 years
like rubber bands do.
One more thing about restoring casings. If you are in doubt to
repaint or not to repaint, usually the answer is NOT. The only case of
repainting is when it is just impossible to use the casing, it has e.g.
significant portions eaten by rust. If rust is in smaller spots, just remove all
electronics and grind it down with wire brush, then sandpaper, then you can
spot-paint if it is so visible. However, during painting, there are three things
you have to maintain to get a good painting:
1. The colour. If the casing was black, you need THE SAME black. People
experienced with collecting post stamps, painting these small figures for
strategy games or airplane models know what's going on with proper colour
selection. If you use even marginally different colour, this will be awfully
visible when put near original. Even minor difference in light reflection is
instantly visible.
2. The texture. You cannot spray-paint instead of powder coating, as this will
be visible. If you plan to powder-coat, test a few powders. Especially in metal
casings like PC ones, it is important to maintain granularity (which you may NOT
get by using cheap electrostatic blower as it clogs with higher granularity).
There are different granularities, from near-mirror plain surface to visible few
millimeter grains. This must have the same properties.
3. The thickness. Frequently underestimated. Thickness accumulates when you
paint, changing dimensions. It can even make the casing impossible to put back.
Do not paint plastic. Period. This wears out very quickly. If there was some
painted part, use the same 3 factors as in metal plus one more factor: Paint's
self-etching properties. If this factor will be different, the wear related to
abrasion from using will be non-uniform.
Naively covering all plastic defects with paint makes it even worse when it will
be touched for some time. If the plastic was already entirely painted, the idea
is to use the same paint, fortunately most of these were prototypes and
low-scale production and were painted with something available at hand, like
wall paint (yes, really, Mera OM series, emulsion paint was used and it is
possible to restore it using wall-grade emulsion pain).
I found that most Youtube clips about restorations produce a well-looking but
non-working equipment after a few hours of use. This should never be taken as a
manual. No, painting over electric machines internals is not a good idea. All
elements moving with friction should not be painted and should be lubricated.
Although there is a wide variety of lubrication compounds, there are in fact two
characteristics of them you should pay ettention to:
1. Liquid or solid. Apply solid when liquid would flow from surfaces.
2. Density (read: More or less sticky). That's why you should not use machine
grease to floppy drives - it will be too hard to move as it will stick. Silicone
grease is usually used.
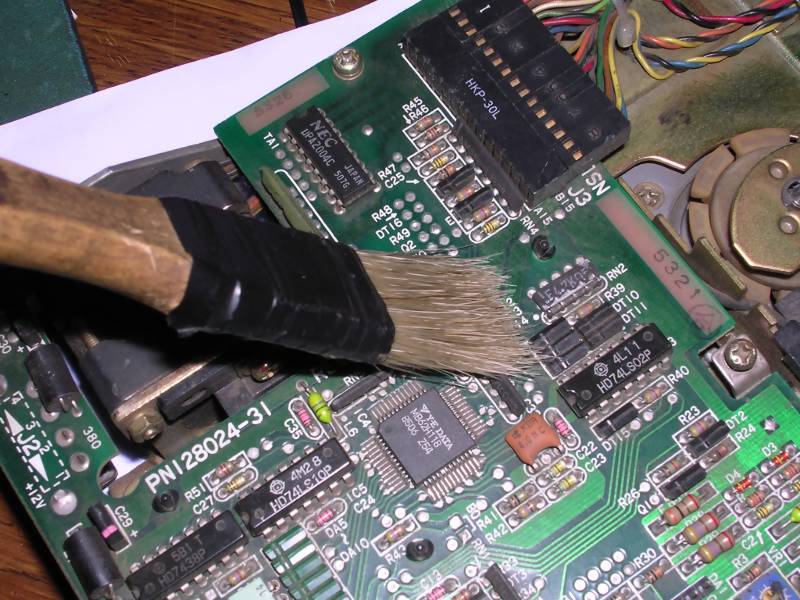
If you don't clean fragile CMOS circuits, you can use a
normal painting brush |
In some rare cases you may get broken casing made of aluminium alloy. Usually
computers with casings made of Al are quite heavy and it's hard to throw them
like plastic ones, but my post office thrown a 35kg box with CRT monitor inside
so everything is possible. In general, never solder/weld alluminium without
professional tools. There are "easy soldering" sets with special soldering
alloys and flux, but they are more glue than solder. Broken alluminium part
forms a thin layer of oxide on its surface, successfully preventing any
soldering attempts. In such cases it may be better to use a strong,
well-penetrating glue to keep parts together (especially when crack surface is
coarse, like in casting Al alloys) and add some information not to use glued
part for carrying.
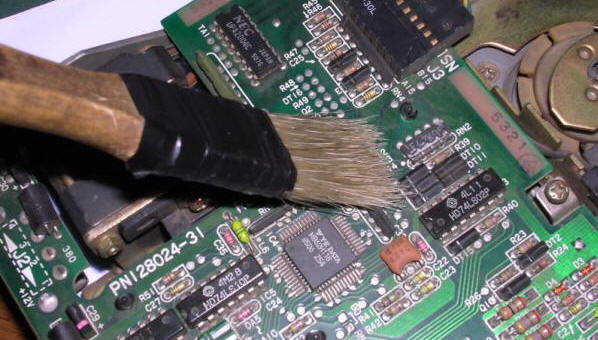
Printed circuit boards should be cleaned using a normal brush and vacuum cleaner
to remove dust moved by the brush. Some
people use isopropyl alcohol, but I think it may be too agressive for some
components, especially if (usually computers from eastern Europe) paper-based or
styroflex capacitors are in PCB. The only use of alcohol (IPA or normal
denaturated) should be when there
are obvious traces of flooding, fungus or oxidation on PCB. IPA (isopropyl alcohol) can
also damage decoupling capacitors if they are weak. |
It's time to evaluate technical condition of the computer. Re-assemble it
enough to discover principle of operation and find or test the power supply
unit.
MCbx, 2016