Chapter 9: Monitors and displays
The goal of this page is not to show all possible problems with
monitors and displays because there is a variety of designs. It shows only
common and the most important problems with displays.
When you open a monitor, the same precautions that in computer's PSU apply.
Another important thing is high voltage part. In some very old displays, CRT
transformer-multiplier module has no bleeder resistor. It means that >10
kilovolts may be present in multiplier's capacitors when monitor is turned off.
Wait long enough or make some
discharging tool.
Prepare for lots of dust, as CRTs are convection-cooled.
The history that HV from transformer may instantly kill you is usually
exaggerated as current is relatively small and frequency is high. The problem is that if you get
shocked with HV, your hand may get into parts which are under lower voltages,
but with more dangerous currents (e.g. power supply unit's capacitors charged to
400V), and this part is the most dangerous one.
|
Cleaning
Cleaning the screen should be done using a soft cloth and window
washing liquid. Do not separate CRT from the casing unless you want to replace
it. If possible, you can remove plastic rear casing and clean it with water.
Casing should be cleaned as all plastic parts.
Inside, you will find lots of dust. Electronics part is located on
the bottom, hot air goes upwards, taking all dust from the base and rear
of monitor. This dust then falls down on electronics board and CRT like
in a cyclone filter. As always a small brush can be used, but pay
attention to tuning rings and magnets on CRT. If it is not enough and
you are sure that there is no high voltage retaining in capacitors, CRT
may be gently cleaned with a soft cloth. Do not move or remove the
rubber high voltage connector to the CRT as it may fall apart. Because
quite high frequency goes there, even a good insulation may cause HV to
leak. Deflection part can be cleaned using brush.
If monitor has a fan, you may see a picture like on the right - here not
only a brush, but a vacuum cleaner had to be used to clean this mess. |
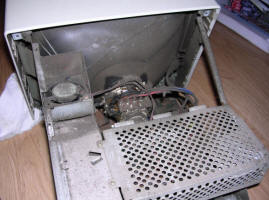
They may be really dirty... |
If you encounter any problems, check tuning knobs first, also these on
the rear of monitor. If you experience lack of some signal, check the plug and
cable first because many times damaged wire in cable was the cause of all
problems.
Generally avoid manipulation of internal components when the
monitor case is opened and CRT is in operation. It is not only about possible electric shock, but some
regulators shouldn't be tuned when the unit is on.
Monitors have their own power supply units, giving relatively
high output voltages (usually >30V). If it works and transformer works, you
should hear HV transformer working.
Move your hand close to CRT screen face. If you feel static electricity it means that
HV section works.
If you see a horizontal line, it means that vertical deflection
is defective. Vertical line means that there is a problem in horizontal
deflection circuit. If you see a point, then something is really bad as
deflection doesn't work at all.
Technical solutions used to keep deflection are different in
different monitors. Sometimes it can be even linked to power supply unit
switching transistor, so diagnosing in such cases is very difficult. In
late-1980s displays you may find deflection built on some kind of TDA chip which
application you may easily find on the Internet and compare with your unit.
| During re-assembly remember that cables are usually separated.
High-voltage cable (going from transformer-multiplier to CRT plug)
should not be surrounded with sensitive signal or audio cables as high
frequency will leak.
In some color CRTs, especially in these with early iMac or eMac computers,
you may find purple distortions on screen. These distortions are caused by
magnetic field from speakers, slowly magnetizing the CRT. The only way to fix it
is demagnetization of a CRT. You won't do this easily with soldering iron as
with tape recorders, you usually need quite powerful coil connected to AC to
make this work.
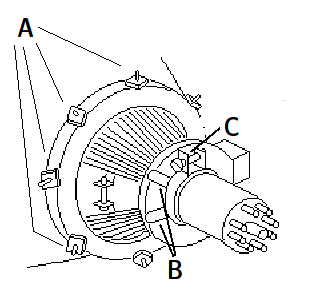
In a monochrome display, if a picture is warped on one edge, look at the
deflection circuit magnets located in the outward part of deflection coils
closest to screen (A in the picture). Are they set as in factory (they are usually protected with
paint or glue)? Maybe they were moved. Significant problems with picture center
is caused by bad orientation of centering rings (B in the picture). Keep front
one steady and move the second one slightly.
If a picture is rotated, check are deflection coils in proper angle. In some
cases the glue they are sticked to tube may peel off and coil assembly may
rotate by itself. In such cases to prevent destroying CRT avoid using excessive
force when locking the coils on CRT by screw ring (C in the picture).
If the monitor doesn't start and you see a very bright, blue or violet light
from the electron gun part of CRT (by default it may glow a bit in orange), it may be the symptom of irreversible CRT
damage: loss of vacuum. |
 |
If picture is out of focus, try to tune the focus using focus trimmer located
on or near high voltage transformer. Sometimes there are two trimmers on a
transformer assembly. They mayh be for horizontal and vertical focus (tune them
one after another to get best results) or focus and "Screen" trimmer. Screen
trimmer sets the brightness of the picture, so if it is bright, or dark to loss
of colours it means that this trimmer is not well set.
These things were essential. There is an exhaustive
CRT monitor repair FAQ in
the Internet. It is mostly about PC monitors repair, but many things can be
applied to all CRT monitors and sometimes TVs. There is also a nice explanation
how CRT works.
Tuning
With years of operation, all electronic devices slowly change their
parameters due to components worn-out or work conditions changes. In CRT monitors it can be seen by picture being larger or smaller
than when monitor was new, picture may be shifted or moved. Sometimes picture is
too bright or too dark. It needs tuning. First, try with controls which are on
monitor's casing, as in many types everything can be done with them. But
sometimes external controls are limited co contrast knob and monitor needs to be
tuned using internal trimmers. Usually you won't find instructions for tuning
all monitors, especially for all trimmers on its mainboard. If you have a
schematic, you may figure out what potentiometer is responsible for what, but
many times schematic is not accessible.
You can use trial and error when looking for the proper regulators, but with the
following rules:
0. There is a high voltage inside. Tune the "live" system only when
tuning knobs are accessible by e.g. holes in casing. Do not stick fingers or
metal tools into a jungle of wires in a working monitor. Do not stick the
screwdriver blindly into working monitor's rear being in front of screen. Use the
mirror to view result while still having an eye on the electronics. There is
also a high frequency inside, so moving some wire closer to HV wire may have
impact on quality as the wire will pick the radio noise up.
1. Do not use trial-and-error when discovering regulation instruments of a
colour monitor. They have much more knobs inside and the final effect is visible
only after few other changes - they influence each other. This is way too
uncontrollable.
2. Do not try the regulation instruments swinging them from one limit to another
- just move them very slightly and effects should be visible, if not, don't use
force, but restore them. If something doesn't move or is locked by paint or
piece of rubber, don't move it as it may be critical for condition of a circuit.
2. For tuning picture width, usually a coil is used. You stick a plastic
screwdriver in and turn the core sliding it in or out of the coil. Use the
plastic screwdriver during live-tuning as metal one will: a. already influence
the picture and b. heat itself up by inductivity, sometimes even melting the
plastic part of core.
3. Typical FAQs deal with problems of too dark monitor. Sometimes it becomes too
bright. If monitor is still too bright after turning brightness to minimum,
there are two things frequently skipped in FAQs:
- Grid voltage on CRT. It is usually regulated using a "SCREEN" or "G2"
trimmer on (or in smaller monitors near) flyback transformer-multiplier
assembly. Simplified, this controls how much electrons will be "pushed" towards
screen. The problem with this trimmer is that sometimes it gets worn out and
requires small correction to get away from "milky" picture.
- Heater voltage/currrent. Heater may be connected through the
low-resistance resistor which, contrary to typical resistor when failing, may
become more conductive. This is a common problem for all portable TVs from
eastern block countries such as Elektronika or Leo. The problem is that the heater is powered using a complex high-frequency current flowing from
HV transformer as a side-winding and you won't measure the voltage very
precisely with typical non-TrueRMS multimeter.
Another thing is with LCDs. LCDs of old computers usually have 4 problems:
1. Crystal poured out or screen rot
Impossible to repair, visible by black patches on screen caused by liquid
crystal particles poured from their chambers. Screen rot, seen as usually
circular wet-like patches, is caused by cleaning LCD with aggressive chemicals
e.g. alcohol and cannot be fixed as it's the sign of internal delamination.
2. Poor contrast
In most cases it cannot be easily fixed. In some other it is possible to boost
parameters using internal trimmers. Do not try to modify them without knowledge
what are you doing
3. Missing lines
In low-resolution displays this problem may be fixed by gently pressing LCD on
the edges. Sometimes it may be needed to remove the LCD part from its circuit
board and clear the conductive rubber, but it may be difficult to put it back
together. Check connectors and ribbon cables as problems with them may be
indicated by filled or empty lines on the screen.
4. White seen as red, red backlight
Problem with backlight tube. The only solution is to carefully disassemble LCD
enough to remove tube and then install the same one. Be careful as tube is
usually extremely fragile. In some rare cases red tube
is symptom of bad inverter, but usually bad inverter shuts off itself (or blows
its fuse) and doesn't start up while in bad tube case the inverter shuts off
after some short time.
MCbx, 2016


