![]()
![]()
![]()
![]()
![]()
![]()
![]()
![]()
![]()


All my content and ptohos

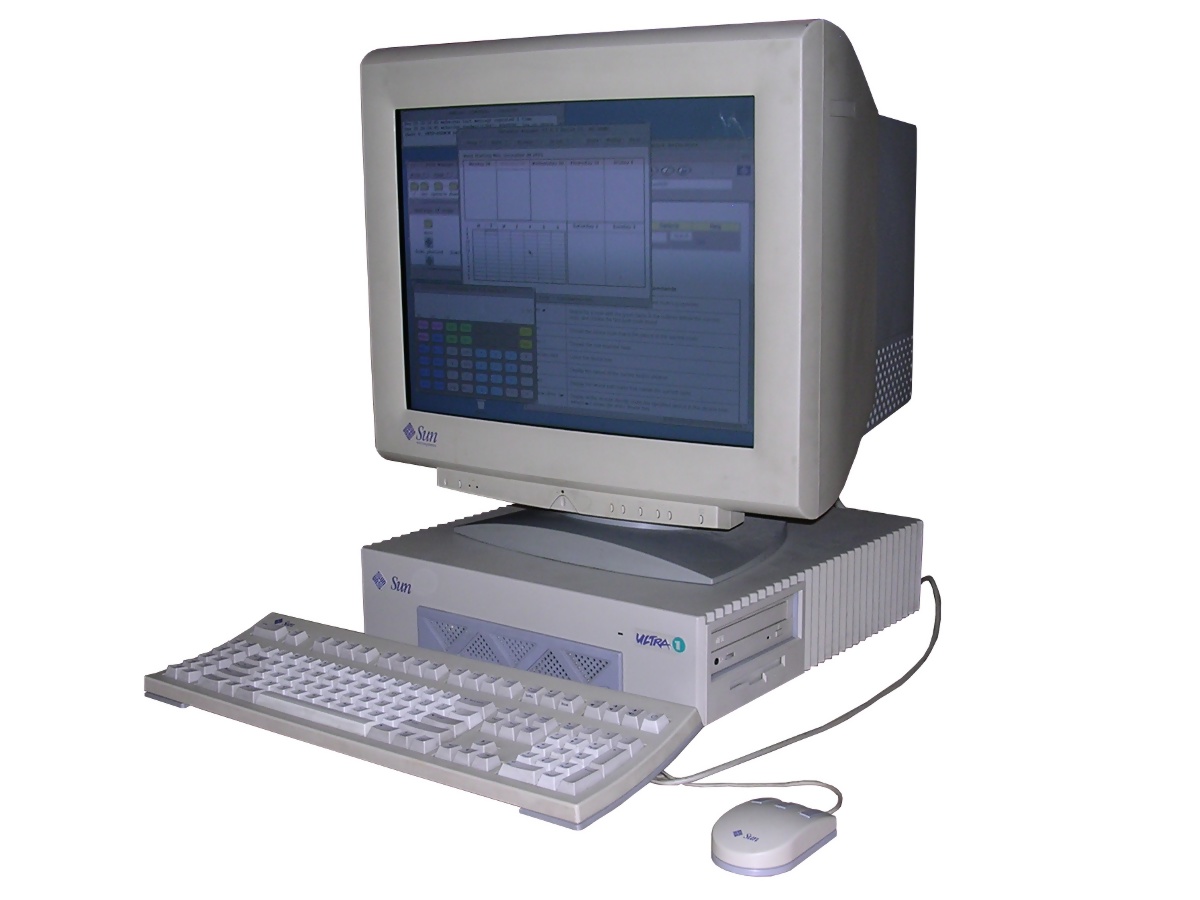
Sun Ultra 1 (model 140)
After success of high-performance SPARCStation computers, Sun released Sun Ultra series - a new series of SPARC-based workstations with a new Ultra SPARC processors. There were different types of Sun Ultra 1 machines, with different processor speed (143MHz, 167MHz, 200MHz) or additional graphics capabilities (Creator series). They were used mostly as computational platforms for physics simulation or 3D graphics, especially rendering (Toy Story movie has been made on Sun SPARCStation machines). Sun's machines were running Solaris - a special Unix system with all Unix tools and CDE window manager. Later Sun introduced their own windowing programs.
| Manufacturer | Sun |
|
| Origin | USA | |
| Year of unit | 1996 | |
| Year of introduction | 1995 | |
| Class | Sun SPARC | |
| CPU | UltraSPARC | |
| Speed | 143MHz | |
| RAM | 1024MB (8x128MB) | |
| ROM | Sun OpenBoot | |
| Graphics | Using additional card | |
| Sound | ...present | |
| System expansion bus | Sun SBus |
|
| Floppy/removable media drives | SCSI CD-ROM | |
|
|
||
| Hard disk: | 4GB SCSI + 18GB SCSI (SCA) |
|
|
|
||
|
Peripherals in collection: |
||
| Other cards:
|
Graphics card | |
| Non-standard expansions: | ||
| Operating system(s): | Solaris >=2.5, Linux, BSD |
This unit was used probably as some kind of computational workstation in IT center of a big industrial plant. In early 2000s Debian has been installed on it and it was working as network routing device until 2005-2006. Currently it runs Solaris 7.
To upgrade hard disk, use any single-connector (SCA) SCSI drive. Most drives should work after proper partitioning. If you don't have a tray to slide the disk in rails, use 4 screws and small (0,5-1mm thick) washers. RAM should be installed in pairs. Removing RAM modules is made using lever which pries one side of stick.
| Contents: | Starting, usage | Software | NVRam battery | Links |
Starting
The machine has quite advanced BIOS called OpenBoot. It consists of the firmware and a command processor ("ok" prompt) which allows to configure the most important parts of the system, do tests and list SCSI devices (scsi-probe). To get to it during boot, press and hold Stop-A keys during power-on. If you type "words" you will get a full list of control words, but no usage. And the usage is quite non-standard, it's a reverse Polish notation present e.g. in Forth language.
Imagine you have a good or reworked battery keeping NVRAM, a memory which keeps computer main settings. Instructions to modify a NVRAM chip are present in this page. Boot the system, you will get to "ok" prompt", and you are ready to program NVRAM. Prepare the following information:
- The model number of your Sun computer. Ultra1 is
80. SPARCStation 10 or 20 is 72. The full list is available
here. Some FAQs state about real-machine-type variable. I haven't
spotted it in any of my Sun ROMs.
- Last 3 bytes of ethernet (MAC) address. First ones must be 08 00 20
-3 bytes of Serial Number - probably what you have read from barcode label
on NVRAM chip.
Now the procedure is following:
set-defaults
setenv diag-switch? false
1 0 mkp
80 1 mkp //substitute
80
for your machine type
8 2 mkp
0 3 mkp
20 4 mkp
XX 5 mkp
YY 6 mkp
ZZ 7 mkp //substitute
XX, YY, ZZ
with your MAC address bytes
0 8 mkp
0 9 mkp
0 a mkp
0 b mkp
TT c mkp
UU d mkp
VV e mkp //substitute
TT, UU, VV
with your serial number bytes
0 f 0 do i idprom@ xor loop f mkp
Let's explain this procedure. The first line fills default NVRAM values in. The second one disables fault diagnostic. All lines below modify particular bytes in NVRAM. The template is:
what where mkp
e.g. 80 1 mkp will write 0x80 value to byte 0x01 or NVRAM. The last line computer the checksum, checksum allows to boot the machine without complaining.
A full tutorial of OpenBoot prompt usage is also accessible.
After proper configuration of OpenBoot, the machine will try to boot from HDD right after powering on.
To install Solaris from CD, boot to OpenBoot prompt ("ok" prompt), insert Solaris CD, and announce:
boot cdrom
This will boot CD. In Solaris 7, it will boot directly
to GUI desktop and launch the installer.
Solaris dropped 2. version prefix since ca. 2.7, so Solaris 7 is Solaris
2.7.
Preparing hard disk
If the disk is taken from PC, it must be "labelled" before using in Sun
computer. Click the console, kill the installer process (Ctrl-C) and
type
format
You can get list of commands with "?" command. Now select the hard disk, the program will ask to label it. Answer yes and quit format, now restart the computer. Do not do anything more in format, especially avoid formatting disk from this program, as if it can't format partition it goes to low-level formatting (it doesn't matter that your SCSI HDD has disabled LLF, locked pages, is blessed by shaman :), etc., it will somehow format it!) without any warning! So you may brick your SCSI drive very easily. Possibilities to recover SCSI drive from LLF are quite limited in Format and are constrained to only few models of Quantum drives.
After installation of OS, which is quite straightforward, you have to decide do you want to use CDE desktop or Sun OpenWindows desktop. The difference is that while CDE looks like a typical CDE (see their open-source page), OpenWindows looks more like a Linux's Fluxbox manager, with right-click menus for everything.
There is one more important thing - the system may boot in 32-bit mode, while it can boot in faster 64-bit. It is caused by a bug in 64-bit mode in first UltraSPARC CPUs, which may allow unauthorized code execution. Because this system is old and probably has more bugs, we can force the system boot in 64-bit.
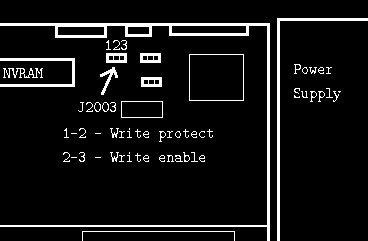
| The first thing is to update BIOS. In Solaris 7 installation CD, OpenBoot update package is just present with system distribution and it will be started at first system boot if needed. If update cannot proceed and restarts every time (error like "Couldn't determine Flash PROM Component type"), you may have flash ROM protection jumper set (1-2 position). You have to power the computer off, turn the jumper J2003 to 2-3 position, power it back on, update the firmware, power the computer off and place the jumper back in "protect" position. The location of J2003 is shown in the picture. To access it, you usually have to remove video card. Remember about unlocking the rods near graphics card's connector by pulling them upwards. Generally it is quite difficult to place this graphics card properly. |
 |
Next, it is needed to tell the system to ignore old CPU warnings. Log in as root. Start a text editor, from GUI or use vi (if you know key functions :) ), and open file:
/platform/sun4u/boot.conf
Sometimes this "sun4u" may be different according to your platform (e.g. sun4m for SPARCStation 20). Now find and uncomment the line:
ALLOW_64BIT_KERNEL_ON_UltraSPARC_1_CPU=true
If it is not present, type it manually but in Solaris 7 it should be present, but commented (# as first character). Now save the file, reboot and you have a 64-bit system.
If you think about software, you won't find much. This is a high-performance workstation, so the software is very specialized - I was working with computer simulation programs for Sun, there are also programs for 3D rendering, but nothing you can download. If you think about GNU programs, the situation is worse than in Apple computers - yes, you have to pay for GNU tools too.
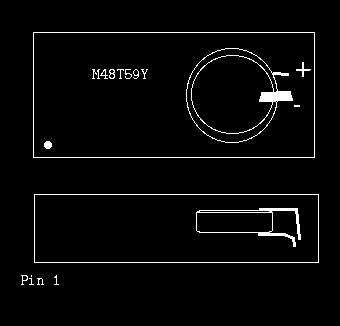
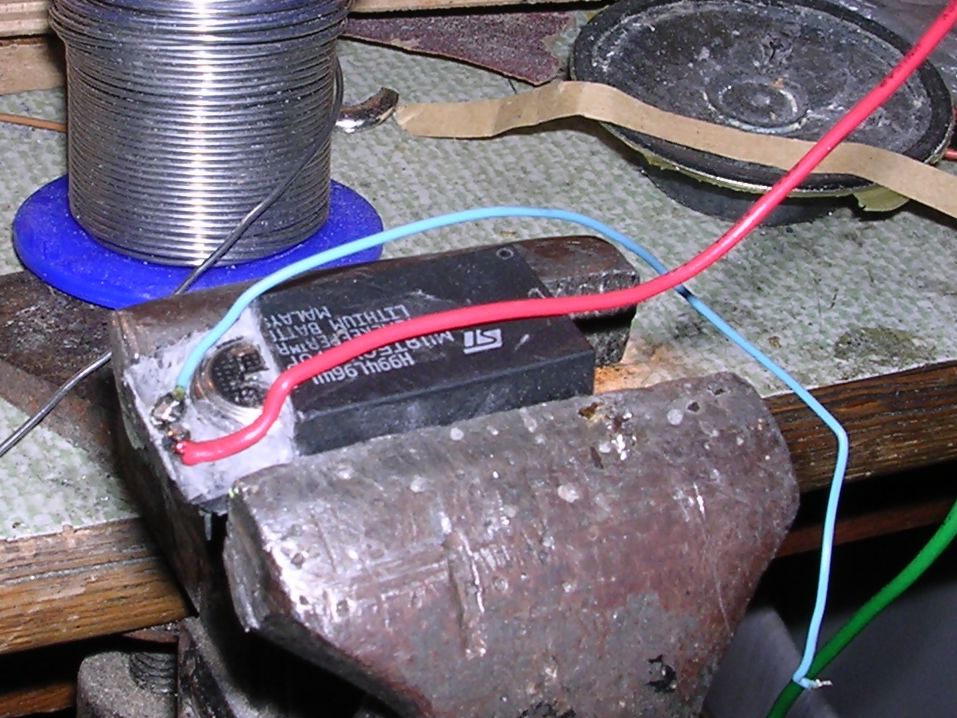
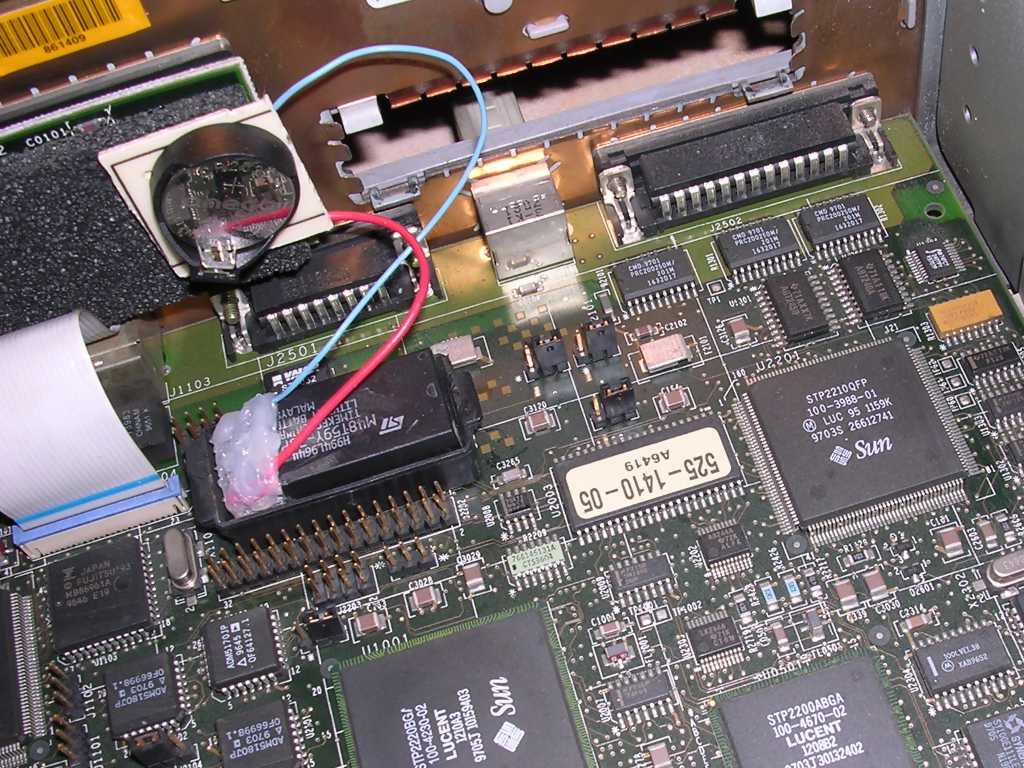
Most Sun workstations use M48T59Y battery-backed NVRAM
chip. This chip, like DS1287, has a battery built-in. And like DS1287
could be reworked to use normal CR2032
battery, this one can be reworked too. The most important thing is to
cut the proper part of chip.
To remove the chip, pry the "tray" off the mainboard. The chip will go
out. Remember the chip's pin 1 position. After extracting the chip,
re-seat the tray on socket.
Now using a sharp knife remove barcode label and stick it on some other
part of mainboard or computer. This is a serial number and I think it
may be useful later.
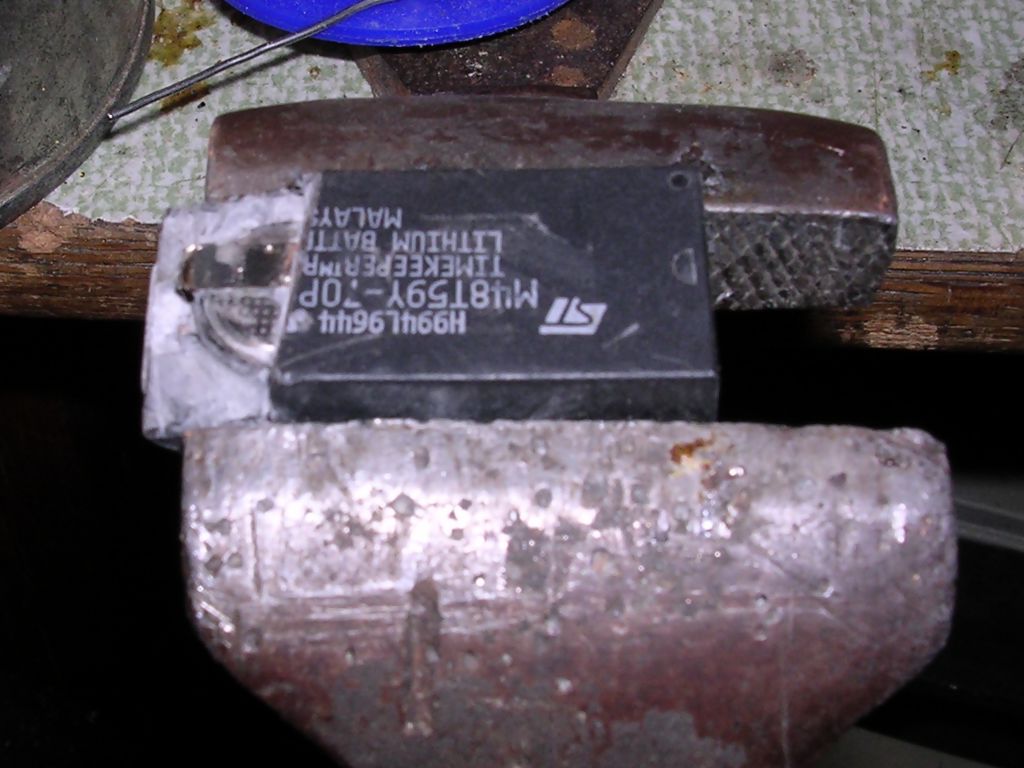
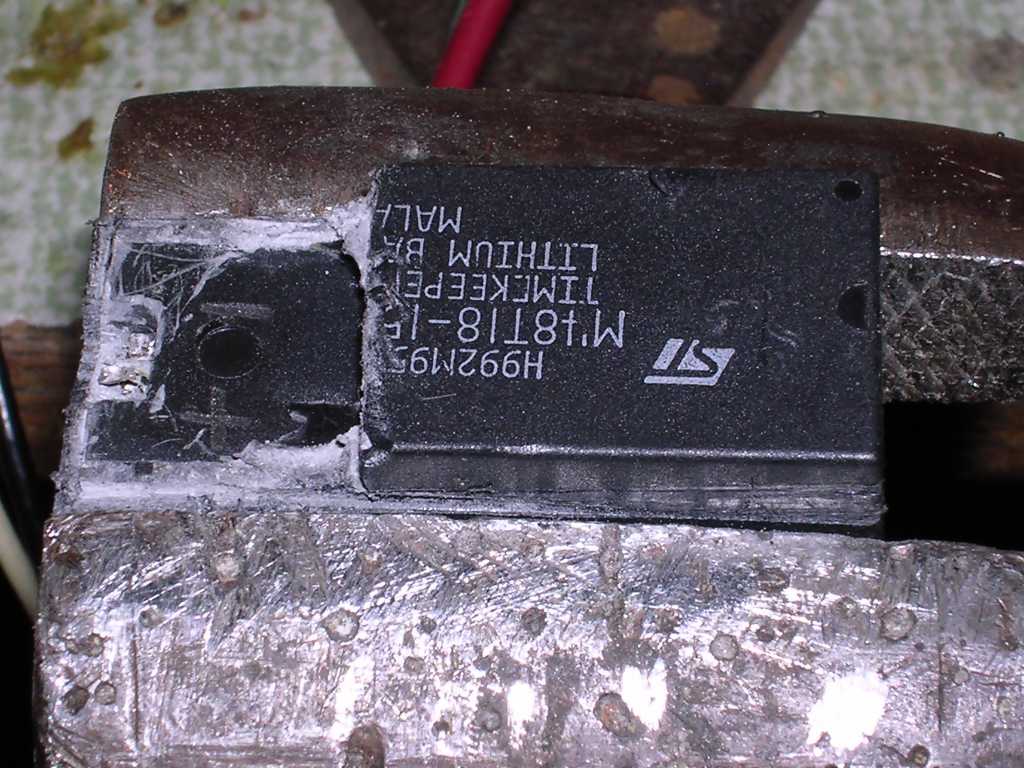
Now fix the chip to make machining easier. Do not bend
pins. This chip is manufactured by filling the outer shell with liquid
polymer. So the first step is to remove the part of the shell. See the
image below for exact battery and connections location:
Generally, you have to remove the rightmost part to expose battery
connectors. Cut the shell with saw and pry it off. You should get a
layer of gray polymer, it is easily machineable. Go through it using
file or small screwdriver until you find a battery. Now machine around
it to clear connections.
Carefully cut the upper connection and bend it towards the outer part of
chip (opposite to pin 1). Now machine around + and do the same thing.
They are ICs pins bent upwards, so they are easily solderable. Solder
wires and protect them using hot glue.
[UPDATE 2016-09]
It is possible to do it a bit quicker by cutting the circuit around the half of battery and then prying out the plastic part. However you may destroy battery connectors by excessive force acting under them. Two last photos show the procedure in which the leaking battery has been completely removed this way. Then it was needed to drill in softer plastic to get to connectors. The silicon chip is harder but has a cut on a side (larger than "Pin 1" notch in typical DIP package) through which battery connections are running, so it was needed to remove plastic from this part.
Here are few photos from actual process:


http://www.unixguide.net/sun/manager/9.1.shtml - Which SunOS /
Solaris version for which Sun model?/
http://docs.oracle.com/cd/E19620-01/805-4456/6j47kbnh9/index.html
- Flash BIOS update and recovery if update gone wrong.
http://download.oracle.com/docs/cd/E19127-01/ultra1.ws/802-3816-10/802-3816-10.pdf
- Ultra1 series Manual.
http://download.oracle.com/docs/cd/E19127-01/ultra1.ws/802-3819-10/802-3819-10.pdf
- Ultra1 series Service manual