
Colour Test Card Generator
The Test Card Generator programming software has the normal features which make
up the modern Windows™ interface: a title bar,
a set of drop-down menus, an editing pane
and a status bar. You can move its window wherever you like on
your Windows™ desktop, but you cannot re-size or maximise it..
When run, the software initially loads a default image and a default set of teletext pages.
You can configure these defaults using the Options menu selection.

The title bar contains the name of the application (TCGEN), the version number,
a minimise button, a (disabled) maximise button
and a close button. If an image and teletext pages have been loaded,
their filenames are also displayed. If you right-click in the title bar you will get a
context menu containing the Move, Minimize and Close items.
If you close the window (by clicking on the close button, selecting Close from the
right-click menu or using the keyboard shortcut Alt-F4) you will be prompted to save the
current teletext pages if any changes have been made.

The menu bar contains the drop-down menus
File, Edit, View,
Generator and Help. These menus
may be activated by clicking on the appropriate menu name or by using a
keyboard shortcut (hold down Alt and press the key corresponding to the underlined
character). If any of the menu items are unavailable, they will be 'greyed out' and
clicking on them will have no effect.

When a menu item is highlighted, the status bar displays a brief description of
the function of that command. Otherwise, the status bar is split into three regions:
a message region,
a status region and
an information region.
The message region displays "Please wait..." when the
program is busy and will not respond to user input.
The status region displays the status of the current operation, if any:
- When an image is being loaded it displays the name of the image file.
- When a time-consuming task is in progress (for example erasing
or programming the generator) it displays a progress bar.
- When a teletext page is displayed it gives instructions on graphics editing
When an image is displayed, the information region shows the Red, Green and Blue
values of the pixel pointed at by the mouse.
Note that the values use the Rec.601 coding range where 16 corresponds to black and 235 to peak white.
When a text page is displayed the information region shows the
ASCII code of the character at the text cursor (caret) position.
The file menu is concerned with loading, saving and printing the test card (or other) image
and the teletext pages. The file
menu can be accessed by clicking on its name in the menu bar
or by means of the keyboard short-cut Alt-F.
The Load image command loads the image you want to program into the Colour Test Card Generator.
It will accept files in raw YUV format, in BMP (Windows bitmap) format, in JPEG (.JPG) format or in GIF format.
In the case of the BMP, JPEG and GIF formats the image is assumed to have square pixels, and will be scaled to
fill the television frame (if the image shape isn't 4x3 it will be centred and cropped as necessary).
In the case of the YUV format the image is assumed to correspond to the Rec.601 standard.
If you are designing your own graphics specially for the Colour Test Card Generator it is probably best
to create an image with dimensions 624 x 468. This will ensure that no horizontal scaling is required and
therefore give the highest quality results.
The command calls up the Open File dialogue box:

Image names shown with a web-browser icon are links to files on the internet. When selected they
will be downloaded automatically; if you use a dial-up internet service you will be prompted to make a
connection.
The Load teletext command loads the required teletext page or pages.
It will accept either a file containing a single page (.VID) or a carousel file
containing all four pages (.CAR). If a single page is loaded it replaces the page
currently displayed; if a carousel file is loaded it replaces all four pages.
The Save teletext command saves the four teletext pages as a carousel file.
The filename used is the same as that from which the pages were loaded (i.e. the contents
of the file are replaced). If the pages were not loaded from a carousel file (i.e. they were typed in,
imported via the clipboard or loaded individually), the Save command will display
the Save As dialogue box so you can enter the desired filename.
If the current teletext pages are unchanged, so don't need to be saved, the Save command is
inhibited.
The Save teletext as command saves the four teletext pages as a carousel file.
You are prompted to select a file name; the .CAR extension will be automatically added.
Use Save As rather than Save if you need to change the disk, directory (folder),
or filename to something different from their current values.
The Print Setup command allows you to do the following:
- Select the printer to use.
- Set the printer's properties (for example paper type and printing quality).
- Set the paper size and orientation (portrait or landscape).
These affect subsequent uses of the Print image and
Print teletext commands.
The Print image command prints out the current image.
Best results will be obtained with a 'photo quality' colour printer.
The Print teletext command prints out the four teletext pages.
The Exit command quits from Test Card Generator and
closes its window. If the current teletext pages in memory have not been
saved, you are first prompted to save them.

The edit menu is concerned with editing the current teletext pages.
The edit menu can be
accessed by clicking on its name in the menu bar
or by means of the keyboard short-cut Alt-E.
The Cut command transfers any selected text to the clipboard, and
deletes it from the teletext page. If no text is selected, the Cut command is inhibited.
Once the selected text is in the clipboard, you can Paste
it either elsewhere in a teletext page or into any other application which
supports pasting of text from the clipboard. Any previous contents of the clipboard
are discarded.
Selected text is highlighted in reverse-video. You can select text in the following ways:
- Holding down the left mouse button and 'dragging' it selects a block of text.
Dragging the mouse horizontally selects part or all of a line. Dragging the mouse
vertically selects a block of lines (only entire lines may be selected).
- Holding down the Shift key and moving the cursor with the arrow (or other
cursor-movement) keys selects
a block of text. Moving the cursor horizontally selects part or all of a line. Moving the
cursor vertically selects a block of lines (only entire lines may be selected).
- The Select all command selects the entire page.
Once a block of text has been selected, you can alter the selection by holding
down Shift and moving the cursor. If you want to change the start point of a selection,
make the initial selection from right to left or from bottom to top. If you want to change the end point of a selection, make the initial selection from left to right or from top to bottom.
The Copy command transfers any selected text to the clipboard,
but unlike Cut it leaves the teletext page unchanged.
If no text is selected, the Copy command is inhibited.
Once the selected text is in the clipboard, you can Paste
it either elsewhere in a teletext page or into any other application which
supports pasting of text from the clipboard. Any previous contents of the clipboard
are discarded.
See Cut for details of how text may be selected.
The Paste command inserts the contents of the clipboard into
the teletext page at the current position of the text cursor (caret).
If the clipboard contains no text, the Paste command is inhibited. You
can use Paste to transfer a block of text from elsewhere in a teletext page,
or to insert a block of text which has been placed in the
clipboard by any other application.
Note that the paste operation may cause some of the existing contents
to be pushed off the right or bottom of the page. In this case they are lost.
The Delete command deletes any selected text, without copying
it into the clipboard. See Cut for details of how
text may be selected. The delete command has an identical effect to
pressing the Delete key on the keyboard. Text which is deleted can only
be recovered by reloading the teletext pages from a file.
The Select All command selects the entire teletext page. It
is useful if you want to transfer the page into another application
(e.g. a word processor) via the clipboard.
The Text colours menu lists the possible text colours. Clicking on the menu item
or pressing the specified function key selects the appropriate colour of text:
The Graphics colours menu lists the possible graphics colours. Clicking on the menu item
or pressing the specified function key selects the appropriate colour of graphics:
The Special modes menu lists the special display modes. Clicking on the menu item
or pressing the specified function key selects the appropriate mode:
For details of these modes see the Teletext Codes section.
The View menu is used to select what is displayed: the test card image or one of the four teletext pages.
It also controls special display modes useful when editing teletext pages.
The view menu can be accessed by clicking on its name in the
menu bar or by means of the keyboard short-cut Alt-V.
The Image command displays the current test card (or other) image.
The Page 100 command displays the first teletext page (usually the index page).
This page corresponds with the red fastext button on your TV remote control.
The Page 200 command displays the second teletext page. This page
corresponds with the green fastext button on your TV remote control.
The Page 300 command displays the third teletext page. This page
corresponds with the yellow fastext button on your TV remote control.
The Page 400 command displays the fourth teletext page. This page
corresponds with the blue fastext button on your TV remote control.
The Show codes command alternates between the normal teletext page display
and a mode in which the control codes are shown as two-letter mnemonics rather than being acted upon.
The mnemonics are as follows:
| NU | NUL* |
DL | DLE* |
| AR | Alpha red |
GR | Graphics red |
| AG | Alpha green |
GG | Graphics green |
| AY | Alpha yellow |
GY | Graphics yellow |
| AB | Alpha blue |
GB | Graphics blue |
| AM | Alpha magenta |
GM | Graphics magenta |
| AC | Alpha cyan |
GC | Graphics cyan |
| AW | Alpha white |
CW | Graphics white |
| FL | Flash |
CD | Conceal display |
| ST | Steady |
CG | Contiguous graphics |
| EB | End box |
SG | Separated graphics |
| SB | Start box |
EC | ESC* |
| NH | Normal height |
BB | Black background |
| DH | Double height |
NB | New background |
| SO | SO* |
HG | Hold graphics |
| SI | SI* |
RG | Release graphics |
*These control characters are reserved for compatibility with other data codes. They should not normally
appear in a teletext page.
The Reveal command alternates between concealing and revealing any parts of the page
affected by a Conceal display control code.
The Generator menu is concerned with the programming of the hardware
Colour Test Card Generator. It can be accessed by clicking on its name in the
menu bar or by means of the keyboard short-cut Alt-G.
The Check command tests the connection to the generator, including the PC's serial port,
the cable and the generator itself.
The Erase command erases the current contents of the generator. This takes approximately
thirty seconds.
The Program command programs the current image, teletext pages etc. into the generator.
It automatically performs the Check and Erase
operations before starting the programming, which takes approximately six minutes.
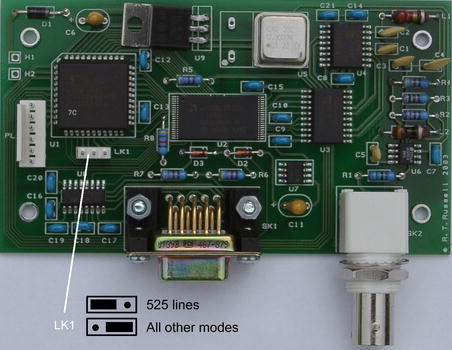
If you have selected the 525-lines standard a message will be displayed reminding you that for
operation in this mode an internal link must be changed. To do this disconnect the power supply
from the generator and remove the four fixing screws (accessible from underneath). Carefully
separate the top and bottom of the case, noting that they will still be joined by the power
connections. For operation at 525 lines set link LK1 to the left position (as viewed with the
connectors towards you, as per the illustration below); for operation at 180, 405, 441, 625 or 819
lines set link LK1 to the right position. Reassemble the case, taking extreme care not to
trap or damage the power connections. Fit the fixing screws and reconnect the power supply.
The Program from file command programs the generator from a ROM data file rather
than from the currently loaded image and teletext pages. This allows the generator to be used
for specialised purposes, such as to generate non-standard signals or animated patterns.
The Options command opens a dialogue box which allows you to set various options
controlling what gets programmed into the generator, and to determine the default test card
and teletext pages which are initially loaded.
The various options are as follows:
- The serial port used for connection to the generator can be selected to COM1, COM2, COM3 or COM4.
- The television line standard can be selected as 625, 405, 441, 819, 180 or 525 lines.
- The colour encoding can be selected as monochrome, PAL (625 lines), NTSC (405 and 525 lines),
PAL-N (625 lines), PAL-M (525 lines) or NTSC-4.43 (525 lines).
- The various vertical-interval signals (teletext, insertion test signals, widescreen signalling) can be
enabled or disabled. In the case of teletext, the fastext labels can be specified. In the case of
the widescreen signalling, the signalled aspect-ratio can be chosen; the alternatives are:
| 12F12 | A 4:3 image filling the raster |
| 14L12 | A 14:9 image letterboxed within a 4:3 raster |
| 16L12 | A 16:9 image letterboxed within a 4:3 raster |
| 16F16 | An anamorphic 16:9 image filling the raster |
- The default image and teletext pages, which are loaded automatically when the software is run,
can be selected.
The help menu gives access to the Colour Test Card Generator
documentation, provides links to information via email or from the R.T.Russell website,
and displays version information.
The help menu can be accessed by clicking on its name in the
menu bar or by means of the keyboard short-cut Alt-H.
The Help Topics command calls up the main help window, from
which you can browse or search the online Colour Test Card Generator
documentation.
The Email command calls up your default mail program (if any) so
that you can send a message to request help or information about the Colour Test Card Generator.
The Website command calls up your default web browser (if any)
and automatically directs it to the R.T.Russell home page.
The About command displays the version number of the Test Card
Generator programming software.
The editing pane is where the current test card image or a teletext page
(if any) is displayed for viewing or (in the case of a teletext page only) for editing.
When a teletext page is displayed the following operations are available using the keyboard:
| Key | Operation |
|---|
| Insert |
Toggle between insert and overtype mode. In overtype mode
any character typed will over-write the existing character at that position on the line.
In insert mode any character typed will 'push' the rest of the line to the right
to make room. The insert/overtype status is indicated by the shape of the text cursor
(caret): in overtype mode it is an underline and in insert mode it is a solid block.
|
| Delete |
If any text is selected (highlighted) this key has an identical effect to the
Delete command: the selected text is deleted, without being copied to the
clipboard. Otherwise, the character to the immediate right of the cursor
(caret) is deleted and the rest of the line is moved left to fill the gap. |
| Home |
Move the cursor (caret) to the start of the current line. |
| Ctrl/Home |
Move the cursor (caret) to the start of the top line. |
| End |
Move the cursor (caret) to the end of the current line. |
| Ctrl/End |
Move the cursor (caret) to the start of the bottom line. |
| Page Up |
Display the previous teletext page. If page 100 is displayed, Page Up has no effect. |
| Page Down |
Display the next teletext page. If page 400 is displayed, Page Down has no effect. |
 |
Move the cursor (caret) one character to the left, wrapping to the end of the previous
line as required. If Shift is held down, select (or de-select) a character.
If the cursor is already at the beginning of the page, the key has no effect. |
 |
Move the cursor (caret) one character to the right, wrapping to the beginning of the
next line as required. If Shift is held down, select (or de-select) a character.
If the cursor is already at the end of the page, the key has no effect. |
 |
Move the cursor (caret) up one line.
If Shift is held down, select (or de-select) a line. If the cursor is
already on the top line, the key has no effect. |
 |
Move the cursor (caret) down one line.
If Shift is held down, select (or de-select) a line. If the cursor is
already on the bottom line, the key has no effect. |
| Backspace |
Delete the character immediately to the left of the cursor (caret), and
move the cursor left one position. The rest of the line, to the
right of the cursor, is moved left to fill the gap. If the cursor is at the beginning
of a line, concatenate the contents of the present line onto the end of the previous line. |
| Return (Enter) |
Insert a 'new line' at the current position of the cursor (caret).
Everything to the right of the cursor will be moved onto the next line,
and the rest of the page is moved down one line to make space (causing the
bottom line to be lost). By this means you can split an existing line into two or more lines. |
| Esc |
This has the same effect as the Show codes menu option. |
| Tab |
This has the same effect as the Reveal menu option. |
The 'printing' keys (letters, numbers and symbols) and function keys cause the appropriate
character or control code to be entered at the position of the cursor (caret), and the cursor
is then moved right by one position. If anything is selected (highlighted)
when the key is pressed, it is first deleted. See the Teletext Codes
section for the effects of control codes.
When a teletext page is displayed the following operations are available using the mouse:
| Action | Operation |
|---|
| Left click |
Clicking in the editing pane with the left mouse button causes the text
cursor (caret) to be moved to the character position nearest to the mouse pointer.
If Shift is held down, the region between the previous position of the text
cursor and the new position will be selected. |
| Left drag |
Holding down the left mouse button and 'dragging' the mouse pointer
over the program displayed in the editing pane causes a section of text
to be selected. Dragging the mouse horizontally selects part or all of a line;
dragging the mouse vertically selects a block of lines (only entire lines may
be selected). |
| Right click |
Clicking in the editing pane with the right mouse button causes the
Edit Menu to be displayed at that position.
|
| Ctrl+left button |
Holding down the Ctrl key and pressing the left mouse button causes the
graphics sixel at that position to be 'lit' (assuming that a
graphics mode has been selected).
By holding down the left button you can draw with the mouse.
|
| Ctrl+right button |
Holding down the Ctrl key and pressing the right mouse button causes the
graphics sixel at that position to be 'unlit' (assuming that a
graphics mode has been selected).
By holding down the right mouse button you can erase with the mouse.
|

 ©
Richard Russell 2005
©
Richard Russell 2005