[1.買った]→[2.動いた] [English Note 1, Note 2]
[2020年07月06日]
ジャンク・カッターを、買った
 今まで、私が持っている中・小型の電動工具といえば、「電動ドリル」や「リュータ」しかなかったが、(私の体力低下を補う意味で、)少しづつ電動工具を増やして行こうと思っている。(しかし、これらと付き合うと、余計に体力を消耗させられるような気がする)
先日買った「卓上グラインダSKG-9」は、まずますの良い買い物だった。
だが、その前に買ったものは、失敗だった。
今回のも、私の狙いが外れて、失敗!
買ったのは、ACコードが切断された「Rurytwin90」(総費用¥2,700送料込み)で、ジャンク工具にしては、高価な方だ。
てっきり、可動品を一斉処分するために、ACコード切断だけで放出したのではないか?という“私の甘い観測”で、買ったのだが、どうやら、それは、やはり甘過ぎたようだ。
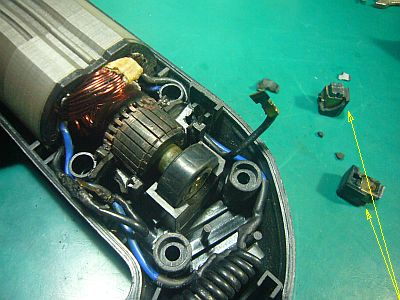
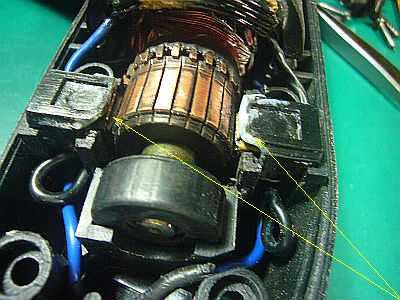
調べたら、中の心臓部・ブラシ接点部周辺が高温度で熔けて盛り上がっていた。
「カーボン・ブラシ」も、完全に擦り減っていて、接触不良になってしまっているように見える。
それに、モータの片側の巻き線の色が黒くなってしまっている。(図2<クリック>)
巻き線の抵抗は、両方ともおよそ10.3Ωほどだ。これは、一応、まだ死んではいないとしておこう。
その他の部分を、私が修復可能かどうか、もう少し丁寧に調べてみたい。
−−−−−−−−−−−−−−−−−−−−−−−−−

+++ コード切断だけ、ではなかった! +++
こうした不動品を狙う場合は、出来るだけ単純な原因のものを期待しているが、そうでないと、詳しい知識の持ち合わせが無いので、対処に困る。
今回は、外観に傷みが少ない感じから、そんなに酷い故障・不良ではないだろうと思った。
単に、ACコードの切断だけだろうと思ったのだが、そうは問屋は卸さなかった!
分解してみたら、「カーボン・ブラシ」は完全に擦り減ってしまっていた。
その結果、周辺部が溶け出していて、「ブラシ保持部」も「台座部」に固着していて、取り出す際に割れてしまった。(図3)
「ブラシ保持部」を支える「支持部」周辺の妙な盛り上がりも気になる。(図4<クリック>)
これなどは、丁寧に補修すれば、何とかなるかもしれない。
“黒化した巻き線”の方は、“レヤ・ショート”の怖れもあるのだが、他に打つ手は無いので、このまま進行!
課題は、“カーボンブラシ部”の修復だ。これに近い「カーボン・ブラシ」が見付ったので、発注しておいた。
兎に角、やれるところまで、やってみようと思う。
[2020年07月11日]
ジャンク・カッターが、動いた

当初、分解した時は、切断された「ACコード」を入れ替えれば済むと思っていたが、調べて行く内に、それだけではないことが分かって、修復の可能性が疑わしくなった。(図6<クリック>)
取り敢えず、これに近そうな「カーボン・ブラシ」を注文(2個¥1,320送料込み)し、受け取ってみて、それがこのマシンに全く合わないことが分かって、ほぼ“絶望感”に苛(さいな)まれた。
しかし、追挑戦!
最終的に、割って剥がした「ブラシ保持部」を「プラ・リペア」で小補修・整形し、旧品の「カーボン・ブラシ」を再利用することで、“接点部”を「準正常状態」に戻して、モーターが回転出来るようにした。
最後、一か八かで、全個所をビス止めした後、スイッチを入れたら、見事に、騒音・振動と共に、双刃が回転した!
やった!成功だ!(図5)
これで、プラスチック板を切ってみたが、問題無く切れた!
−−−−−−−−−−−−−−−−−−−−−−−−−
 +++ ブラシ、支持部は旧品を再利用 +++
最初、「ブラシ保持部」は融着していたので、無理矢理剥がしたら、其処此処が欠けてしまった。おまけに「台座部」側にも、剥がれた「ブラシ保持部」が残っていた。
この「ブラシ保持部」は、ブラシ交換の際に、簡単に抜き差し出来るはずなんだが、これは下回りが融着してしまっていたので、差し込んでもしっかり固定は出来ない状態だった。
それを、「プラ・リペア」で補填・成形して、安定して留められる状態にした。(図7)
また、「カーボン・ブラシ」は、後部の「押し出しバネ」がへたっていて、“これ以上は使えません状態”だったので、その「バネ」を無理矢理広げて、「ブラシ」を前に押し出せるようにした。
(多分、これで暫くは、保てるだろう)
「バネ」を広げている途中で、中の銅線が後ろの「導通板」から千切れて外れてしまったので、それを“半田付け”で修理。
(本来は、“溶接”すべきだろうが、そんな道具の手持ちは、当苑には無いのである)
「カーボン・ブラシ」には「金属角スリーブ」を被せて、電気伝導度を良くしているらしいのだが、それらを合体させて「ブラシ支持部」に装着した。(図8<クリック>)
そして、それらを、「台座部」に差し込むわけだが、その前に「ブラシ支持部」の後部に、本体からの「接続用舌片」を差し込んでおかねばならなかった。(「舌片」は黒太ビニール線で繋がれているが、取り回しはそれほど難しくない)
中の配線群も、通路を選べば、ちゃんと収まるようだ。
[English Note]
Junk Cutter purchased
 Up until now, there were only "electric drills" and "router" as small and medium-sized power tools I have, but I am thinking of gradually increasing the number of power tools (in the sense of compensating for my deterioration in physical strength. However, I feel that if I go out with them, I will be exhausting my physical strength).
The "Desktop grinder SKG-9" which I bought the other day was a good purchase.
But before that, What I bought was a failure.
This time too, I missed my aim and failed !
I bought the "Rurytwin90" (total cost \2,700 shipping included) of cut the AC cord (it's an expensive junk for me).
Perhaps it might have been saled only by AC cord cutting in order to dispose of all movable items at once.
I bought it with such "my sweet observation", but apparently it seemed that too sweet.
Upon examination, it was found that the heart area around the brush contact part has melted at a high temperature.
"Carbon brush" also had worn out, and it seems that the contact was poor.
Besides, the color of the winding on one side of the motor is black. (Fig_2 <click>)
The resistance of both windings is about 10.3Ω. Let's assume this isn't dead yet.
I would like to examine the other parts more carefully if I can repair them.
−−−−−−−−−−−−−−−−−−−−−−−−−

+++ It wasn't just the code cut ! +++
When aiming for such immovable items, I wish to expect the cause as simple as possible, but if not, (i have no detailed knowledge,) so it is difficult to deal with.
his time, I felt that the appearance was not damaged, so I thought it would not be such a serious failure or defect.
I thought it was just a disconnection of the AC code, but it didn't so !
When I disassembled it, the "Carbon brush" was completely worn out.
As a result, the peripheral part was melted out, and the "Brush holding part" was also fixed, and it cracked when taken out. (Fig_3)
I am also worried about the strange rise around the "supporting part" that supports the "brush holding part". (Fig_4 <click>)
Whether this can be repaired will depend on the availability of a "carbon brush".
I can't help thinking of making a broken "brush holder" with a "3D printer"(now vartual on me).
The "blackened winding" may be a "layer short", but there is no other way to hit it, so proceed as it is!
The challenge is to repair the “carbon brush part”.
I found a "carbon brush" close to this, so I ordered it.
Any way, I think I'll try it to the point where I can do it.
[English Note]
Junk Cutter works

Initially, when I disassembled it, I thought that it would be enough to replace the disconnected "AC code", but as I investigated it, I realized that it was not the only one, and I doubted the possibility of repairing it. (Fig_6 <click>)
For the time being, I ordered a "Carbon Brush" that looked like this (2 piece cost \1,320 shipping included) , received it, and found that it didn't suit my machine at all, and almost "despair".
I have a small dissapoint, but I'll try again !
Any way, the "brush holding part" that was split and peeled off was repaired and shaped with "Pla Repair", and reusing the old "carbon brush", the "contact part" was returned to "quasi-normal state".
Finally, with a gamble, after screwing all the points, turning on the switch, the twin blades splendidly rotated accompnied with noise and vibration!
Hooray! Success! (Fig_5)
I tried to cut the plastic plate, but it cut without problems !
−−−−−−−−−−−−−−−−−−−−−−−−−−−−−−−−−−−−−−−
 +++ Brush and support part reuse old product +++
At first, the "brush holder" was fused, so when I forcibly peeled it off, it was missing here and there.
In addition, the peeled "brush holder" remained on the "pedestal" side.
This "brush holder" should have been able to be easily inserted and removed at the time of brush replacement, but the lower part of the "brush holder" was fused, so even when it was inserted it could not be firmly fixed.
I supplemented and molded it with "Pla-repair" to make it stable. (Fig_7)
Also, "carbon brush" said "cannot be used anymore" because the "Pushing spring" at the rear is too compressed.
So I forcibly expanded the "spring" so that the "brush" could be pushed forward.
(Maybe, it will be able to keep it for a while)
While unfolding the "spring", the copper wire inside came off from the "conductive plate", so I repaired it by "soldering".
(Originally, "welding" should be done, but I do not have such a tool on hand.)
It seems that the "carbon brush" is covered with a "metal square sleeve" to improve the electrical conductivity, and I united them and attached to the "Brush support". (Fig_8 <click>)
Then, I would insert them into the "Pedestal part", but before that, I had to insert the "Connecting tongue" from the main body into the rear part of the "brush support part".
(The "contacting tongue" is connected by a thick black vinyl wire, but it is not so difficult to handle.)
The wiring group inside seems to fit properly if you choose the passage suitably.
 今まで、私が持っている中・小型の電動工具といえば、「電動ドリル」や「リュータ」しかなかったが、(私の体力低下を補う意味で、)少しづつ電動工具を増やして行こうと思っている。(しかし、これらと付き合うと、余計に体力を消耗させられるような気がする)

 +++ ブラシ、支持部は旧品を再利用 +++
 Up until now, there were only "electric drills" and "router" as small and medium-sized power tools I have, but I am thinking of gradually increasing the number of power tools (in the sense of compensating for my deterioration in physical strength. However, I feel that if I go out with them, I will be exhausting my physical strength).

 +++ Brush and support part reuse old product +++