Converting a TRS-80 Model 100 keyboard to
USB
(Last modified
3 Jul 2012)
Updated 3 Jul 2012. Added support for F9 through F12, using ALT
versions of the third group of function keys. This lets me use
programs such as mc (text-based file manager). I've updated the
.zip below; also added the .hex file to the .zip so you can burn the
object file into a Teensy++ 2.0 without having to rebuild. Also
added a copy of the comments in my source file showing the map between
the unusual M100 keys and their PC-101 counterparts.
Updated 13 Jun 2012. One more fix. The fix below removed
the tilde key; this fix restores it. This fix also tweaks the
debounce delay just a bit, making the keys a bit more solid. I've
updated the .zip below.
Updated 12 Jun 2012. Fixed a bug that appeared when I used the
M100 keyboard with my Raspberry Pi. Pressing the right-Alt key
(GRPH) sent spurious keystrokes to the RasPi, which messed up the nano
editor. I've updated the .zip below.
This project converts a TRS-80 Model 100 (M100) keyboard to USB.
My intent here is to use this converted keyboard on my Raspberry Pi
(RasPi). In fact, I want to replace the M100 logic board with the
RasPi board, leaving the M100 case as intact as possible, then adding
whatever connectors I need to bring the RasPi I/O to the rear panel.
I could have just plugged in an off-the-shelf USB keyboard, but chose
to do the conversion for several reasons. First of all, what fun
is it to just buy something? You spend a few bucks, take it home,
and you're done! What's the point? :-)
However, the stock M100 keyboard is a passive matrix design, nothing
but switches and diodes. This means the keyboard draws zero
current. Since my ultimate goal is to run the whole Ras-Pi Model
100 off of batteries, having a low-power USB keyboard is vital.
Additionally, I want to keep the TRS-80 case as original as possible,
and it would be tough for me to replace the existing keyboard with
something else that looked good. (This is more a mechanical
skills issue than anything else.)
Choosing the connectors
The first hurdle was choosing the right headers for the two keyboard
connectors. The keyboard connections are brought out on two
10-pin single-row female headers. The tricky part is the pins on
the logic board are round and very small diameter, far smaller than the
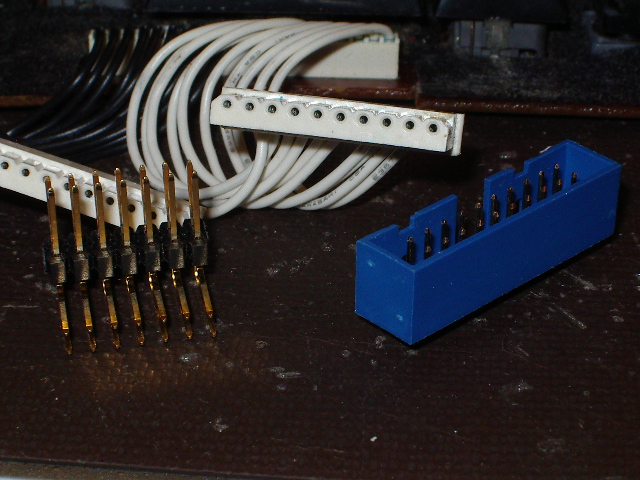
stock header pins you usually find on PCBs. Refer to the photo
below:

On the left, you can see the standard square-pin header commonly found
on PCBs. To the right, in the blue shroud, is a connector I found
in my junk box that has small-diameter pins suitable for use with the
M100 keyboard connector (the white block in the center).
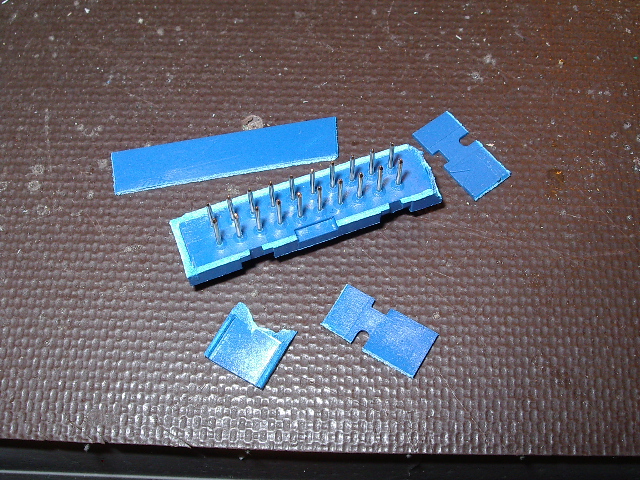
So I have a connector that sort of matches, but the shroud and the
extra-long pins inside the shroud means that the final assembly will be
too tall to fit in the case when I'm done. So I had to remove the
shroud, leaving only the pins and the connector substrate. At
least this is a mechanical task in my skill range! :-)

With the shroud gone from two connectors, I was ready to begin wiring
up the adapter. I was in a hurry so I grabbed the only
USB-capable development board I had, which is a Teensy++ 2.0. The
Teensy++ is total overkill for this project, but you go with what you
have...
Here is the schematic for the adapter
(PDF). As you can see, it is only connections between the Teensy
and the two keyboard connectors.
The connections to the keyboard matrix were based on the schematic in
the original TRS-80 Model 100 Technical Reference manual (available
on-line here).
Note
that
schematic
is
not
faithful to the key cap labeling on the
M100; it took some work with a DVM to trace out exactly what went where.
I wired up the adapter on a piece of perfboard, including a 40-pin DIP
socket for the Teensy++. Next up was the fun part, the
code. Please read through the comments in the code for some of
the low-level details I had to address. Weird stuff like
push-on/push-off CAPS LOCK and NUM LOCK keys had to be accomodated, and
there were some outright errors on the schematic. Here is the source code and a suitable makefile.
Rather than create an USB stack from scratch, I used the example
keyboard code from the PJRC website; here is a link to the
code I used as my foundation. I removed some unused timer code,
then defined registers for driving the port lines wired to the matrix
columns and registers for reading the port lines wired to the matrix
rows. I also added a table for mapping physical keys to given
rows and columns. I then added the special processing code for
converting the M100 key layout into something close to the PC-101
keyboard I'm typing this on.
Note that the M100 keyboard is missing some necessary keys and has
other keys arranged differently from a PC-101 keyboard. For
example, the M100 keyboard does not include keys for tilde, vertical
bar, backslash, or the curly-braces, all of which are pretty important
if you want to use your keyboard for programming. Additionally,
the M100 keyboard has both square-braces on the same key, unlike the
PC-101 keyboard, which has these characters on separate keys. I
corrected these issues in special-case code in my program. I also
provided features that are commonly used in everyday work, such as
HOME, END, PAGE-UP, and PAGE-DOWN functionality.
Because the PJRC code I started from consisted of C source and a
makefile, I didn't even need to create an AVRStudio project for this
effort. I simply opened up Visual Studio 2005, created a new
makefile project, and pointed VS2005's build, clean, and build-all
commands to the makefile. I did need to make a couple of minor
changes to the makefile, since I am using an AT90USB1286 device.
I finished the code, built it, then used the Teensy download app,
supplied by PJRC, to move my code into the Teensy++. When I
plugged my adapter's USB cable into the desktop PC, the PC enumerated
the new keyboard. Now I can type on either the M100 keyboard or
my P/S2 desktop keyboard, and the PC handles the characters properly.

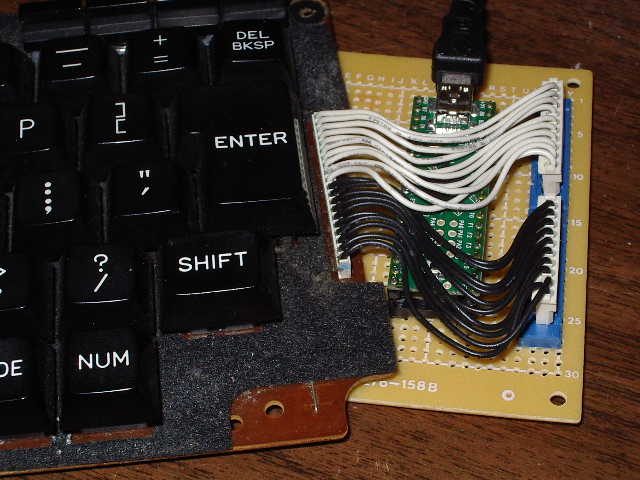
Here is the finished adapter wired to the M100 keyboard. You can
see the USB cable plugged into the top edge of the Teensy board.
Since the M100 keyboard has considerably fewer keys than a PC-101
keyboard, I had to map some key combinations on the M100 to get
important keys available on a PC-101 keyboard. The following
comments from my source file shows how to get the important but missing
PC-101 keys.
/*
* Map of M100 keys to
PC-101 keys (shows only unusual or M100-specific keys; see
modifyKeyPressForM100())
*
*
M100 key PC-101 key
*
----------------- ----------
*
BKSP
backspace
*
shift-BKSP delete
*
GRPH
left-ALT
*
CODE
right-ALT
*
CAPS LOCK Caps Lock
*
NUM
Num Lock
*
PASTE
{ (left curly-brace)
*
shift-PASTE } (right
curly-brace)
*
alt-PASTE F9
*
[
[ (left bracket)
*
shift-[ ]
(right bracket)
*
LABEL
\ (backslash)
*
shift-LABEL | (vertical bar)
*
alt-LABEL F10
*
alt-PRINT F11
*
PAUSE
` (back-tick in Forth)
*
shift-PAUSE ~ (tilde)
*
alt-PAUSE F12
*
shift- <-- Home
*
shift- --> End
*
shift- up-arrow Page Up
*
shift- dn-arrow Page Down
*/
This was a great project, and I'm happy with the resulting M100
functionality. Mind you, it won't replace the IBM Model M I'm
typing on right now, but it should certainly make the M100 suitable for
playing with the Raspberry Pi.
Home