(Last modified 27 Jun 2013)
The mbed is a neat device, but I wanted an interactive programming environment for my mbed and my KLBasic project wasn't cutting it; too much work, not enough payback. So I hit the web for alternatives and found eLua. Wow!
eLua is an embedded version of the Lua programming language; go here for the full details on Lua. Go here for the full details on eLua.
There are two ways to play with eLua. The simpler is to download a full binary image to your mbed, connect a terminal program to the mbed's serial port (through USB) and start typing. The more complex is to download the full development tree, including eLua sources, CodeSourcery compiler and linker, and a suitable IDE. This page will walk you through test-driving a full binary image. Setting up your development environment so you can rebuild eLua from source is much more complex. My other bare-metal mbed pages and pages on the eLua and mbed websites can help, but it is, unfortunately, no easy feat.
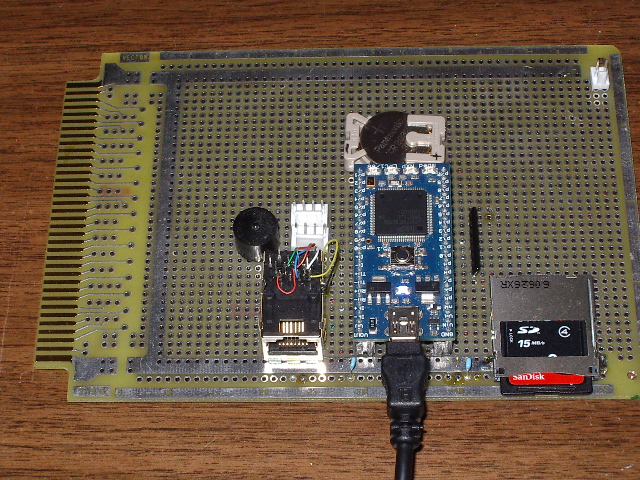
Before I get to the details, I should show you what my dev system looks like. Here is my mbed development platform:

In the lower-right, you can see an SD card connector I added, just for this project. Although the stock 0.9 eLua image for mbed doesn't support SD cards, I have a modified version (available below) that does. Having a few gigs of program storage on your eLua system is pretty sweet!
Test-driving eLua on Windows XP
If you haven't done so already, download the mbed USB serial driver (mbedWinSerial_16466.exe) from the mbed site. Run this .exe to install the serial driver. You will get several warnings about unsigned installations; just click Continue in each case.
Connect your mbed board to the PC. You should see a new removable disk drive (E: in my case) in your Explorer. The device manager should also show a new serial port, named mbed serial port (COM3 in my case).
Open a terminal program (I'll use HyperTerm) and create a connection to the mbed serial port. Configure your connection for 115200 baud, 8N1.
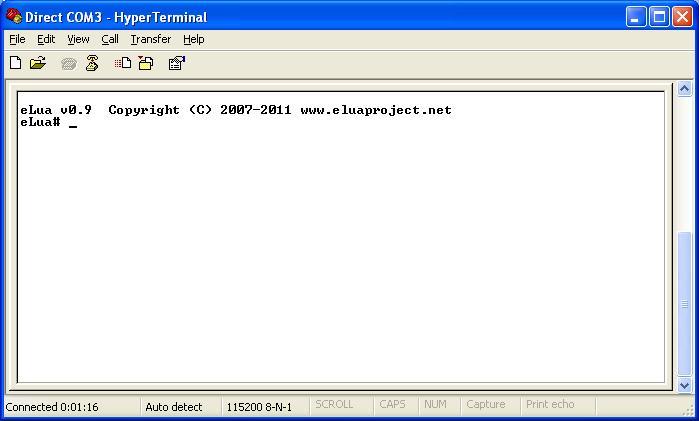
Go to the eLua page of binary images and grab the latest mbed eLua image (I'll use the 0.9 image, elua0.9_lua_lpc1768.bin). Drag this binary image onto your mbed removable disk drive. Press the mbed's reset button. After the blue LED stops flashing, you should see the eLua start screen on your terminal program:

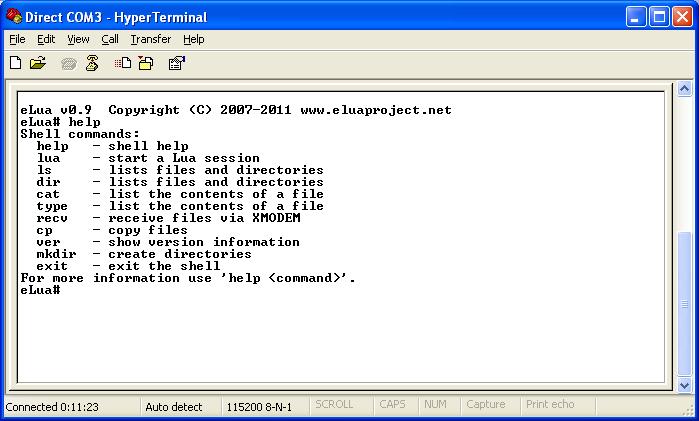
This is the eLua shell, a very simple set of commands for working with system resources. Type 'help' (no quotes) to see the available commands:

Using the stock eLua binary, your mbed has two drives. There is a small, read-only drive called /rom, which holds selected files placed during the build process; this drive is empty on the stock eLua binary image.
There is also a small, read/write drive called /semi. This drive is unique to the mbed board and uses the off-chip flash storage provided by the mbed developers. This is the same drive that you see in your Windows Explorer window on your desktop. This is also your gateway into working with eLua.
Open a text editor (I will use Wordpad set for text-only). Copy and paste the following text into your editor and save the resulting file to your PC hard drive as blinky.lua:
-- blinky.lua
-- blink LED1 on the mbed board
-- press any key to end this program
led = mbed.pio.LED1
pio.pin.setdir(pio.OUTPUT, led)
print ""
print "Press any key to exit program..."
while (term.getchar(term.NOWAIT) == -1) do
pio.pin.sethigh(led)
tmr.delay(0, 500000) -- delay is in usecs
pio.pin.setlow(led)
tmr.delay(0, 500000)
end
Drag this text file onto the mbed drive on your desktop. Go to the terminal window and, at the eLua# prompt, enter:
lua /semi/blinky.lua
The shell will load the blinky.lua program from the /semi directory and launch the eLua program, running your script. Watch the LED blink for a while, then press any key on the terminal keyboard to end the program and return to the eLua shell.
Things to change
The blinky.lua program gives you a taste of eLua. The web has several pages on using eLua and on examples of eLua programs you can load into your mbed. And because eLua is built on the Lua language origiinally, many of the powerful features of Lua are carred across and available to you on the mbed hardware. For example, Lua supports some powerful string and file processing capabilities, using tables and io functions. These tools are also available in eLua, which simplifies tasks such as writing text editors or text-based games.
But eLua is still a work in progress. For example, there are hooks built into the eLua source for adding an SD card to your hardware through SPI. Unfortunately, the 0.9 release of eLua for the mbed does not support this addition. Also, eLua looks for a file named autorun.lua on reset and will launch that program immediately, allowing you to do turnkey projects. This is a great feature, but the 0.9 version of eLua looks for this file only in the /rom directory, and the only way to put a file in the /rom directory involves rebuilding all of eLua; not beginner-friendly at all.
I've fixed some of these issues by modifying the 0.9 eLua source files and building a custom version for mbed. You can grab my custom binary image here. This modified version of eLua for mbed contains the following changes/mods:
- Support for SD flash card; files on the SD card appear in the
directory /mmc.
- /rom contains a prebuilt autorun.lua that provides an easy hook for adding your own, additional autorun.lua.
- Shell can launch an eLua script based only on the file name (.lua extension assumed); the script must be in the base directory of a memory device.
Add an SD card
To use an SD card with my binary image, connect your SD card to the mbed using these connections:
- SD card pin 1 (CS) to mbed pin P14
- SD card pin 2 (DI) to mbed pin P11
- SD card pin 3 and pin 6 (VSS) to mbed pin P1
- SD card pin 4 (VDD) to mbed pin P40
- SD card pin 5 (SCLK) to mbed pin P13
- SD card pin 7 (DO) to mbed pin P12
Using an autorun.lua file
My modified image contains one file in the /rom directory, which is listed here for reference:
-- /rom/autorun.lua
-- modify to run a file on reset
basefile = "/autorun.lua"
runfile = "/mmc" .. basefile
f = io.open(runfile)
if (f ~= nil) then
f:close()
dofile (runfile)
else
runfile = "/semi" .. basefile
f = io.open(runfile)
if (f ~= nil) then
f:close()
dofile (runfile)
end
end
This file is run automatically by the shell following reset. This script searches first the directory /mmc (if it iexists) and then the directory /semi. If in either case it finds a file named autorun.lua, the script loads and runs that file, then immediately exits to the eLua shell. This lets you develop an autorun.lua script on your SD card, then move it to the /semi directory (if you choose) after the file is solid.
Note that the way the /rom autorun.lua file is designed gives you a chance to recover, should you manage to create an autorun.lua script that locks up your system. If the bad script is on the SD card, just remove the SD card, delete the bad script using your PC, then replace the SD card and reboot. If the bad script is in the /semi directory, just use your PC to put a dummy autorun.lua script on your SD card, then replace the SD card and reboot. Both of these steps will get you to an eLua shell prompt, where you can do any additional fixes you might need.
To test out the autorun feature, use your PC editor to create a file on the SD card named autorun.lua. Put the following text in the file:
print "This is my autorun.lua script!"
Copy this file to the SD card. Turn off power to the mbed board, install the SD card, and power up the mbed board. On the terminal, you should see the above text showing that eLua found and ran your autorun.lua script.
Quick-launch of eLua scripts
In the original 0.9 eLua image, you had to use a shell command, complete with script file path and extension, to launch an eLua script. For example, if you wanted to run the autorun.lua script shown immediately above, you would have to type:
eLua# lua /mmc/autorun.lua
My modified image adds a feature to the shell so it first scans the root folder of all memory devices, looking for a selected file with an extension of .lua. Only if this search fails does the shell then check if the command you entered is a valid shell command. This means you can launch the above autorun.lua script from the shell prompt by typing:
eLua# autorun
Note that the search path is maintained by the diskio system inside eLua and I don't have control over the search order. To be safe, make sure that there is only one <file>.lua script in the entire search path (root folder of all memory devices).
This auto-search feature lets you do some cool stuff with eLua. For example, I wanted a shell command to clear the screen, like the old DOS cls command. With the auto-search mod in place, this is easy. Create a file named cls.lua and add the following text:
term.clrscr()
Done! To clear the screen from the shell prompt, type:
eLua# cls
Now you can add your own eLua shell commands, written in eLua.
A simple text editor
I still have to go to the PC to edit my eLua scripts. This is OK, since most of the editors I use have lots of features and simplify the editing. But I would like to have an editor right on the mbed, for quick jobs and for (eventually) using the mbed standalone with a PS/2 keyboard and Gameduino VGA display.
There is a version of the Linux text editor (ed) available on one of the eLua developer's git pages, but that version takes more memory than I have on my mbed. So I set out to write my own text editor in eLua, partly to get the editor and partly to learn more about eLua. Here is my text editor, written in eLua. It weighs in at 330 lines and 8.5 KB of source code:
lines = {}
CMD_QUIT = string.byte('q')
CMD_OPEN = string.byte('o')
CMD_GOTO = string.byte('g')
CMD_INSERT = string.byte('i')
CHAR_CTRL_Z = 268 -- ctrl-Z
CMD_WRITE = string.byte('w')
CMD_DELETE = string.byte('d')
CMD_TOP = string.byte('t')
CMD_BOTTOM = string.byte('b')
CMD_NEXT = string.byte('n')
CMD_PREVIOUS = string.byte('p')
CMD_APPEND = string.byte('a')
CMD_HELP = string.byte('?')
CMD_REPLACE = string.byte('r')
CMD_YES = string.byte('y')
CMD_NO = string.byte('n')
local prevstatusmsg = ""
--LINES_IN_DISPLAY = term.getlines()
LINES_IN_DISPLAY = 22
LINE_ERROR_DISPLAY = LINES_IN_DISPLAY+2
LINE_STATUS = LINES_IN_DISPLAY+1
LINE_CMD = LINES_IN_DISPLAY+2
LINE_ENDING = "\r\n"
function ShowHelp()
term.clrscr()
print("Legal commands:")
print(" " .. string.char(CMD_HELP) .. " show this help screen")
print()
print(" " .. string.char(CMD_OPEN) .. " open a file for editing")
print(" " .. string.char(CMD_WRITE) .. " write text to a file")
print(" " .. string.char(CMD_QUIT) .. " exit editor, DOES NOT SAVE!")
print()
print(" " .. string.char(CMD_TOP) .. " display text at top of file")
print(" " .. string.char(CMD_BOTTOM) .. " display text at bottom of file")
print(" " .. string.char(CMD_NEXT) .. " display next block of text")
print(" " .. string.char(CMD_PREVIOUS) .. " display previous block of text")
print()
print(" " .. string.char(CMD_REPLACE) .. " replace selected line")
print(" " .. string.char(CMD_INSERT) .. " add new lines of text at selected line")
print(" " .. string.char(CMD_APPEND) .. " add new lines of text at end of file")
print(" " .. string.char(CMD_DELETE) .. " delete one or more lines of text")
print()
print(" " .. string.char(CMD_GOTO) .. " go to selected line")
print()
term.print(1, LINE_CMD, "Press Enter to continue: ")
repeat
c = term.getchar(term.WAIT)
until (c == term.KC_ENTER)
end
function ShowErrorAndWait(errmsg)
term.print(1, LINE_ERROR_DISPLAY, errmsg)
repeat
c = term.getchar(term.WAIT)
until (c == term.KC_ENTER)
end
function ShowStatus(statusmsg)
term.moveto(1, LINE_STATUS)
term.clreol()
if (statusmsg == nil) then
term.print(prevstatusmsg)
else
term.print(statusmsg)
prevstatusmsg = statusmsg
end
end
function LoadFile(filepath)
file = io.open(filepath)
if (file == nil) then
ShowErrorAndWait("Cannot open file: " .. filepath)
return
end
for line in file:lines() do
table.insert(lines, line)
end
file:close()
ShowStatus("File: " .. filepath)
filechanged = false
firstline = 1
end
function SaveFile(savepath)
file = io.open(savepath, "w")
if (file == nil) then
ShowErrorAndWait("Cannot write to file " .. savepath)
return
end
for i, l in ipairs(lines) do
file:write(l, LINE_ENDING)
end
file:flush()
file:close()
end
function DisplayFile(firstline)
term.clrscr()
for i, str in ipairs(lines) do
if (i >= firstline) then
term.print(1, i - firstline + 1, i .. ":" .. str)
if ((i - firstline + 1) == LINES_IN_DISPLAY) then
break
end
end
end
ShowStatus()
end
function GetCmd()
repeat
term.moveto(1, LINE_CMD)
term.clreol()
term.print("Cmd: ")
c = term.getchar(term.WAIT)
if (c == CMD_QUIT) then
term.moveto(1, LINE_CMD)
term.clreol()
if (filechanged == true) then
term.print("File has changed! Quit without saving? ")
repeat
c = term.getchar(term.WAIT)
if (c == CMD_YES) then
print(string.char(CMD_YES))
done = 1
return
end
until (c == CMD_NO)
else
done = 1
return
end
elseif (c == CMD_OPEN) then
term.moveto(1, LINE_CMD)
term.clreol()
term.print("File: ")
tfile = io.read("*l")
if ((tfile ~= nil) and (tfile ~= "")) then
lines = {}
LoadFile(tfile)
firstline = 1
end
DisplayFile(firstline)
elseif (c == CMD_GOTO) then
term.moveto(1, LINE_CMD)
term.clreol()
term.print("Line: ")
firstline = io.read("*n")
DisplayFile(firstline)
elseif (c == CMD_INSERT) then
if (lines.maxn() == 0) then
insertline = 1
else
term.moveto(1, LINE_CMD)
term.clreol()
term.print("Insert at line: ")
insertline = tonumber(io.read("*l"))
end
if (insertline ~= nil) then
firstline = insertline
repeat
term.moveto(1, LINE_CMD)
term.clreol()
term.print("At " .. insertline .. " Text (or ctrl-z): ")
text = io.read("*l")
if (text ~= nil) then
table.insert(lines, insertline, text)
insertline = insertline + 1
filechanged = true
end
DisplayFile(firstline)
until (text == nil)
end
DisplayFile(firstline)
elseif (c == CMD_WRITE) then
term.moveto(1, LINE_CMD)
term.clreol()
term.print("File to write: ")
savefile = io.read("*l")
if (savefile ~= nil) then
SaveFile(savefile)
filechanged = false
end
DisplayFile(firstline)
elseif (c == CMD_DELETE) then
if (table.maxn(lines) == 0) then
ShowErrorAndWait("File is empty!")
else
term.moveto(1, LINE_CMD)
term.clreol()
term.print("Line(s): ")
start, stop = io.read("*number", "*number")
if (start ~= nil) then
if (stop == nil) then
stop = start
end
max = table.maxn(lines)
if (start > max) then
ShowErrorAndWait("File only has " .. max .. " lines!")
else
for n = start, stop do
table.remove(lines, start)
filechanged = true
end
end
firstline = start
end
DisplayFile(firstline)
end
elseif (c == CMD_TOP) then
firstline = 1
DisplayFile(firstline)
elseif (c == CMD_BOTTOM) then
firstline = table.maxn(lines) - LINES_IN_DISPLAY + 1
if (firstline < 1) then firstline = 1 end
DisplayFile(firstline)
elseif (c == CMD_NEXT) then
firstline = firstline + LINES_IN_DISPLAY
if (firstline > table.maxn(lines)) then
firstline = table.maxn(lines) - LINES_IN_DISPLAY + 1
if (firstline < 1) then firstline = 1 end
end
DisplayFile(firstline)
elseif (c == CMD_PREVIOUS) then
firstline = firstline - LINES_IN_DISPLAY
if (firstline < 1) then firstline = 1 end
DisplayFile(firstline)
elseif (c == CMD_APPEND) then
repeat
term.moveto(1, LINE_CMD)
term.clreol()
term.print("Text (or ctrl-z): ")
text = io.read("*l")
if (text ~= nil) then
table.insert(lines, text)
filechanged = true
end
firstline = table.maxn(lines) - LINES_IN_DISPLAY + 1
if (firstline < 1) then firstline = 1 end
DisplayFile(firstline)
until (text == nil)
elseif (c == CMD_REPLACE) then
term.moveto(1, LINE_CMD)
term.clreol()
term.print("Line: ")
text = io.read("*l")
currline = tonumber(text)
if ((currline == nil) or (currline < 1)) then
elseif (currline > table.maxn(lines)) then
ShowErrorAndWait("No such line; file only has " .. table.maxn(lines) .. " lines.")
else
firstline = currline - (LINES_IN_DISPLAY /2)
if (firstline < 1) then firstline = 1 end
DisplayFile(firstline)
tmsg = prevstatusmsg
ShowStatus(currline .. ":" .. lines[currline])
term.moveto(1, LINE_CMD)
term.clreol()
term.print("New (or ctrl-z): ")
text = io.read("*l")
if (text ~= nil) then
lines[currline] = text
filechanged = true
end
end
DisplayFile(firstline)
ShowStatus(tmsg)
elseif (c == CMD_HELP) then
ShowHelp()
DisplayFile(firstline)
else
DisplayFile(1)
end
until (done == 1)
end
done = 0
if (#arg >= 1) then
LoadFile(arg[1])
end
DisplayFile(1)
GetCmd()
Yeah, I usually have a LOT more comments than this in my code. And those of you knowledgeable in Lua will, no doubt, find lots of issues with my code. But it's intended as a starting point and was great fun to write. Note that you will need to use an ANSI terminal window for this editor.
Unfortunately, although this program does load in my mbed, it takes up so much memory that I don't have enough room for large programs. For example, there is not enough room to edit the editor's source code.
But at least I can edit simpler programs, save them to the SD card, and run them, all from the mbed. I'll take it!
Final thoughts
I think I've found a new language, at least for target-based development. eLua is relatively small, screamingly fast, and amazingly powerful. The eLua dev team deserves a ton of cred for creating such a capable, smooth tool. I have had to dig into the eLua source (did I mention that the entire eLua system is written in C?) and the code I've seen is well-designed and easy to work with.
eLua has been ported to many different ARM boards; refer to the eLua website above for a list of target boards and devices available. Note that many of the targets, including the mbed, support Ethernet connections
Sorry for the long post, but this is, to me, a ground-breaking project. Time to go, I have a boat-load of embedded projects to get started on...
Home