![]()
![]()
![]()
![]()
![]()
![]()
![]()
![]()
![]()


All my content and ptohos

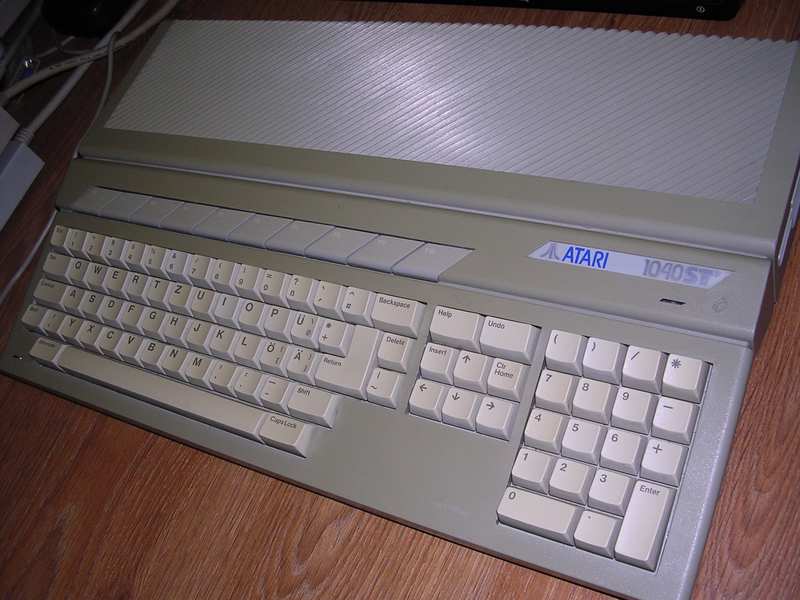
Atari 1040STf/520STm
This is a semi-professional grade 16-bit computer from
80s. It's CPU is MC68K at 8MHz, the same as first Apple Macintosh
computers. It has 1MB of RAM (512K in 520ST) and built-in floppy drive.
These machines were quite expensive for its time, but in Poland there
were some users. In first versions, the only instructions in ROM was
"Read OS from floppy disk", like in Amiga, but in later versions OS is
stored in ROM chips, so it runs automatically. Downfall of this solution
is that OS upgrade requires EPROM re-programming or booting from floppy.
Atari 1040 was known as good computer for making music because it had
MIDI interface built in. Characters after ST specifies type - F means
integrated floppy drive, M is for RF modulator.
| Manufacturer | Atari |
|
| Origin | U.S.A | |
| Year of unit | 1989 | |
| Year of introduction | 1986 | |
| End of production | 1993 | |
| CPU | Motorola MC 68000 | |
| Speed | 8MHz | |
| RAM | 1MB | |
| ROM | 192kB (TOS) or 32kB (Boot) | |
| Colors: | 512 | |
| Sound: | YM2149 chip, MIDI | |
| OS: | TOS in ROM or floppy. | |
| Display modes: | Text: 40/80x25
simulated Graphics: 320x200x16, 640x200x4, 640x400x2 (special monitor needed) |
|
|
520STm: |
||
|
|
||
| Media: |
Built-in 3.5" FDD (1040STf) External 3.5" FDD Optional external HDD. |
|
|
Power supply: |
||
|
Built-in switching power supply unit in 1040.
520ST: External power supply: |
||
| I/O: | Serial port (RS232) Centronics Hard disk port (dedicated, ACSI) Ext. floppy disk RGB Joystick, Mouse Cartridge expansion MIDI ports
|
|
| Possible upgrades: | Many upgrades and h/w mods. | |
|
Peripherals in collection: |
||
| Software accessibility: | Quite Easy (TOSEC, old, abandoned sites) |

My 1040 unit is a German one, with German keyboard and TOS. I don't have an original mouse and monitor for this computer, but TOS works quite well and it runs programs.
My 520ST is from United Kingdom and it has PAL UK modification for modulator. I don't have floppy disk drive for it, but pinout looks quite compatible with PC.
| Contents: | Starting | Repair | Making floppies | Mouse | Serial, FDD, parallel | Video connector | Links |
Starting:
After power-up it will display clear screen and will try to boot TOS from floppy. If it fails (no floppy in drive), it'll try to load TOS from ROM. Anyway, you should end with TOS loaded. It may probe the drive for a minute or longer, to make this time shorter you can format a blank floppy and place it in drive during power-up.
In most cases you can drive cursor by keyboard arrows and Alternate key.
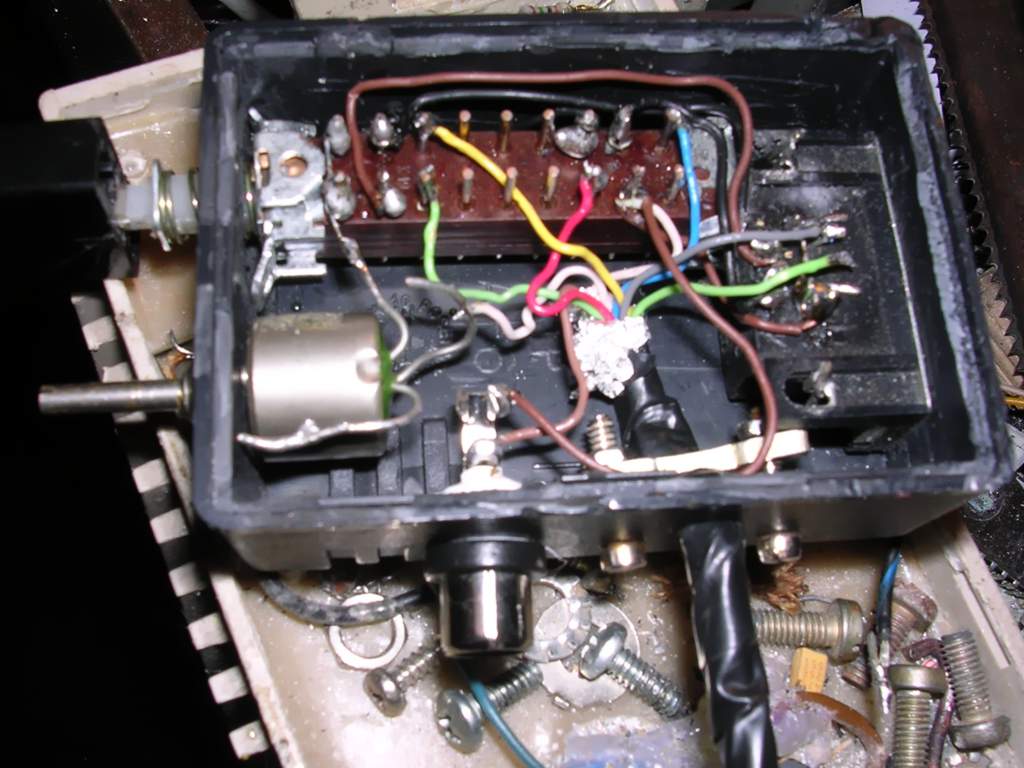
Repairing mouse/joystick connectors:
Atari ST has mouse/joystick ports in a strange place, making it difficult to plug and unplug connectors. After more than few years of plugging/unplugging these connectors may break off. If these ports don't work and moving or pushing connector makes it work for a moment - it's a problem with connector soldering.
To fix it, you must resolder connectors. It's good to
clean keyboard contacts too. Here's how to do it:
1. Remove screws from the bottom of Atari. Don't remove 3 screws keeping
floppy drive in place.
2. Remove upper cover by lifting its left side and sliding a bit to the
right, as it's kept by FDD on the right.
3. Carefully open keyboard upwards, disconnect it from mainboard.
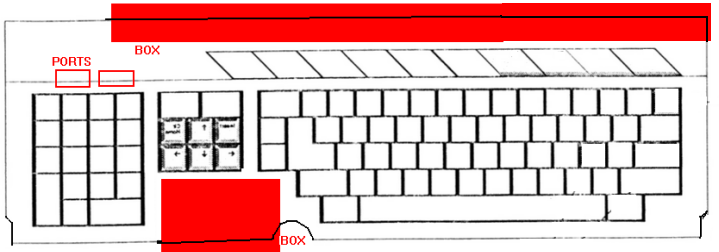
4. Find two boxes, at least 5cm (2in) high. Place the keyboard KEYS
FACING DOWN on these boxes so that none keys are pressed. Here's a
picture of this alignment (keyboard shown FROM THE REAR):
5. Remove keyboard from boxes, now remove all screws
from the back. Lots of smaller ones and two larger, holding mouse/joystick
ports with metal part. These screws behind transparent plastic cover
must be removed too. Carefully place the keyboard in boxes and pry the
printer circuit board out.
6. Do not open the board (PCB) in any direction because you may damage
LEDs. Just lift it vertically, and few centimeters above flip to the
other side. Some rubber pads will be on the PCB, some in plastic frame.
7. Take all rubber pads from PCB (don't touch inside of them!) and place
them into holes in frame. Missing one rubber pad? Return key has two
holes, but usually only one pad, doesn't matter in which hole. No key
must be pressed during this operation or the pad will fall out.
8. Having free PCB, you can repair solders of connectors. If any track
is torn from PCB, you have to use piece of wire formed in a loop in one
of its ends to replace missing track part. After correcting soldering
make sure (with ohmmeter) you haven't made any short circuits!
9. You can clean keyboard gold parts using cloth with denaturated
alcohol.
10. Carefully place the PCB back on the frame, vertically, aligning LEDs
first, small plastic alignment pins next. Replace all screws. Now you
can lift the frame from boxes and check aren't any keys stuck inside (if
there is - rubber pad is missing).
Making system floppies:
You can make system floppy disks with normal 3.5" floppy disk
drive in PC. However, there are two things you must know:
- Double density disks (DD, 720kB) which are working in Atari are
different than High Density (ND, 1.44MB) disks in PC. First thing you
need to do, is covering the hole opposite to write protection hole.
Second - is special formatting. In DOS/Windows 9x you just use:
FORMAT A: /F:720
but in WinXP:
FORMAT A: /t:80 /n:9
You'll get a blank floppy barely usable on ST.
Writing disk images is easier - you just use FloImg utility from
here.
So you'll end with disk, which may be or may be not readable by ST, but
writing to disks formatted in PC will be a problem. Why? HD drive writes
much stronger than DD, and DD may have problems with physically
overwriting magnetized places. To make floppy friendly to DD drives, you
have to totally neutralize magnetization of the HD floppy and re-format
it in Atari. Just use an AC coil the same way it's used to demagnetize
tape recorder heads or CRTs. You turn it on a few meters away from
floppies, move it slowly towards it, next de-magnetize by putting it
closer with circular moves. When finished (2 minutes will be more than
enough) turn it off but do it with coil few meters away disks. Now
they're ready to be re-formatted. WinXP may display some errors, but
Win98 works well.
Now about the disk images: There are usually a few games on one disk. These are called Menudisks, because they boot to menu which makes you able to choose game. These are of course illegal releases. Legal ones occupy just one disk (or two if game os bigger).
There are two popular ST disk images. just .st extension is a typical disk images, they can be started in emulator or written to floppy. STX image format is like G64 for Commodore 64 - it's not a dosk image, but exact recording of magnetic flux timings. Although it really can be useful while emulating copy-protected games, it cannot be normally written back to floppy.
Mouse
Here is brief description of mouse pinout. Connector is DB9 male on the computer:

| Mouse 1 -X axis B 2 -X axis A 3 -Y axis B 4 -Y axis A 5 - Middle button* 6 - Left button 7 - +5V DC 8 - GND 9 - Right button |
Joystick Up Down Left Right Reserved Fire +5V DC GND Not connected |
* - Not connected in ST.
As Amiga Mouse directly connected works, but in bizarre way, it's possible to make my universal mouse working with it.
Serial, FDD and parallel communication
The computer has 2a serial and parallel Centronics port.
Serial port is a standard one, with pinout described in Wikipedia
here, DB-25
female connector. The only difference is that pin 6 is not connected.
Centronics is also a standard port with Strobe, 8 data lines, Busy and
ground placed as in standard in female DB25.
(1 - strobe, 2-9 - D0-D7, 11-BUSY, 18-25 - GND)
External FDD has the following pinout:
11 10
9 8
7 13 12 6
5 14 4
3 1 2
(looking at connector on the rear of ST)
1 RD Read Data
2 SIDE0 Side 0 Select
3 GND Ground
4 INDEX Index
5 SEL0 Drive 0 Select
6 SEL1 Drive 1 Select
7 GND Ground
8 MOTOR Motor On
9 DIR Direction In
10 STEP Step
11 WD Write Data
12 WG Write Gate (write enable)
13 TRK00 Track 00
14 WP Write Protect
Video connector
It's possible to connect VGA monitor there, but frequencies are quite
strange, so not all old VGA monitors will go.
Anyway, it's 13-pin DIN connector:

| 1 - Audio Out 2 - Composite Sync 3 - Clock Select (programmable o/p) 4 - Monochrome detect/Clock in (STE) 5 - Audio In 6 - Green 7 - Red 8 - 12V for some monitor switches 9 - Horizontal Sync 10 - Blue 11 - Monochrome 12 - Vertical Sync 13 - Ground This is a monitor switch, allowing to connect VGA monitor to ST. Color mode doesn't work properly in most cases as it requires unusual scanning frequency. Here are 2 photos of a working converter: |
|
 |
 |
http://www.atari.org/hosted/quickfaq/ - Atari ST Quick FAQ -
everything you want to know about ST. Many links are dead, so just
search for files.
http://animefin.animeunioni.org/~mikil/atari_st/ - some txts
http://www.lysator.liu.se/~celeborn/sync/atari/ - More TXTs
ftp://ftp.datavase.info/atari/DOCS/ - between 00:00 and 08:00
http://atari4ever.free.fr/
- LOTS of hardware hacks
http://atari.wroclaw.pl/tos.html
- Polish TOS - Tu możesz ściągnąć TOSa po Polsku
http://www.atari.st/ - Game
database with screenshots, descriptions, music, no download.
http://dev-docs.atariforge.org
https://www.dev-docs.org/docs/
- Many documents related to Atari hardware, software and programming
http://acm.xf.cz/ - Pinouts of
Atari ST computers
http://web.archive.org/web/20080113194644/http://oldcomputers.net/stacy.html
- Information about rare ST as a laptop.
http://web.archive.org/web/20031002024945/http://www.vanc.igs.net/~roughley/tos_main.htm
- History of TOS operating system on Atari ST computers.
http://web.archive.org/web/20040805131328/http://members.madasafish.com/~aseabrook/atari/
- This can be a good place to start exploring dead web pages archived in
Internet Archive. Today, you'll find more information there than in "living"
Internet.
Software:
http://www.umich.edu/~archive/atari/ - Much software
http://ftp.lip6.fr/pub/atari/
- More
http://sites.google.com/site/stessential/ - Many applications.
http://emulatari.free.fr/
- Games library, in French (click Jeux Atari ST and you should know
where to go next)
http://web.archive.org/web/20101010000046/http://membres.multimania.fr/falkweb/utsi.htm
- Atari
programmer's site with some programs. [DOWNLOADS GONE]
http://ahladnik.free.fr/ -
another game collection - Recently something redirected from this site,
visit with NoScript.
http://web.archive.org/web/20160307143337/http://thegamearchives.net/?val=0_2_1_0_0_4_25_0_0_0_0 -
Games for many platforms, including Atari ST
http://d-bug.mooo.com/ - Games
Other good games collections available pirated on the net are:
- TOSEC
- Pompey Pirates Collection