![]()
![]()
![]()
![]()
![]()
![]()
![]()
![]()
![]()


All my content and ptohos

Power Macintosh G4 MDD (2003)
It was a cheaper downgrade of Power Mac MDD from 2002, and the last machine supporting Mac OS 9 (which was still used by some studios). Contrary to its original MDD, it has a single 1.25GHz G4 CPU, 256MB of RAM upgradeable to 2GB (yet Mac OS 9 may see only 1.5GB) and 80GB hard drive. As Power Macintosh G5 was to go, this G4 became quite popular as cheap, but powerful alternative to expensive Apple high-end computers. Dual CPU configurations were made to order.
MDD units were upgradeable with drives (4 3.5", 2 5.25") and had 3 IDE channels. DDR memory was faster than DIMM, giving the machine more speed, especially with newer OSes.
| Model No: | M8570 |
|
| Year: | 2003 | |
| Discontinued: | 2004 | |
| CPU: | PowerPC G4 1.25GHz | |
| RAM: | 2GB | |
| Max. RAM: | 2GB | |
| RAM Type: | 4 PC-2700 DDR1 (2.5V) | |
| Hard disk: | 120GB IDE, 3.5" SL | |
| Floppy drives: | None | |
| Other drives: | 32x CD-ROM | |
| Graphics: | AGP (GeForce) | |
| Sound: | 3.5mm Jack sound input / output (Stereo), one built-in speaker. | |
| Display: | Depends on graphics card installed (default: ADC or DVI) | |
| Dedicated OS: | Mac OS 10.2 (later 10.3.2) |
|
| Maximum OS: | Mac OS X 10.5.8 |
|
| Expansions: | USB, FireWire, AirPort internal expansion, 4 PCI slots, 1 AGP slot, 2 ATA66 IDE ports. | |
|
Additional peripherals in collection: |
||
| Connectors: | - 2 USB
connectors - 2 FireWire connectors - Ethernet connector - Audio in/out - Graphics card output.
|
|

My unit is in good condition except one hard drive chassis which is missing. Because you can put more 3.5" HDDs there, I just used another bay and longer cable to ATA100 port. It can run Mac OS X 10.5 without bigger performance problems.
WARNING!
If you plan to re-install a primary hard drive, make sure that you're using an ATA-100 port! Using drive in ATA66 port makes drive slower, and the Mac, expecially with small RAM installed, becomes very slow. The ATA-100 port is located on the edge of mainboard near case hinges, it's easy to find it as it's mounted that the plug goes in parallel to the mainboard.
If you have any stability problems, check the RAM first. It should be put starting from the first socket (bank), look at the mainboard for its marks. Putting modules from the last socket leaving first ones empty gives many problems with stability.
Here you'll find:
| Overclocking |
Overclocking
As they're overclocking quite easy, it still requires some soldering skills, so you're overclocking it for your own responsibility. Don't blame me if it won't run!
My unit is overclocked to 1.66GHz and works well, unfortunately I don't remember the voltage - probably 1.6V. It works well with 10.5, as I put 2GB of RAM in it. With 1.5 and 1.6 (512+512+512+128) it still works good.
To overclock this computer, you should remove CPU module from mainboard. The best thing now is to decide which frequency you want to get and write down settings needed. Here's the picture where to look for resistors (drawings show default settings):
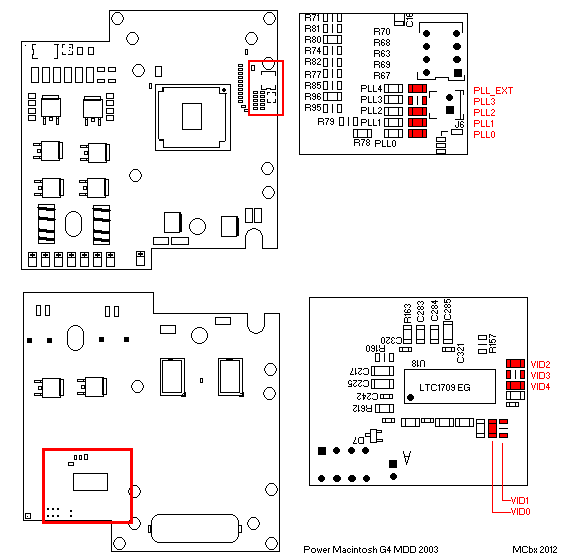
PLL resistors are for CPU multiplier. Resistors are 0-ohm value, so you can just connect pads instead of soldering resistors to them. In this table 0 means pads are connected (resistor installed), 1 - disconnected! (pads connect pin to ground).
| PLL_EXT,PLL[0..3] | Multiplier | Frequency | Notes |
| 00001 | 7.5 | 1.25GHz | Default |
| 01100 | 8 | 1.33GHz | |
| 00110 | 8.5 | 1.417GHz | |
| 10111 | 9 | 1.5GHz | |
| 00111 | 9.5 | 1.583GHz | |
| 11010 | 10 | 1.667GHz | Works |
| 11000 | 10.5 | 1.75GHz | UNSTABLE! |
Now the voltage. Flip the board and locate VID resistors. Their config is (0 - resistor in place):
| VID[0..4] | Voltage | Notes |
| 11110 | 1.3 | |
| 01110 | 1.35 | |
| 10110 | 1.4 | |
| 00110 | 1,45 | |
| 11010 | 1.5 | |
| 01010 | 1.55 | Default |
| 10010 | 1.6 | My setting with 1.66GHz |
| 00010 | 1.65 | |
| 11100 | 1.7 | 1.75GHz is still very unstable, no overheating. |
| 01100 | 1.75 | Overheat, unstable |
| 10100 | 1.8 | DO NOT USE! |
| 00100 | 1.85 | |
| 11000 | 1.9 | |
| 01000 | 1.95 | |
| 10000 | 2 |
-