![]()
![]()
![]()
![]()
![]()
![]()
![]()
![]()
![]()


All my content and ptohos

eMac 700MHz
eMacs were first Apple Macs with power of G4 processor.
They were designed to educational market, yet in August 2002 it was
releasede for consumers with a speed upgrade. Initially it had 128 MB of
RAM and CD RW drive. More expensive models had DVD drive.
There were at least 5 different models of eMacs. My unit is the first
model. Next one had 800MHz or 1GHz CPU, and is referred here as "800MHz"
eMac, it's also known of its ATI graphics chip. Model from 2003 used
1GHz CPU and had bigger hard drive. In 2004 Apple added USB 2.0 to eMacs,
along with faster CPU (1.25GHz) and RAM (DDR333 modules). The last units
from 2005 had 1.4GHz CPU and 64MB of VRAM.
Organization of its internals is more art than engineering and
disassembly is really hard.
| Model No: | A1002 |
|
| Year: | 2002 | |
| Discontinued: | 2003 | |
| CPU: | PowerPC G4 700MHz | |
| RAM: | 256MB | |
| Max. RAM: | 1GB | |
| RAM Type: | 2 PC133 DIMMs | |
| Hard disk: | 20GB IDE, 3.5" SL | |
| Floppy drives: | None | |
| Other drives: | Tray-loading 32x CD-ROM | |
| Graphics: | 1280x960 (max) | |
| Sound: | Stereo, built-in speakers | |
| Display: | Built-in 17" color CRT | |
| Dedicated OS: | Mac System 9 / 10.2 |
|
| Maximum OS: | Mac OS X 10.4 |
|
| Expansions: | USB, FireWire | |
|
Peripherals in collection: |
||
| Connectors: | - 3 USB
connectors - 2 FireWire connectors - Microphone input (3.5mm jack) - Speaker output (3.5mm jack) - Telephone connector (modem) - Ethernet connector. The power switch is near the connectors. |
|

My unit is from some school. Unfortunately it had no hard
drive, so I had to disassemble it and replace all missing screws. Now it
works quite well.
Some eMacs, especially 800MHz ATI-graphics ones, had typical capacitor
plague problem resulting in unstability and problems with voltages (hangs,
hard drive spindowns, etc.). Unfortunately defective capacitors are
placed on down converter board, which is not easy accessible.
Here you'll find:
| Upgrading memory | Disassembly | Overclocking |
Memory upgrade
Simple. Place it on screen (on soft cloth, carpet etc) and remove small door. Here you can put 2 PC133 (133MHz) DIMMs.
Disassembly procedure (simplified, not including particular drives and CRT/power supply assembly).
WARNING! (and I highly recommend to take it seriously)
This is a difficult procedure. Don't blame me if you can't assemble it back.
Yes I haven't assembled an 800MHz (ATI) unit after fixing capacitor problems. That's why it isn't in my
collection :(.
Another warning:
Place the eMac so that nobody will manipulate CRT compartment! Vacuum
tube may not be discharged, so it's dangerous. More, you should NEVER
manipulate CRT neck assembly (the silver can at the end of CRT) with
force as you can destroy CRT! It's EXTREMELY fragile part.
One more warning:
For 800MHz eMac (ATI Graphics), the procedure is different. Different
and more difficult.
1. Place eMac on cloth, screen facing down.
2. Remove user access door - the little door on the bottom which covers
RAM.
3. Remove 2 plastic feet on the bottom.
4. Remove 3 Torx screws on the bottom. Remove 6 more Torx screws, 2 on
each side.
5. Carefully lift the cover, and as there's a aperture between user
access door ad chassis, put a hand there and while keeping cover up
disconect cable from power switch. Yes, you will have to connect it
back in assembly procedure.
6. Lift and remove the cover.
Removing speakers compartment:
1. Take two plastic "wings" and gently pull it to yourself. It should go
off well, as it's not screwed at all.
2. Disconnect speaker cable. Remember to connect it back in assembly.
Removing fan:
1. On your left, disconnect themperature sensor cable. It's near a thick
cable called IVAD, the source of all problems with display :).
2. Remove screw connecting fan metal frame to chassis, it's near this
cable.
3. Remove screw connecting AC inlet to chassis. It's near there.
4. On the right side of the fan, remove 2 screws connecting fan frame to
chassis (one with grounding cable). Disconnect fan cable.
5. The last screw is hard to locate - It's near CRT neck assembly, which
shouldn't be excessively moved. Look near power cables coming into power
supply board (CRT compartment).
6. Grab the fan near AC inlet with one hand, right edge of frame with
another. Carefully pull the fan toward you, be careful on CRT neck
assembly!
Removing RF shield
1. Remove 5 screws keeping RF shield in place: 3 on the top, one on the
right, below user door screws level, and one on the left, at the bottom
of RF shield.
2. Open top of the cage toward you.
Remove Logic Board module:
1. Remove 3 screws on the bottom left of chassis (near front panel)
2. Remove 3 screws on the bottom right of chassis (near front panel)
3. On the top side, there are 2 screws keeping heatsink in place. Remove
them.
4. Remove the screw on I/O panel. Disconnect video cable nearby.
5. Take two protruding metal parts and pull it toward you. It is
connected by 2 wide transition connectors, and they go out very hard.
Congratulations! You have a complete logic board and
drives assembly in your hands!
In 800MHz eMac (ATI Graphics), you have a few more attractions like a
big coil in brick-like resin swinging on wires over the working area or
a huge heatsink with heat pipe assembly.
Overclocking:
Remember! This is definitely NOT factory-guaranted, so you can destroy your eMac and loose warranty! Do it on your own responsibility!
Generally, you can pump 700MHz CPU to 800-900MHz. With 950MHz there are serious heat problems. 800MHz units can run even with 1.33GHz, as their backside cache is better, but it will really spit fire (over 100*C, and still in manufacturer specification!) and .
1. Take service manual and disassemble your eMac to see
mainboard, RAM slots, a male connector and resistors under it.
2. See the image to find resistors R1506, R1509, R1512, R1515 and R1518.
3. Solder resistors according to information. You can just short pads
without resistor, as they are 0 ohms (links).
4. Try to assemble eMac back and test new configuration.
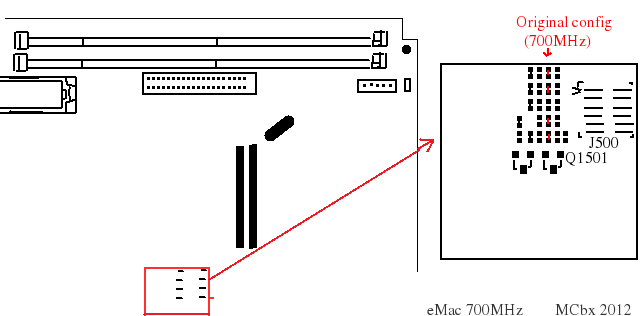
Generally, it works this way:
| R1506 | R1509 | R1512 | R1515 | R1518 | Frequency |
| 1 | 1 | 0 | 1 | 1 | 700MHz |
| 1 | 1 | 1 | 0 | 1 | 750MHz |
| 0 | 0 | 1 | 1 | 1 | 800MHz |
| 1 | 0 | 0 | 1 | 1 | 850MHz |
| 1 | 0 | 0 | 0 | 0 | 900MHz |
| 1 | 0 | 0 | 0 | 1 | 950MHz |
| 0 | 1 | 0 | 1 | 0 | 1GHz |
0 - no resistor, 1 - pads shorted (or resistor in place)
Overclocking 800MHz unit is more efficient, as its CPU has less heat dissipation and lower voltage. Here you can read how to get 1.33GHz from 800MHz eMac. I confirm, it can run yet is spits fire. Keeping hand near air output is impossible.
eMac (ATI Graphics) 1GHz
Next generation of eMac has better CPU (800MHz or 1GHz) and ATI Radeon 7500 3D accelerator with 32MB of memory. Versions with AirPort wireless card had AirPort Extreme - faster standard. It was sold in 3 configurations: 800MHz, 1GHz with DVD drive or 1GHz with SuperDrive, which could record DVDs. As every eMac it has eMac-styled peripherals.
| Model No: | A1002 |
|
| Year: | 2003 | |
| Discontinued: | 2003 | |
| CPU: | PowerPC G4 1GHz | |
| RAM: | 768MB | |
| Max. RAM: | 1GB | |
| RAM Type: | 2 PC133 DIMMs | |
| Hard disk: | 40GB IDE, 3.5" SL | |
| Floppy drives: | None | |
| Other drives: | Tray-loading DVD drive | |
| Graphics: | 1280x960 (max) | |
| Sound: | Stereo, built-in speakers | |
| Display: | Built-in 17" color CRT | |
| Dedicated OS: | Mac System 10.3 |
|
| Maximum OS: | Mac OS X 10.5.8 (1GHz units) or 10.4.11 (800MHz) |
|
| Expansions: | USB, FireWire | |
|
Peripherals in collection: - Original keyboard and mouse - Original power cable |
||
| Connectors: | - 3 USB
connectors - 2 FireWire connectors - Microphone input (3.5mm jack) - Speaker output (3.5mm jack) - Telephone connector (modem) - Ethernet connector. The power switch is near the connectors. |
|

This page describes 800MHz version overclocking. I think 1GHz version is quite similar.