![]()
![]()
![]()
![]()
![]()
![]()
![]()
![]()
![]()


All my content and ptohos

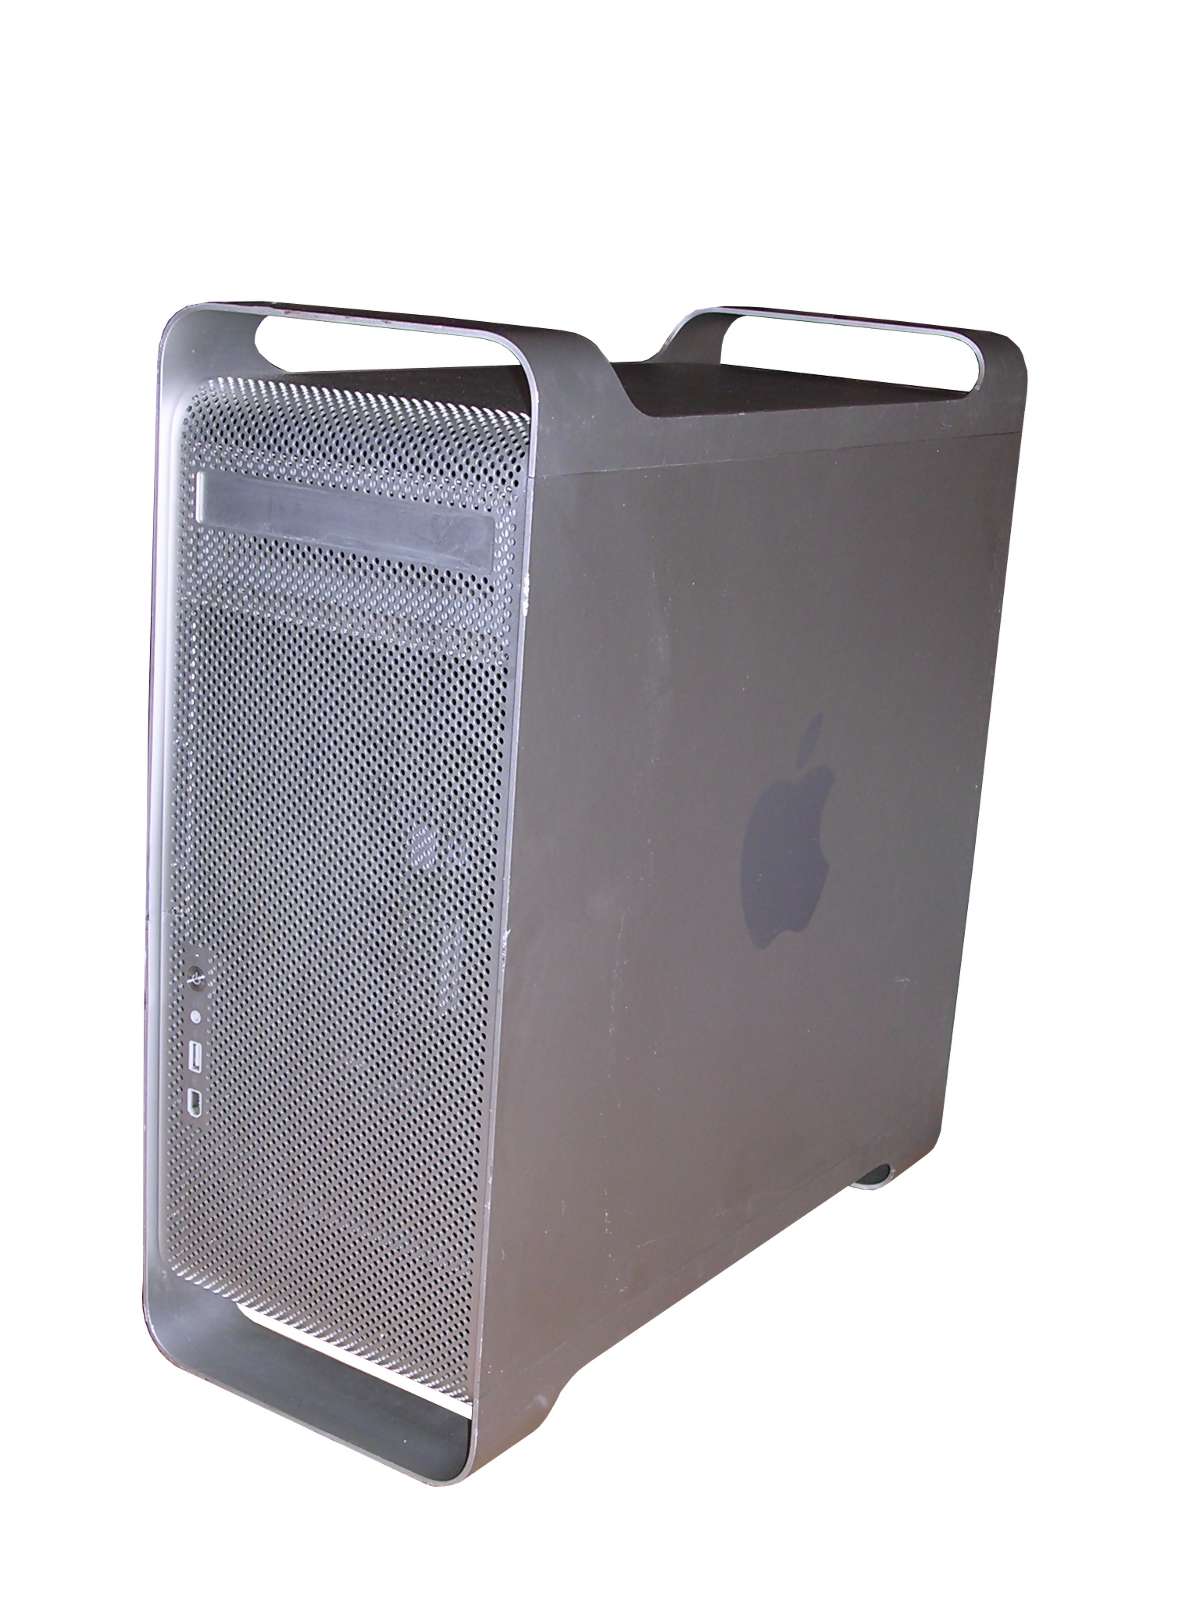
Power Macintosh G5
A Power Macintosh G5, released in 2003, was awaited
performance improvement in PowerPC Macs. Some new technologies have been
fully implemented like SATA interface for hard disks, DDR memory or
faster PCI-X or AGP slots. The casing has been also redesigned, now
being made of alluminum instead of plastic. The downside of this - it is
very sensitive to scratches.
The first series included computers with 1.6, 1.8 and 2GHz processors,
simultaneously dual-processor models have been introduced. Finally, even
a dual-core, dual-processor models were available with built-in liquid
cooling system.
This is unit has no PCI-X support, only 64-bit PCI cards, and its
official name is Power Mac G5 Late 2004. It was a "cost reduced" unit,
having mainboard design simplified and based on iMac G5. Thus, System
bus was running only at 600MHz making it slower than original 1.8GHz
Power Mac G5. It still supported DDR memory.
| Model No: | A1093 |
|
| Year: | 2004 | |
| Discontinued: | 2005 | |
| CPU: | PowerPC G5 1.8GHz | |
| RAM: | 2GB 4x512MB in DDR sticks |
|
| Max. RAM: | 4GB | |
| RAM Type: | DDR 400MHz (PC3200) | |
| Hard disk: | 80GB SATA Possible to expand with another drive |
|
| Floppy drives: | None | |
| Other drives: | CD-RW/DVD drive, tray-loading | |
| Graphics: | nVidia GeForce FX 5200 64MB VRAM DVI and ADC connectors |
|
| Sound: | Stereo, built-in speaker | |
| Display: | External monitor (ADC, DVI, DVI->VGA) | |
| Dedicated OS: | Mac OS X 10.3 | |
| Maximum OS: | Mac OS X 10.5.8 | |
| Expansions: |
- Memory by DDR DIMM - USB - FireWire - AirPort card - Bluetooth board - 64-bit PCI slots - AGP slot for video card |
|
|
|
||
|
Peripherals in collection: |
||
| Connectors: | - USB (3 ports,
one on front) - FireWire (2 ports, one in front) - Ethernet - Phone - Power - Speakers/Mic - Digital audio - Display connectors |
|
This unit has been used in leasing in Germany for more
than year, later it was probably imported.
To be honest, the overall performance of this unit is not much better
than a bit overclocked last Power Mac G4 MDD. Selling it year after MDD
was Apple's typical action towards a "budget" market in which having a
Mac was more important than knowing what exactly is inside. 600MHz
system bus makes it look nice in benchmarks or when it plays chess with
itself, but terribly when it comes to memory-consuming or i/o-consuming
tasks - just try to mess with video encoding, although I never tested
the full-900MHz Power Mac I'm sure there will be at least one-quarter
efficiency increase in the faster-bus one.
| Hardware | Disassembly | Casing repair | Links |
Hardware
Memory upgrade:
Only pairs of equal-size DIMMs are supported. The first pair is in
inside slots, the second goes outwards.
If starting the Mac fails, POST tries to indicate what
happened by flashing its front-side LED after the first flash:
- 1 flash - error around memory, no memory detected.
- 2 flashes - 2 RAM sticks of different parameters as pair. or inserted
incorrectly (two RAMs should be in two slots with "1")
- 3 - Typical RAM test fail
- 4 - bad boot ROM
- 5 - CPU test failed.
Additionally if all fans spin at maximum speed, PMU (or this newer PMU
replacement called SMU) may be culprit, this is unfortunately
mainboard-related problem.
Fans:
G5s are hot CPUs and they need good cooling. More, overclocking of G5
Macs is practically impossible as half of parameters are in mainboard
and the second half in firmware. This Mac has a few fans:
- 2 fans in rear of CPU cage
- Fan on the front, facing back of PCI boards
- Fan between optical drive and hard drives cage
- 2 fans on the power supply unit, normally not seen, on the base of
computer
Disassembly
The lever is on the rear. It goes upwards. Open cover around 10-15
degrees, slide it up. Remove the plastic part the same way or it'll
break. The computer will run hotter and louder without this piece of
plastic.
Now you have access to nearly everyhing except CPU covered behind its
"G5" plate. Remove PCI boards if you have to, get access to one plastic
bolt on the metal part, it goes from the aluminium bottom of boards cage
downwards. Remove it by prying with small flat-blade screwdriver. It has
a smaller bolt going into larger - you have to pull the smaller from the
larger one and then remove the larger one by e.g. twisting a screw into
it, but do not destroy it.
Then the CPU cover can be removed by sliding it towards front of
computer and removing/opening. This component is necessary for proper
operation of cooling system, without it's noisy, as well as without this
plastic part with square hole.
Now look carefully on capacitors. Are they OK? Yes, some of these units
had capacitor disease.
These Macs have no internal reset button - the power unit resets when
the unit is unplugged for a minute without CR2032 battery. Earlier had one behind the fans,
look at the bottom of mainboard.
Hard disks can be removed by rotating the lock on the right side of
disk, disconnecting SATA/power cables and sliding them out. First, it
looks like the upper one won't go out, but it is on small ramps which
lead it lower.
To remove mainboard, it's needed to remove front heatsink cover, CPU
fans, front piece with fan and speaker, PCI board rear limiters (2
screws), then the sheet separating PCI and CPU compartments (lots of
screws, careful about AirPort cable!). Then CD, twisting locks and
sliding it out with cable, disconnecting power one. Then SATA/sensors
cable and power cables. Now two bigger screws around CPU and AFAIR 3
smaller. It should be possible to remove mainboard with CPU heatsink.
Power supply is accessible by removing its cover inside (2 screws), then
by removing 2 screws on the bottom and removing PSU. If you decide to
disassemble it more, it it usually requires cleaning.
Casing repair
| The frequent problem with it is outer shell of casing which
is fragile. It is fixed to chassis with a set of screws going
from inside to this shell, and these holes are probably made by
stir drilling process so they're small and crisp. If handles get
pressed too hard, they bend to one side and the aluminum shell
parts will rip from the chassis near side cover. The problem is
that they cannot be easily put back there as it's hard to weld
aluminum. To repair it, the first thing is to HAVE SIDE COVER INSTALLED all time! If not, you may even assemble it, but this cover will not fit. So there are two methods to put these broken parts back and make the fix not look bad. First one is an epoxy glue, which may even work with good glues. To do it, apply it between side and chassis, put together and squeeze using screw clamps (used in cabinetmaking) but not directly - use small pieces of wood between clamp and casing!. A second more invasive option involves securing the broken part of casing the same way, with clamp and wood, and then drilling a small hole in a specific place, then using a nut and bolt to keep parts together. If you can remove broken parts first it'll look even better. Do this by holding broken nut with e.g. scissors and unscrew bolt from the other side. Generally, if the drilled hole is finished well (conical drill) and the screw's head looks good (conical shape) it will even look flat. However, make sure that you drill in a proper place, on the other side of the chassis there are two bent aluminum parts forming an angle, drill rather BETWEEN them or you'll end with prying one away from hole through the front or rear holes. It's easier to drill between and then pry them both away with a little distance than pyring one in a larger distance. Then remove side, install nut/bolt, ready. |
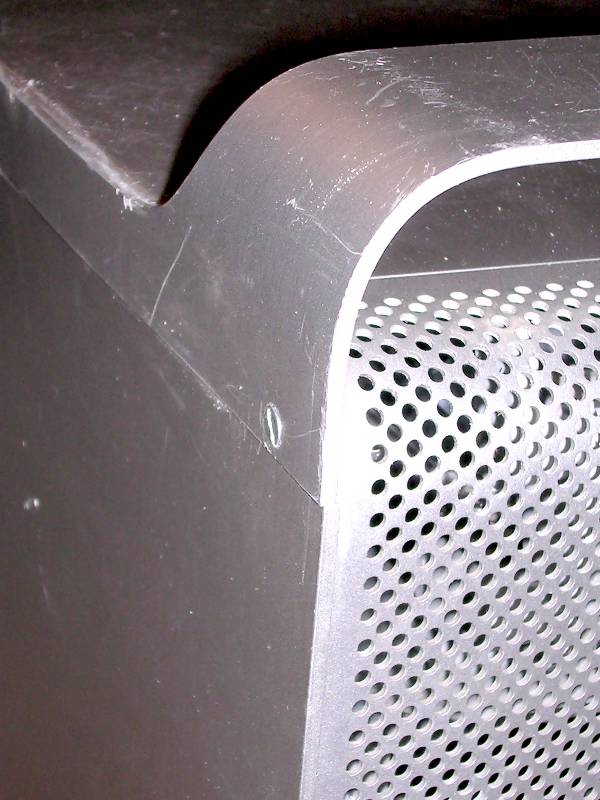 |
After fixing this, having the clamp still installed, you can try to carefully correct the handles shape using rubber hammer and a piece of wood on the other side (do not use a metal one!) or wrench with thick layer of fabric between it and handle. Act carefully and slowly.
If there is a bump in meshed surface, place the computer on it and
correct by using the same rubber mallet from inside. Use some cloth when
putting the computer on front or rear.
Links
https://everymac.com/systems/apple/powermac_g5/specs/powermac_g5_1.8_2.html
- Specification,
http://powermac-g5.com/bobsg5tips.html - G5 modern usage tips