
Chapter 7 - Coloured Text
The earlier chapters gave quite a lot of information if you've never
encountered this sort of thing before. If you're suffering from mental
indigestion, this part is a little more light hearted, just to give
time for the rest of it to become comfortable. Eventually, it'll become
second nature.
In this section I want to extend PRINT a little further and show you
how to print in glorious technicolour instead of black and white as
we've been doing so far. To change the colour of the text is easy and
involves one new keyword: COLOUR (BB4W will also accept COLOR if you
want.)
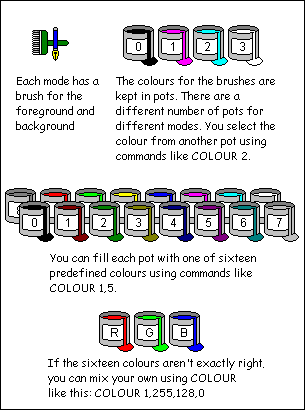
In general, there are 16 colours we can use to liven up our text, but
be wary because exactly how many of these colours are available depends
on which MODE you are in. Due to restraints in the original micros like
the Acorn BBC, different screen modes had different resolutions and, to
conserve memory, different numbers of colours. To change modes you use
the command MODE followed by the number of the mode you wish to invoke.
Each mode has different resolutions in terms of number of columns wide,
rows high and amount of colours available. For example, MODE 4 has 40
columns by 32 rows and only two colours.
There are many different
screen modes available and you can find out all about them under MODE
in the help files. Most of the examples here are in the default mode
unless stated otherwise and so all 16 colours are available. The
colours are invoked by using a number to represent each colour. The
numbers are:
| 0 | Black |
| 1 | Red |
| 2 | Green |
| 3 | Yellow |
| 4 | Blue |
| 5 | Magenta (blue-red) |
| 6 | Cyan (blue-green) |
| 7 | White |
| 8 | Intensified Black (grey) |
| 9 | Intensified Red |
| 10 | Intensified Green |
| 11 | Intensified Yellow |
| 12 | Intensified Blue |
| 13 | Intensified Magenta |
| 14 | Intensified Cyan |
| 15 | Intensified White |
If you think of ink and paper, the colour of the ink is often referred
to as the foreground colour and the colour of the paper is known as the
background. To change the colour of the foreground, we merely call
COLOUR X, where X is one of the numbers above - 0 to 15. The next time
PRINT is called, the text will be printed in that colour. Easy.
| REM
Foreground colour |
|
COLOUR 4 |
|
PRINT "I'm blue!" |
|
END |
When the program finishes, it leaves the foreground and background
colours last selected. It's normally good etiquette to put things back
as you found them, so perhaps we should modify the above to do this.
| REM
Foreground colour |
|
COLOUR 4 |
|
PRINT "I'm blue!" |
|
COLOUR 0 |
|
END |
We can use COLOUR to change the background colour too. To do this, we
add 128 to the above table and any text printed after will have the
colour background given. Some programmers actually present this as a
sum so it's slightly easier to read as it saves mental arithmetic. I
like this but then my mental arithmetic was never too hot: it's up to
you.
| REM
Background colour |
|
COLOUR 128+6 |
|
PRINT "Hello, world" |
|
COLOUR 128+15 |
|
END |
You have to use a different COLOUR statement each time you change the
foreground or background.
| REM
Foreground and background colour |
|
COLOUR 4 |
|
COLOUR 128+6 |
|
PRINT "Hello, world" |
|
COLOUR 0 |
|
COLOUR 128+15 |
|
END |
If you are changing screens in your program, you frequently want to
wipe the slate clean so information from the previous screen is not
interfering with the current one. BASIC has a command to do this: CLS.
This stands for CLear Screen, but takes less typing. To use it is quite
simple, three letters and the previous screen is consigned to history:
| REM
CLS demo |
|
PRINT TAB(29,10);"BBC BASIC For Windows" |
|
WAIT 200 |
|
CLS |
|
PRINT TAB(36,10);"Rules!!" |
|
END |
Should we want to make the whole of the screen change colour, first set
the background colour then call CLS, like this:
| REM
Setting the screen colour |
|
COLOUR 128+7 |
|
CLS |
|
COLOUR 2 |
|
PRINT TAB(10,10);"Hello, world" |
|
COLOUR 0 |
|
END |
For a mode with limited colours it is possible to use the COLOUR command and
substitute the defaults with others from the above table. The default
colours for mode 4 are a black background with white text. To change the text
colour to magenta call COLOUR 1,5 like this:
|
REM Setting the screen colour |
|
MODE 4 |
|
PRINT "Default colour" |
|
COLOUR 1,5 |
|
PRINT "Substituted colour" |
|
END
|
This raises an interesting point. Each mode has a varying number of colours available. Mode 4 has
two colours: 0 and 1, mode 5 has four: 0 to 3 and so on. When using COLOUR X%, the actual colour of the text may not
directly correspond to the table above. Rather, each mode has a number of boxes into which one
of the sixteen colours is slotted. If we don't like the colour BASIC chooses as a default for that box, we can
change it for another as in the previous example. The box is referred to as the logical number whilst
the colour is referred to as the physical number.
There are times when the default sixteen colours just aren't enough. Like
when your mother just has to have Seagull Sunset Red for the bathroom. As we
have just seen it is possible to make BASIC swap the colours we don't want for others
from the table of sixteen, but we can also create our own and substitute these into the
logical boxes. We can think of each colour for what it is: a mixture of
red, green and blue and tell BASIC for colour 3 don't print yellow, print
my new colour with this mix of red, green and blue. To do this, we invoke COLOUR with
four parameters. The first is the colour number we wish
to change, the second, third and fourth are the red, green and blue
components respectively each with a range of 0 - 255. Example, to set
colour 3 to orange (red = 255, green = 128, blue = 0), we would do the
following:
|
REM Changing colours |
|
REM
Change colour 3 to orange |
|
COLOUR 3,255,128,0 |
|
REM Now we've set the colour change to it |
|
COLOUR 3 |
|
PRINT "Hello, world" |
|
COLOUR 0 |
|
END
|
Even when the program stops, the colour will retain its new
value. You can also change
the colour as many times as you want, each time subsequent PRINTs will
use the new colour without affecting anything previously printed with
that colour index:
| REM
Changing colours |
|
REM
Change colour 3 to orange |
|
COLOUR
3,255,128,0 |
|
REM Now we've set the colour change to it |
|
COLOUR 3 |
|
PRINT "Hello, world" |
|
REM
Change colour 3 to brown |
|
COLOUR
3,128,64,0 |
|
PRINT "Hello, world" |
|
COLOUR 0 |
|
END |
Once we've redefined a colour, it is quite easy to get back to the original colour for that particular box.
If we are in a sixteen colour mode, just substitute the correct colour number from our little table and the default
colour is restored again. For other modes, look in the help and it will tell you which are the defaults for that mode.
If you've got really carried away, changed lots of colours and now want to restore the defaults, BB4W has a special
command that will do just this. The command belongs to a family of commands that all affect the output to the screen
in some way and are hence called VDU commands. To invoke it we type VDU and one or more numbers. The effects
of the VDU command depend on the number that follows and are fully described in the help, the one we require is
VDU 20. Here's how we do it:
| REM
Restoring colours |
|
MODE 6 |
|
REM
Change colour 3 to orange |
|
COLOUR
3,255,128,0 |
|
REM Now we've set the colour change to it |
|
COLOUR 3 |
|
PRINT "Hello, world" |
|
REM Reset the colours back to the default |
|
VDU 20 |
|
REM Reselect the foreground colour |
|
COLOUR 3 |
|
PRINT "Hello, world" |
|
END |
Resetting the colours with VDU 20 also restores the default choice for the background and foreground colours.
Tip: Changing colours whilst printing
|
We can embed colour commands into a string variable.
This way we can
change colours on the fly whilst printing. To do this, we use CHR$(17)
followed by CHR$(Colour_Number) before the string we want to print:
| REM
Changing colours in mid stream |
|
PRINT CHR$(17)+CHR$(4)+"Hello"; |
|
PRINT CHR$(17)+CHR$(3)+" World" |
|
COLOUR 0 |
|
END |
|
|
CHR$(17)
in this instance acts like the COLOUR command. Obviously, these can be
hard to read, so if you're using this sort of thing a lot, you can make
some strings up with this information pre-declared:
| REM
Changing colours in mid stream |
|
Blue$=CHR$(17)+CHR$(4) |
|
Yellow$=CHR$(17)+CHR$(3) |
|
PRINT Blue$+"Hello"+Yellow$+" World" |
|
END |
|
|
|
Exercises
1) Examine the different MODEs in the help file, try printing text in
MODEs 1 to 6 to get the feel for what they look like.
2) Modify the Changing colours program to produce new random colours by
using three RND(255) statements in the call on lines 2 and 5.

 © Peter Nairn 2006